
Top Hat Teddy Crochet
Top Hat Teddy Crochet Pattern
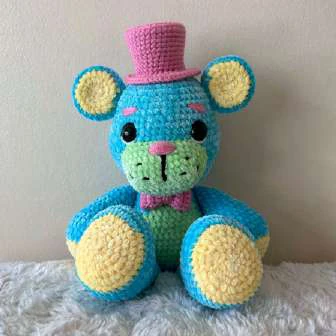
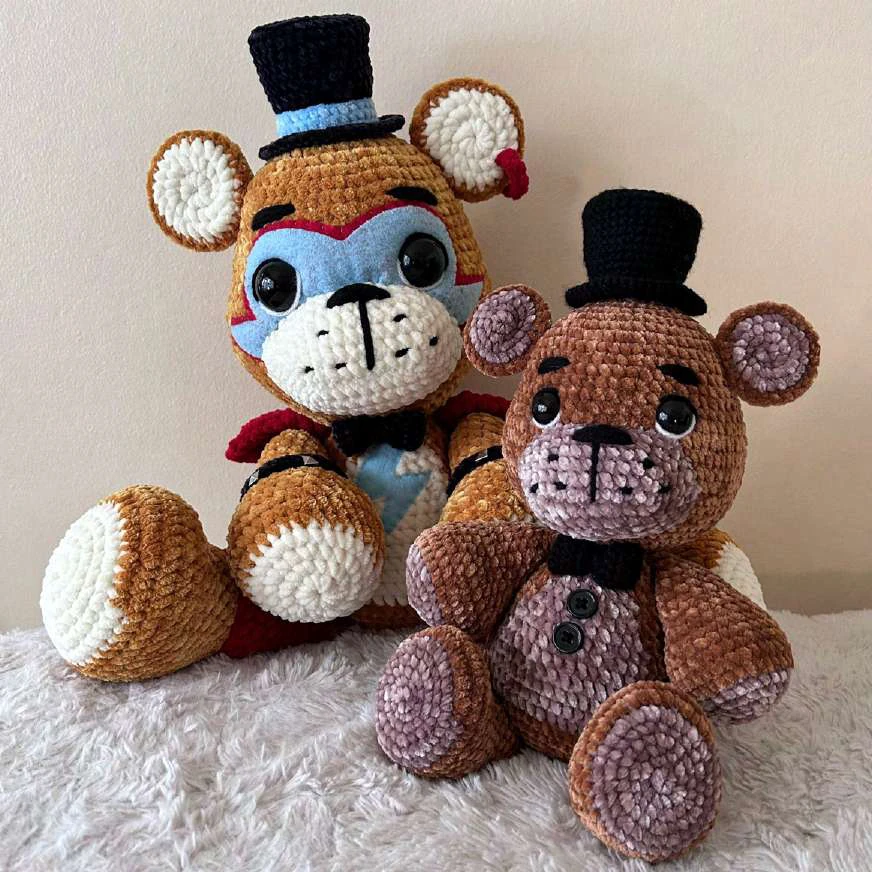
TOP HAT TEDDY CROCHET PATTERN
Abbreviations
CH = chain
MR/MC = magic ring/magic circle
SC = single crochet
INC = single crochet increase
DEC = single crochet decrease
SLST = slip stitch
ST = stitch
BLO = back loop only
Materials
You can use whichever yarn/brands you prefer, just keep in mind the size difference of the types of yarn I used, because they are
scaled based on their respective sizes.
TOP HAT TEDDY:
Premier Just Chenille yarn in the color ‘Cocoa Brown’ (3 skeins)
Bernat Velvet yarn in the color ‘Mushroom’ (1 skein)
Red Heart Super Saver in Black (1 skein)
Red Heart Super Saver in White (1 skein)
Polyester Stuffing
Black embroidery thread
White embroidery thread (optional)
Piece of cardboard (can be any recycled scrap piece)
ROCKSTAR TOP HAT TEDDY:
Loops & Threads Chenille Home Slim in the color ‘Mustard’ (2 Skeins)
Sweet Snuggles Lite in the color ‘Winter White’ (1 skein)
Bernat Blanket in the color ‘Crimson’ (1 skein)
Yarn Bee in the color ‘Charcoal’ (1 skein)
Premier Just Chenille yarn in the color ‘Light Blue’ (1 skein)
Red Heart Super Saver in Black (1 skein)
Red Heart Super Saver in White (1 skein)
Polyester Stuffing
Light Blue felt sheet
Red felt sheet
Light Blue embroidery thread (if you choose to sew on the felt)
Red embroidery thread (if you choose to sew on the felt)
Piece of cardboard (can be any recycled scrap piece)
TOP HAT TEDDY CROCHET PATTERN
Notions/Tools
GENERAL:
Stitch Markers
Sewing Pins
Yarn Needle
Scissors
Embroidery Needle
Hot glue gun & hot glue
4mm crochet hook
TOP HAT TEDDY:
2 black buttons
2 (18mm) safety eyes
ROCKSTAR TOP HAT TEDDY:
6mm crochet hook
2 (30mm) safety eyes
12 pyramid studs
IMPORTANT
This pattern is for personal use only. This pattern is property of
pattern or any part of it.
You may sell your finished plushies made from this pattern, as long as
you’re the one who made it!
If you decide to post any photos of your creations made with this pattern, I
TOP HAT TEDDY CROCHET PATTERN
Notes
–
This pattern is used in US terminology only.
–
I use the yarn under/yarn over method, but you may use whichever
method you prefer.
–
All decreases in this pattern use the invisible decrease method
because the regular decrease may leave larger gaps in your work. I
highly recommend using the invisible decrease method.
Tips (PLEASE READ ME!!!)
–
I’d recommend reading through the entire pattern before beginning
to get an idea of what you’ll be doing before you start.
–
Red text indicates special instructions for Rockstar Top Hat Teddy
ONLY!
–
Remember that where I place things like the eyes, eyebrows, snout,
etc. are a general recommendation. If you find that your eyes or
snout look better in different rows due to different tension or sizes of
yarns, go ahead!
–
Make the snout before you make the head so it’s easier to map out
where the eyes should be. I sew on the snout to the head before I
close off the head or place the eyes.
–
If crocheting Rockstar Top Hat Teddy (in Super Bulky 6 yarn like I did),
and round 1 is Mr 6, do the following instead to avoid a pointy tip:
skip rounds 1-2, make a mr 12, and continue onto round 3. This is
what I did when making mine. Refer to your Mr as round 2 instead of
TOP HAT TEDDY CROCHET PATTERN
round 1 when doing this so you can correctly reference the rows for
placement purposes.
–
An alternative to sewing on the felt details for Rockstar Top Hat
Teddy is to glue them on. You may do this if you prefer. Follow all the
steps the same way, just glue instead of sewing!
–
If crocheting Rockstar Top Hat Teddy, there are a couple of instances
where I color change by making an additional row of slip stitches in
the back loop of the round (with the new color), then continuing the
next round in the back loops of the slip stitches. This method creates
a more solid color change. The round of slip stitches doesn’t count
as a round in this case. I do this for the legs and the top hat. It’s also
specified in the corresponding sections as a reminder.
TOP HAT TEDDY CROCHET PATTERN
Pattern Contents
1.
Crochet the Body ………………………………………………………………………………………………………………..………… 7
2.
Crochet the Snout …………………………………………………………………………………………………………………..……. 8
3.
Crochet the Head …………………………………………………………………………………………………………………….…… 9
a.
Instructions for Top Hat Teddy ………………………………………………………………………….……….. 11
b.
Instructions for Rockstar Top Hat Teddy ……………………………………………………………….. 13
4.
Crochet Two Ears ………………………………………………………………………………………………………………………… 23
a.
Inner Ear ………………………………………………………………………………………………………………………..… 23
b.
Outer Ear …………………………………………………………………………………………………………………………. 23
5.
Crochet Two Arms ………………………………………………………………………………………………………………………. 25
6.
Crochet Two Legs ……………………………………………………………………………………………………………..………… 26
a.
Instructions for Top Hat Teddy …………………………………………………………………………………. 26
b.
Instructions for Rockstar Top Hat Teddy ………………………………………………………………. 27
7.
Crochet the Top Hat ………………………………………………………………………………………………………………….. 28
a.
Brim ……………………………………………………………………………………………………………………………………. 28
b.
Hat top ……………………………………………………………………………………………………….…………………….. 29
8.
Crochet the Bow Tie …………………………………………………………………………………………………………………… 30
9.
Additional Rockstar Top Hat Teddy Accessories …………………………………………..…………………. 32
a.
Bracelets …………………………………………………………………………………………………………………………… 32
b.
Earring …………………………………………………………………………………………………..……………………….… 34
c.
Shoulder Pads ………………………………………………………………………………………………………………… 35
d.
Lightning Bolt …………………………………………………………………………………..…………………………….. 36
10. General Assembly …………..………………………………………………………………………………………………………..…. 37
a.
Attach the Head and Body ………………………………………………………………………………………… 37
b.
Sew on the Ears ………………………………………………………………………………………….………………….. 38
c.
Assemble Top Hat …………………………………………………………………………………………………………. 39
d.
Sew on the Bow ………………………………………………………………………………………………………………. 40
e.
Sew on the Arms …………………………………………………………………………………………………………….. 41
f.
Sew on the Legs ……………………………………………………………………………………………………………… 41
TOP HAT TEDDY CROCHET PATTERN
Body
While crocheting the body, we will color change to make the belly. In the black text, are the
stitches to be made in ‘Cocoa Brown’ for Top Hat Teddy (4mm), or Mustard for Rockstar Top
Hat Teddy (6mm). In the Pink text are the stitches to be made in ‘Mushroom’ for Top Hat
Teddy (4mm), or ‘Winter White’ for Rockstar Top Hat Teddy (6mm).
Round 1:
Mr 6 sc (6)
Round 2:
Inc x6 (12)
Round 3:
(Sc, inc) x6 (18)
Round 4:
sc, inc, (sc 2, inc) x5, sc (24)
Round 5:
(sc 3, inc) x6 (30)
Round 6:
Sc 2, inc, (sc 4, inc) x5, sc 2 (36)
Round 7:
(sc 5, inc) x6 (42)
Round 8:
Sc 3, inc, (sc 6, inc) x6, sc 3 (48)
Round 9:
(sc 7, inc) x6 (54)
Round 10:
Sc 24, sc 13, sc 17 (54)
Round 11:
Sc 23, sc 15, sc 16 (54)
Round 12:
Sc 22, sc 17, sc 15 (54)
Round 13:
Sc 22, sc 17, sc 15 (54)
Round 14:
(sc 7, dec) x2, sc 4, sc 3, dec, sc 7, dec, sc 3, sc 4, dec, sc 7, dec (48)
Round 15:
Sc 21, sc 13, sc 14 (48)
Round 16:
Sc 3, dec, (sc 6, dec) x2, sc 6, dec, sc 5, sc, dec, sc 6, dec, sc 3 (42)
Round 17:
Sc 18, sc 12, sc 12 (42)
Round 18:
(sc 5, dec) x2, sc 4, sc, dec, sc 5, dec, sc 2, sc 3, dec, sc 5, dec (36)
Round 19:
Sc 17, sc 8, sc 11 (36)
Round 20:
Sc 17, sc 8, sc 11 (36)
Round 21:
Sc 2, dec, (sc 4, dec) x2, sc 2, sc 2, dec, sc 2, sc 2, dec, sc 4, dec, 2sc (30)
Round 22:
Sc around (30)
Round 23:
(sc, dec) x10 (20)
TOP HAT TEDDY CROCHET PATTERN
Make a slip stitch and fasten off, leaving a long tail for sewing later. Stuff
and put the finished body off to the side, and move onto the snout.
Snout
Use ‘Mushroom’ for Top Hat Teddy (4mm), or ‘Winter White’ for Rockstar Top Hat Teddy
(6mm).
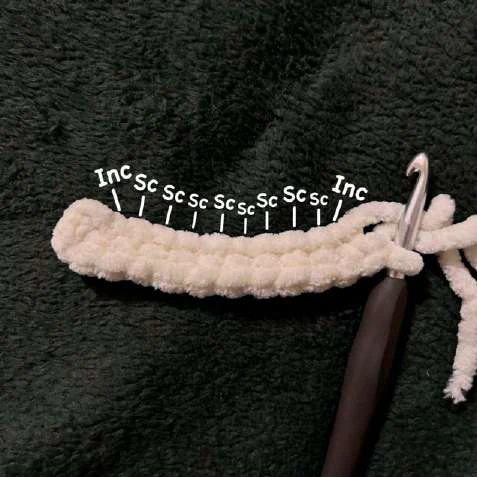
Ch 11 and work in a continuous spiral around both sides of the chain.
Round 1:
Starting in the 2nd ch from hook – inc, sc 8, inc
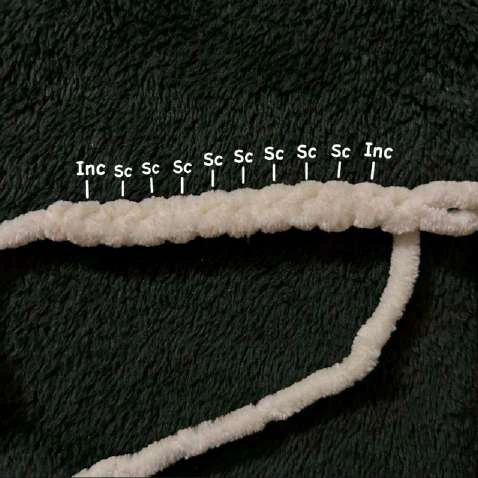
Now flip your work and continue onto the other side of the ch, your first sc will be
in the same ch you just worked in, just on the opposite side- inc, sc 8, inc (24)
TIP: For this pattern, I crochet into the front and back loop of each chain, so on the first side, I will be
crocheting into all 10 front loops. When I flip to the other side, I am crocheting into ALL 10 back loops of
the chain. (ignoring the 11th chain) Below are photo examples of this.
Starting from the right, with your hook
Now crochet into the other side of the
in the 11th chain – inc, sc 8, inc
chain – inc, sc 8, inc
Turn your work, and continue.
TOP HAT TEDDY CROCHET PATTERN
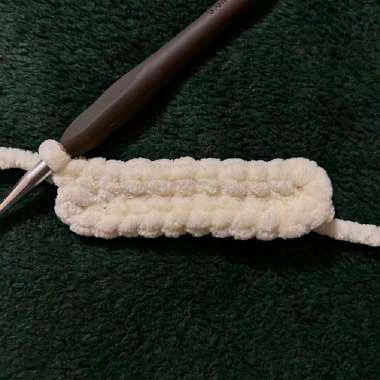
You should now have 24 sc. Continue
crocheting in a spiral for round 2.
Round 2:
Sc, inc, sc 8, (sc, inc) x2, sc 9, inc (28)
Round 3:
Sc 2, inc, sc 8, (sc 2, inc) x2, sc 10, inc (32)
Round 4:
Sc around (32)
Round 5:
Sc 3, inc, sc 8, (sc 3, inc) x2, sc 11, inc (36)
Round 6:
Sc 4, inc, sc 8, (sc 4, inc) x2, sc 12, inc (40)
Finish off with a slip stitch and then fasten off your piece. Leave a long tail
for sewing. Set aside for now.
Head
Use ‘Cocoa Brown’ for Top Hat Teddy (4mm), or ‘Mustard’ for Rockstar Top Hat Teddy
(6mm).
Round 1:
Mr 6 sc (6)
Round 2:
Inc x6 (12)
Round 3:
(Sc, inc) x6 (18)
Round 4:
Sc, inc, (sc 2, inc) x5, sc (24)
Round 5:
(sc 3, inc) x6 (30)
Round 6:
Sc 2, inc, (sc 4, inc) x5, sc 2 (36)
TOP HAT TEDDY CROCHET PATTERN
Round 7:
(sc 5, inc) x6 (42)
Round 8:
Sc 3, inc, (sc 6, inc) x5, sc 3 (48)
Round 9:
(sc 7, inc) x6 (54)
Round 10-15:
Sc around (54) 6 ROUNDS
Round 16:
Sc, inc, (sc 2, inc) x17, sc (72)
Round 17:
(sc 3, inc) x18 (90)
Round 18:
Sc around (90)
Round 19:
(sc 3, dec) x18 (72)
Round 20:
Sc around (72)
Round 21:
Sc, dec, (sc 2, dec) x17, sc (54)
Round 22:
Sc around (54)
Round 23:
(sc 7, dec) x 6 (48)
Round 24:
Sc around (48)
Round 25:
Sc 3, dec, (sc 6, dec) x5, sc 3 (42)
Round 26:
Sc around (42)
Round 27:
(sc 5, dec) x6 (36)
Round 28:
Sc 2, dec, (sc 4, dec) x5, sc 2 (30)
Pause here and follow the steps on pg. 11 for Top Hat Teddy or pg. 13 for Rockstar Top Hat Teddy.
Round 29:
(sc 3, dec) x6 (24)
Round 30:
Sc, dec, (sc 2, dec) x5, sc (18)
Round 31:
(Sc, dec) x6 (12)
Stuff a little more.
Round 32:
Dec x6 (6)
Fasten off, and set aside for assembly later on.
TOP HAT TEDDY CROCHET PATTERN
FOR TOP HAT TEDDY:
Step 1:
I add stuffing temporarily to make sure I like the way everything looks before I secure the
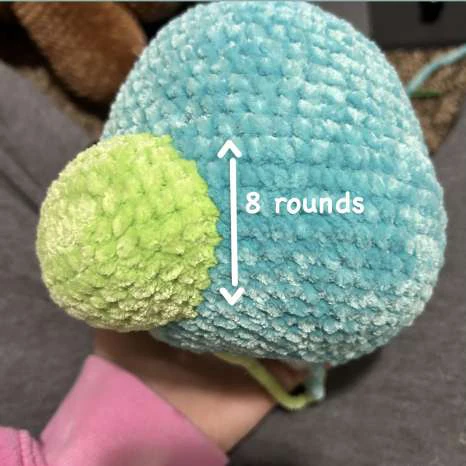
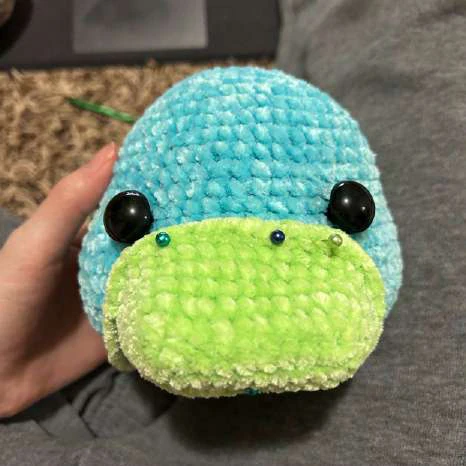
safety eyes. Place 18mm safety eyes between rounds 15-16, making them about 9-10 stitches
apart, but don’t secure them just yet. I like to have my snout ready to put on at this point
to make sure I like the placement of the eyes in congruence with the snout. The top of the
snout gets sewn on between rounds 16-17, and stretches down 8 rounds, ending between
rounds 24-25. Make sure to stuff the snout before closing it off.
Step 2:
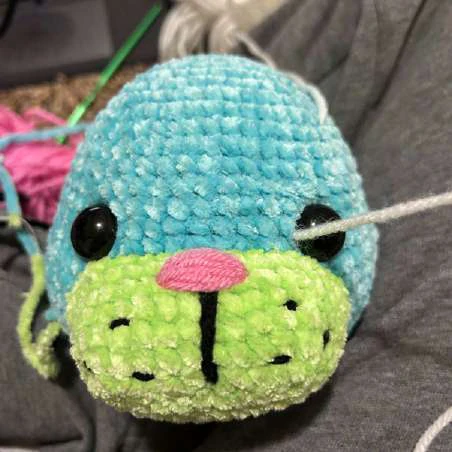
Add all of the snout details. You can see more detailed instructions on this in step 13(pg.18)
of the Rockstar Top Hat Teddy section below. Then unstuƋ the head enough to secure the
safety eyes and add the eye details. To do this, start with white yarn on your yarn needle
and insert your needle anywhere in the head, then bring it out between rounds 15-16 just
in front of the safety eye. Put your needle back into the same row on the opposite side of
the safety eye. This will create the whites of the eyes. Using the same strand of yarn, do
this for the other eye as well. And then tie oƋ the yarn and tuck it into the head.
TOP HAT TEDDY CROCHET PATTERN
(optional: use white embroidery thread to secure the middle of the whites of the eyes onto the head)
Step 3:
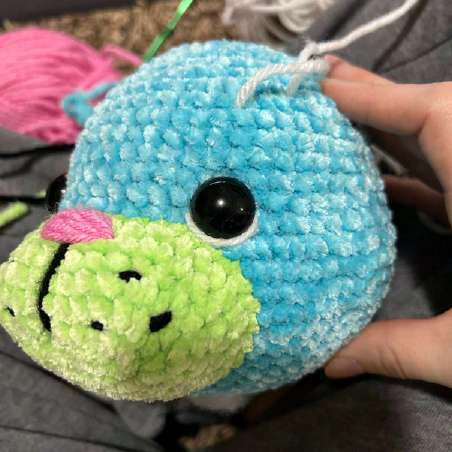
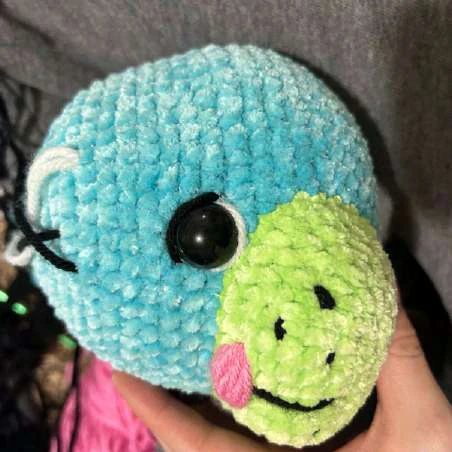
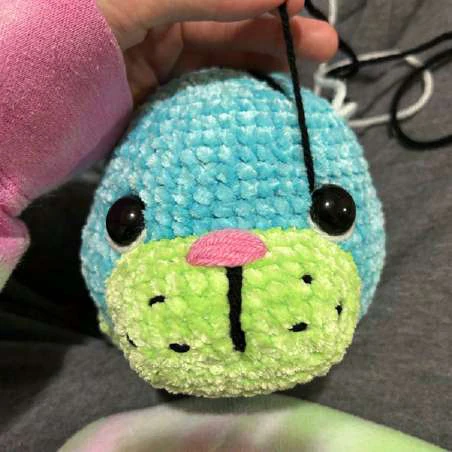
Using black yarn, bring your yarn and needle between rounds 14-15 in the stitch just next
to the safety eye. Then insert your needle between rounds 16-17 in the stitch just next to
the eye. Using the same strand of black yarn, do this to the other eye as well. And then tie
off the yarn and tuck it into the head.
TOP HAT TEDDY CROCHET PATTERN
Step 4:
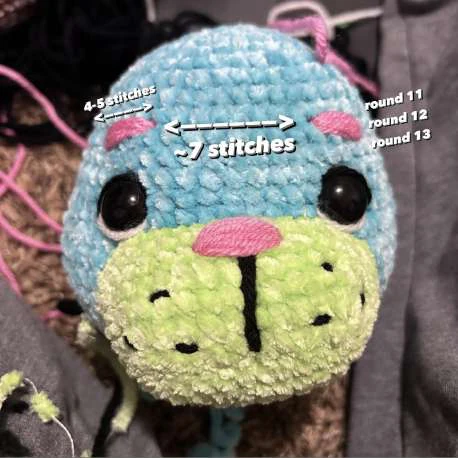
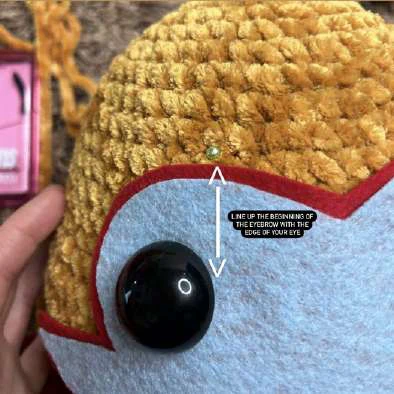
Tip: Line up the beginning of your eyebrows with the
stitch at the edge of your safety eye.
Sew on the eyebrows. They start between
rounds 11-12 and then end between rounds
12-13, and are about 4-5 stitches in length.
They are about 7 stitches away from each
other. Make the eyebrows about 5-6 layers
thick, or until they’re your desired thickness.
Tie off your yarn tails and tuck them into the
head. Continue onto round 29 (pg. 10)
FOR ROCKSTAR TOP HAT TEDDY:
At this point, we are going to want to add the safety eyes, but in order to do so, we will
need our felt pieces ready to put on as well. Below are step by step instructions on how to
assemble these pieces.
Step 1:
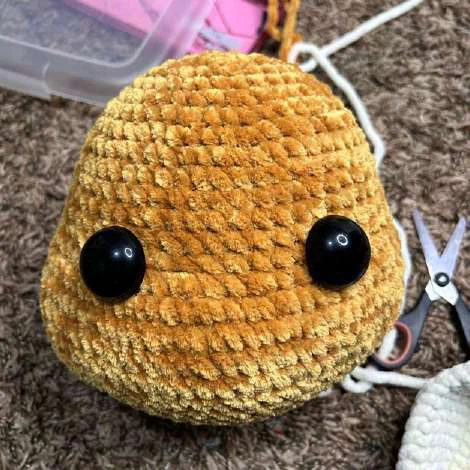
Stuff the head temporarily, as this makes the
process of mapping out the face easier. Don’t worry
about securing the safety eyes yet, we will unstuff
the head later to secure them. Place 30mm safety
eyes where you want them to be. Mine are between
rounds 15-16, about 9-10 stitches apart.
TOP HAT TEDDY CROCHET PATTERN
Step 2:
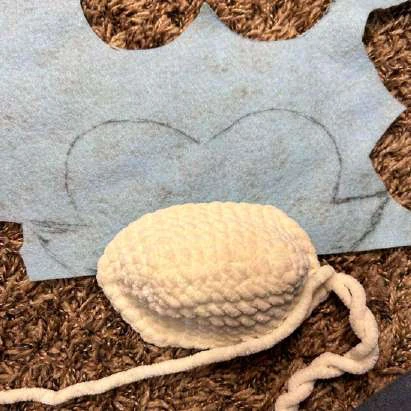
Place your snout at the bottom of a piece of blue felt to get the
visual of how you want your face design to look above the
snout. Using a marker, draw out the design you want. Make
sure you purposefully make this design larger than you want it.
You will be trimming it down in step 4.
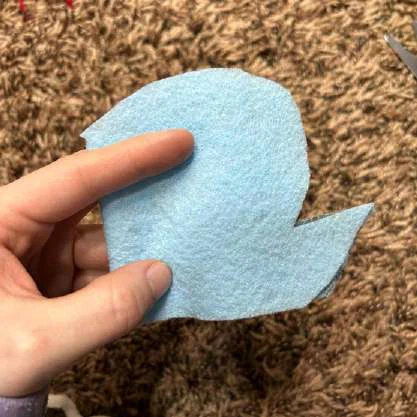
Step 3:
Cut out your felt piece.
The shape of the bottom does not matter
because we are going to cut it out
along the snout later.
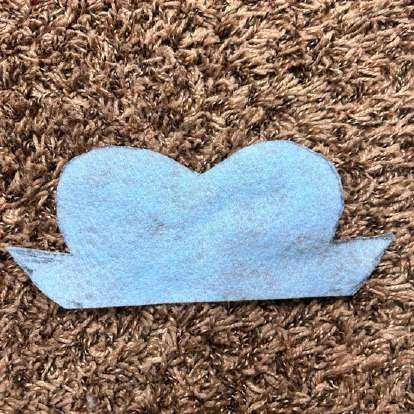
Step 4:
Fold the felt piece in half,
and trim it down to make it
completely symmetrical.
TOP HAT TEDDY CROCHET PATTERN
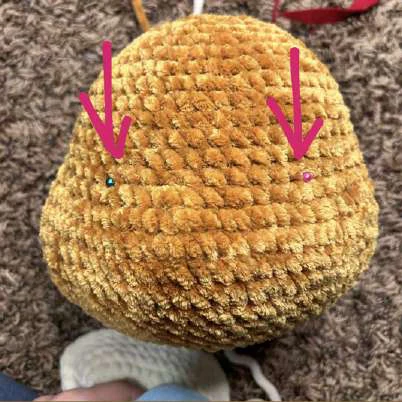
Step 5:
Remove your safety eyes,
and place sewing pins down in their place
to mark which holes you want
your safety eyes to be in.
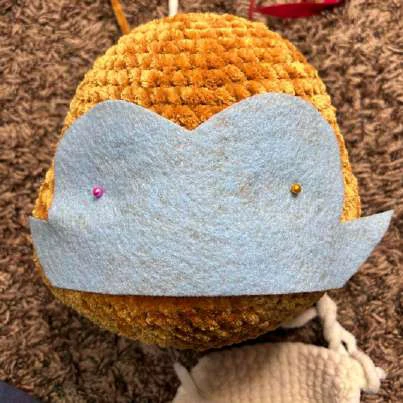
Step 6:
Line up your felt piece where you want it and then use the
safety pins you just put into the head to feel for where you
want the safety eyes to go through the felt, and mark the felt
with 2 more sewing pins. This will tell us where we need to cut a
hole for the safety eyes to go through.
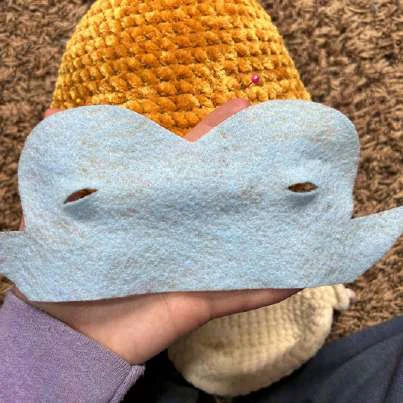
Step 7:
Where you just placed the sewing pins,
cut slits into the felt piece for the eyes to go through.



TOP HAT TEDDY CROCHET PATTERN
Step 8:
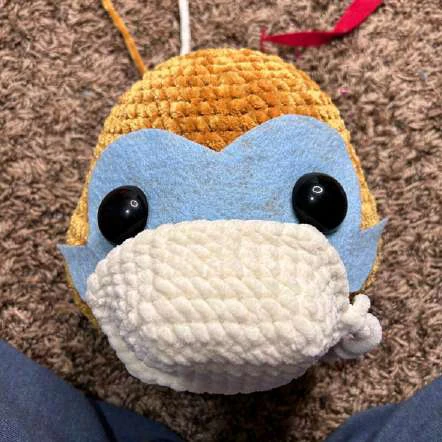
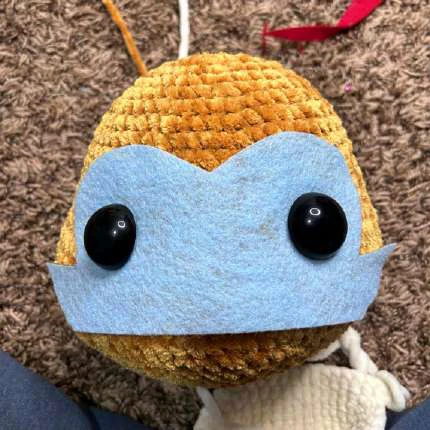
Make sure you like the placement of the eyes and that they’re an even distance from the edges of your
felt piece. Line up the two bumps at the top of your face piece around rounds 11-12. You can then place
your snout as a visual to make sure everything looks the way you want it and move onto step 9.
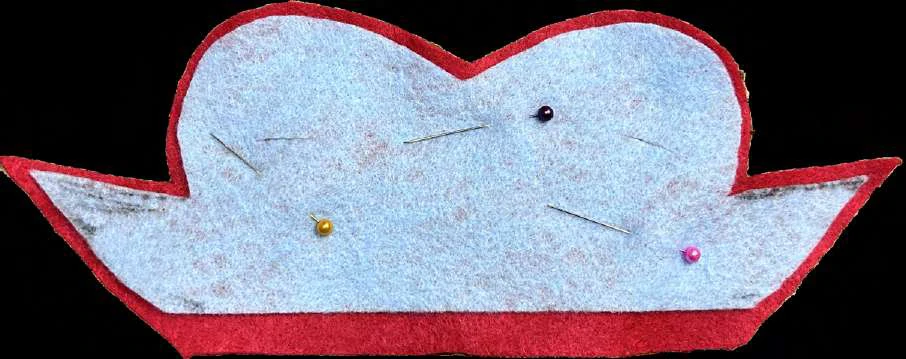
Step 9:
Pin your blue face piece to a sheet of red felt and use it as a guideline to cut out the same shape of a
larger size. This will be the red outline of the face piece. The shape at the bottom still doesn’t matter at
this point, we will be cutting that later on.


TOP HAT TEDDY CROCHET PATTERN
Step 10:
With the felt pieces still pinned together, cut a slit
through the red piece in the same spot as the blue
piece. Insert your safety eyes into both layers of felt
and then into the head as well. This is just to double
check that everything lines up correctly before we
sew everything together. We ideally want our felt
piece to lay perfectly flat with no bumps.
Step 11:
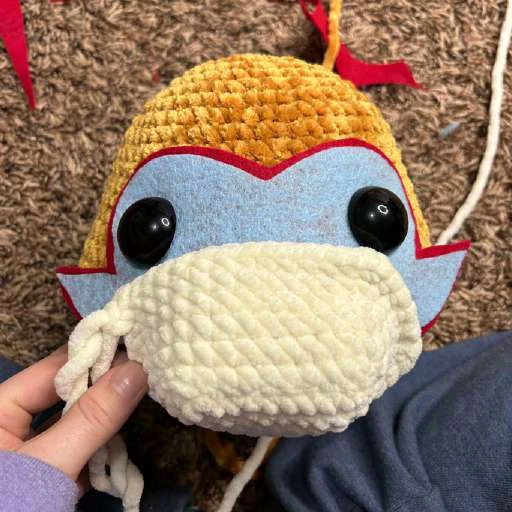
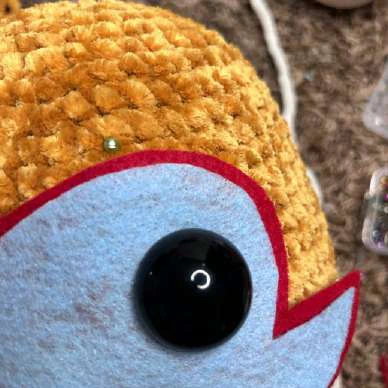
Now map out where you want the eyebrows to start. Mine start between rounds 11-12 and then end
between rounds 12-13, and are 5 stitches long, and 7 stitches apart. This is to make sure your felt piece is
at an appropriate spot before we commit to sewing everything on (we want the eyebrows to land just
above the felt piece and to slightly curve along with it).



TOP HAT TEDDY CROCHET PATTERN
Step 12:
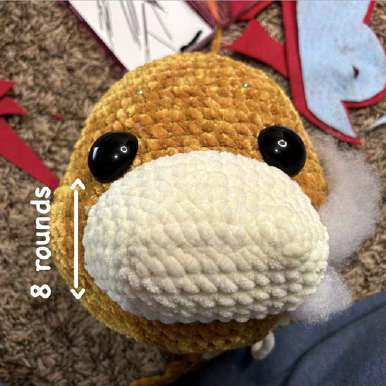
Now that we know the felt pieces are the way we want them, we
want to sew on the snout. The top of the snout is sewn between
rounds 16-17, and is 8 rounds vertical. The bottom of the snout is
sewn between rounds 24-25.
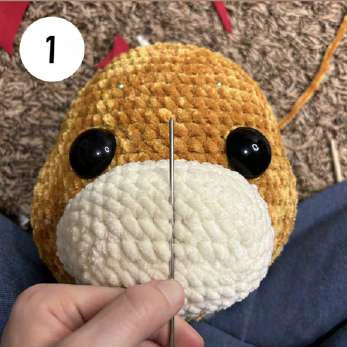
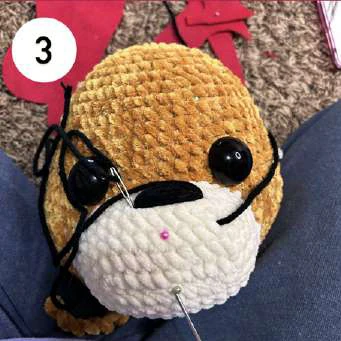
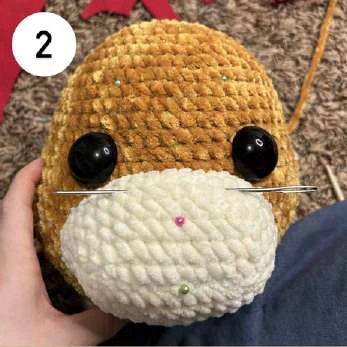
Step 13:
*the number in parentheses match the photos BELOW
(1) Find the center of your snout and use a couple sewing pins to mark it. I use something with a long
straight edge to do this – my yarn needle usually works well. (2) Use this center point to find your middle
5 stitches between the eyes and this is where we’ll begin sewing on the nose. I put the nose between the
1st and 2nd rounds from the top of the snout. (3) Go over the nose about 10-11 times, or however many
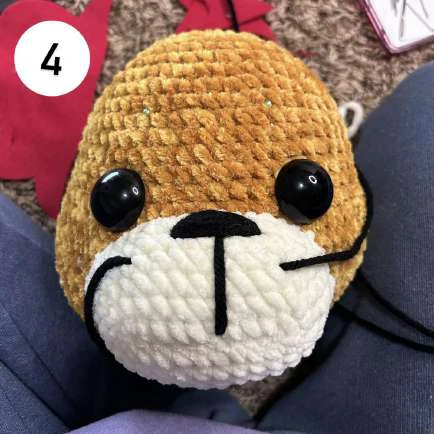
times to get your desired thickness. (4) Then bring your needle down between the 6th-7th row from the
top of the snout (where you marked the center with sewing pins) to make the line of the mouth. Go over
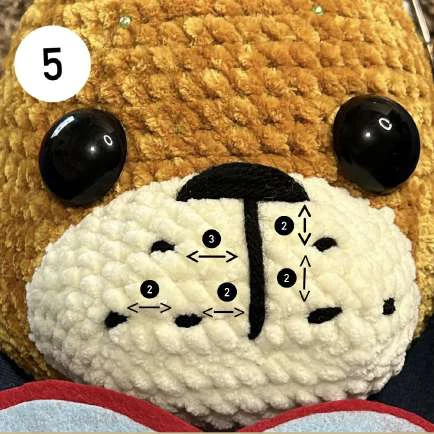
the mouth 2 times, or however many times to get your desired thickness. (5) Make the three freckles on
each side of the snout all 1 stitch in length. Reference the 5th photo below for placement. The numbers
in the photo are how many stitches apart the freckles are from their relative reference points.

TOP HAT TEDDY CROCHET PATTERN
Step 14:
***MAKE SURE YOUR BLUE FELT PIECE IS TURNED TO THE
BACKSIDE THAT ALREADY HAS MARKER ON IT FOR THIS
STEP***. WE WILL BE MARKING IT UP AGAIN TO TRIM IT.
Step 15:
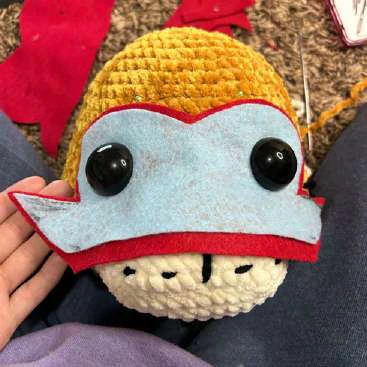
Place your felt pieces back where you want them (you
may want to pin them down), and with a marker trace
out the snout now that it’s sewn in place. This is where
we will cut out the felt along the shape of the snout. I
drew my line a little further out to make sure I didn’t
initially cut off too much.



TOP HAT TEDDY CROCHET PATTERN
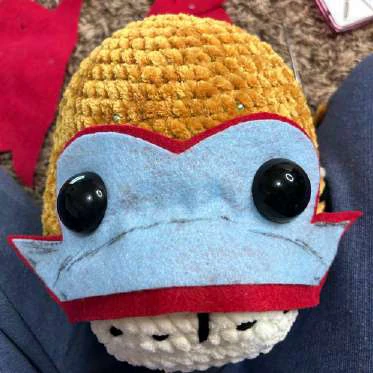
← This is how it looks after it’s cut according to the
shape of the snout. Make sure you flip the blue felt
piece back onto the unmarked side.
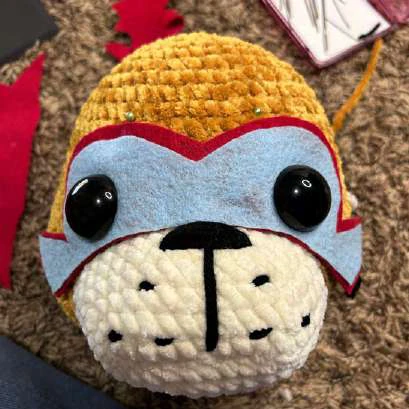
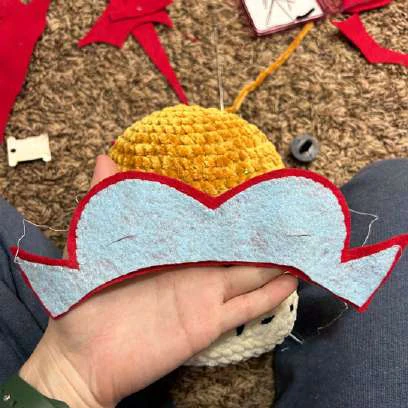
Step 16:
Sew the blue felt piece on top of the red felt piece with
light blue embroidery thread. No need to sew the bottom
part down just yet.
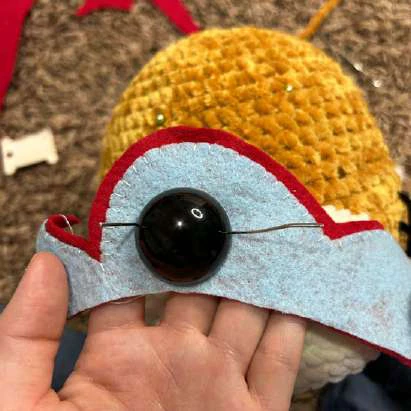
Step 17:
Place eyes in the eye holes and figure out how you want
to position the whites of the eyes. Use sewing needles to
make holes in the felt where you want them to be. I put
the holes slightly underneath the safety eyes to hide the
holes.


TOP HAT TEDDY CROCHET PATTERN
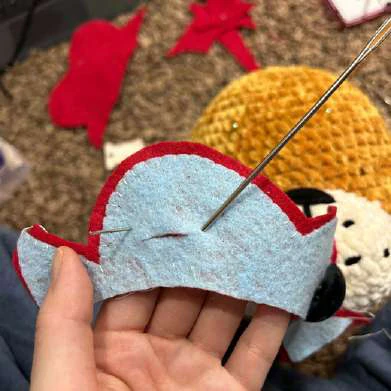
Step 18:
Using a thicker yarn needle, which are usually too blunt to
poke through felt easily on their own, stab it through the
holes you just made with the sewing needles. You’ll then
attach the white yarn onto your yarn needle and sew on
the whites of the eyes.
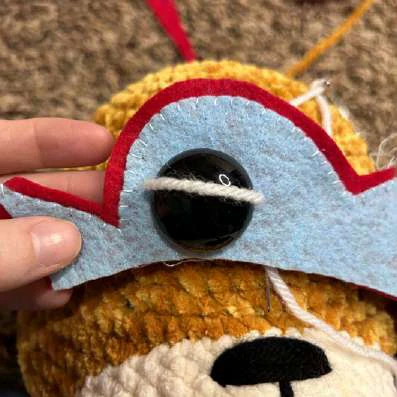
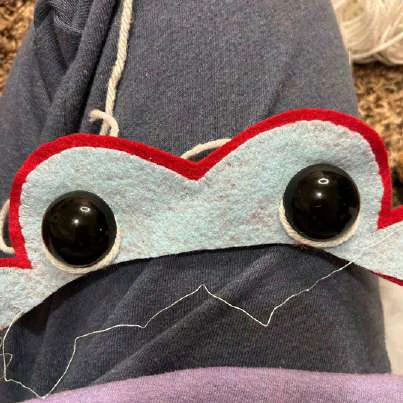
Step 19:
Your yarn may naturally want to lay across the safety eye
as shown. To fix this, I dab a tiny bit of hot glue on the
bottom of the safety eye and glue the yarn down onto the
eye so it doesn’t move. Knot the yarn in the back and do
the same process for both eyes.
← The whites of your eyes should end up looking
something like this.


TOP HAT TEDDY CROCHET PATTERN
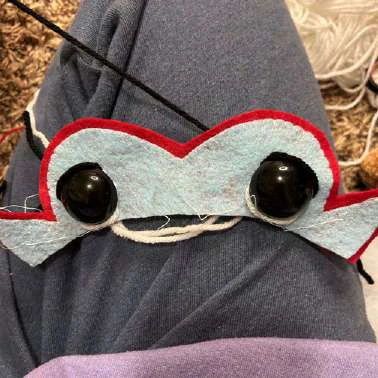
Step 20:
Repeat steps 17-19 with black yarn on the top of the eye.
← It should end up looking something like this.
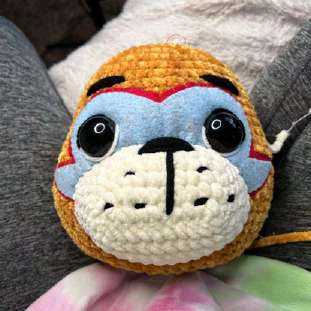
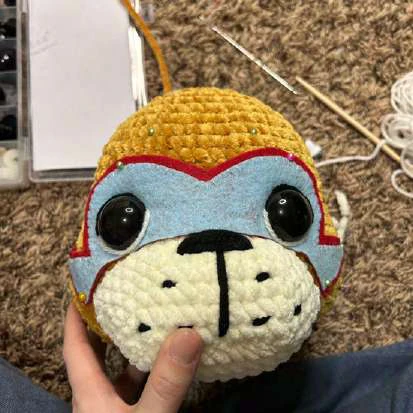
Step 21:
Keeping your eyes inserted into the felt piece, insert them back into the stitches we mapped out
in step 5. Unstuff the head slightly and secure the safety eyes in place. Then pin down the felt
piece in place so we can begin sewing it down. Using red embroidery thread, sew on the red
outline. Using the light blue embroidery thread, sew on the bottom border of the felt to the
snout. Then tie off your thread pieces and tuck them into the head. After that, use black yarn to
sew on the eyebrows. We should still have the pins in place from step 11. The eyebrows start
between rounds 11-12 and then end between rounds 12-13, and are about 4-5 stitches long. They
are about 7 stitches away from each other. Make the eyebrows about 5-6 layers thick, or until
they’re your desired thickness. Tie off your yarn tails and
tuck them into the head. You can now continue onto
round 29 (pg. 10).



TOP HAT TEDDY CROCHET PATTERN
Ears (Make 2)
Part 1: Inner Ear
Use ‘Mushroom’ for Top Hat Teddy (4mm), or ‘Winter White’ for Rockstar Top Hat Teddy
(6mm).
Round 1:
Mr 6 sc (6)
Round 2:
Inc x6 (12)
Round 3:
(Sc, inc) x6 (18)
Round 4:
sc, inc (sc 2, inc) x5, sc (24)
Make a slip stitch and fasten off your piece. Leave a short tail to weave
into the outer ear piece in the next step.
Part 2: Outer Ear
Use ‘Cocoa Brown’ for Top Hat Teddy (4mm), or ‘Mustard’ for Rockstar Top Hat Teddy
(6mm).
Round 1:
Mr 6 sc (6)
Round 2:
Inc x6 (12)
Round 3:
(Sc, inc) x6 (18)
Round 4:
sc, inc (sc 2, inc) x5, sc (24)
Sandwich your inner ear piece to the outer ear piece with RIGHT SIDES facing outwards
(reference photos below). We will be crocheting through BOTH pieces in the next step to
connect both pieces together (round 5).
Right side →
← Wrong side
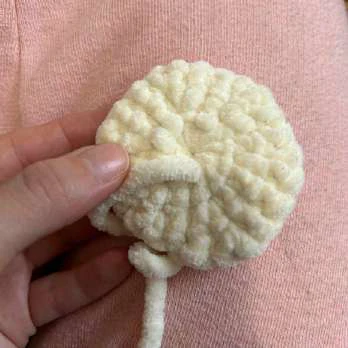
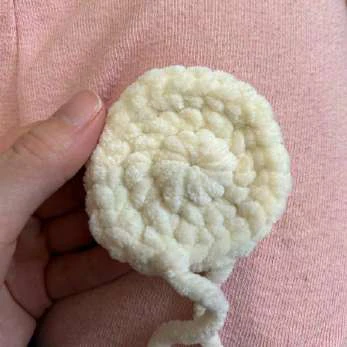
TOP HAT TEDDY CROCHET PATTERN
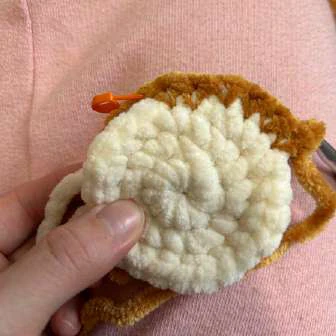
Round 5:
sc around both pieces (24)
← Outer ear piece and inner ear piece sandwiched
together.
– The stitch on the inner ear piece you begin crocheting
in doesn’t really matter. It will look the same regardless.
– As you crochet, just tuck the yarn tails into the center of
your ear pieces.
What it should look like once you start crocheting
around both ear pieces. →
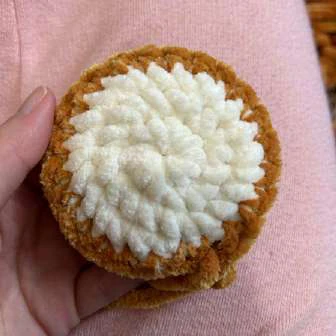
← What the finished ear piece looks like after the separate
inner and outer pieces are crocheted together (finished
piece after completing round 5).
Finish off with a slip stitch and then fasten off your piece. Leave a long tail
for sewing and set aside to assemble later.
TOP HAT TEDDY CROCHET PATTERN
Arms (Make 2)
Start with ‘Mushroom’ for Top Hat Teddy (4mm), or ‘Winter White’ for Rockstar Top Hat
Teddy (6mm).
Round 1:
Mr 6 sc (6)
Round 2:
Inc x6 (12)
Round 3:
(Sc, inc) x6 (18)
Round 4:
sc, inc, (sc 2, inc) x5, sc (24)
Round 5:
(sc 3, inc) x6 (30)
Change color from Mushroom to Cocoa brown for Top Hat Teddy/ from Winter White to Mustard for
Rockstar Top Hat Teddy.
Round 6:
Sc 2, inc, (sc 4, inc) x5, sc 2 (36)
Round 7-8:
Sc around (36) 2 ROUNDS
Round 9:
Dec x3, sc 24, dec x3 (30)
Round 10:
Sc around (30)
Round 11:
(sc 3, dec) x6 (24)
Round 12-13:
Sc around (24) 2 ROUNDS
Start stuffing, and stuff as you go. Only lightly stuff towards the top of the arm, as we will be crocheting
it shut.
Round 14:
Sc, dec, (sc 2, dec) x5, sc (18)
Round 15-19:
Sc around (18) 5 ROUNDS
Round 20:
(Sc, dec) x6 (12)
Round 21:
Sc around (12)
Make an additional 5 sc – the 5th stitch will be the new end of your round.
Round 22:
Pinch your arm closed and sc across both sides (6)
Leave a long tail for sewing, and fasten off. Then set aside for assembly
later on.
TOP HAT TEDDY CROCHET PATTERN
Legs (Make 2)
Option 1: Top Hat Teddy Legs
Start with the color ‘Mushroom’ (4mm).
Round 1:
Mr 6 sc (6)
Round 2:
Inc x6 (12)
Round 3:
(Sc, inc) x6 (18)
Round 4:
sc, inc, (sc 2, inc) x5, sc (24)
Round 5:
(sc 3, inc) x6 (30)
Round 6:
Inc x6, sc 24 (36)
Change color from Mushroom to Cocoa brown.
Round 7:
(Sc, inc) x6, sc 24 (42)
Round 8-9:
Sc around (42) 2 ROUNDS
Round 10:
(Sc, dec) x6, sc 24 (36)
Round 11:
Sc around (36)
Round 12:
Dec x6, sc 24 (30)
Round 13-14:
Sc around (30) 2 ROUNDS
Round 15:
(sc 3, dec) x6 (24)
Start stuffing, and stuff as you go. Only lightly stuff towards the top of the leg, as we will be crocheting
it shut.
Round 16:
Sc around (24)
Round 17-18:
Sc around (24) 2 ROUNDS
Round 19:
Sc, dec, (sc 2, dec) x5, sc (18)
Round 20-25: Sc around (18) 6 ROUNDS
Round 26:
(Sc, dec) x6 (12)
Round 27:
Pinch your legs closed and sc around both sides (6)
Leave a long tail for sewing, and fasten off. Then set aside for assembly
later on.
TOP HAT TEDDY CROCHET PATTERN
Option 2: Rockstar Top Hat Teddy Legs
Start with the color ‘Winter White’ (6mm).
Round 1:
Mr 6 sc (6)
Round 2:
Inc x6 (12)
Round 3:
(Sc, inc) x6 (18)
Round 4:
sc, inc, (sc 2, inc) x5, sc (24)
Round 5:
(sc 3, inc) x6 (30)
Round 6:
Inc x6, sc 24 (36)
Change color from Winter White to Mustard.
Round 7:
(Sc, inc) x6, sc 24 (42)
Round 8-9:
Sc around (42) 2 ROUNDS
Round 10:
(Sc, dec) x6, sc 24 (36)
Round 11:
Sc around (36)
Round 12:
Dec x6, sc 24 (30)
Round 13-14:
Sc around (30) 2 ROUNDS
Round 15:
(sc 3, dec) x6 (24)
Start stuffing, and stuff as you go. Only lightly stuff towards the top of the leg, as we will be crocheting
it shut.
Round 16:
Sc around (24)
At the end of round 16, sc an additional 16 sc or however many stitches
necessary to get to the center of the back of the leg and color change to
Crimson at the end of this round.
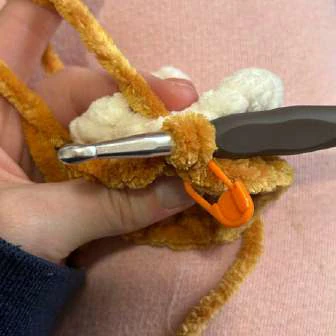
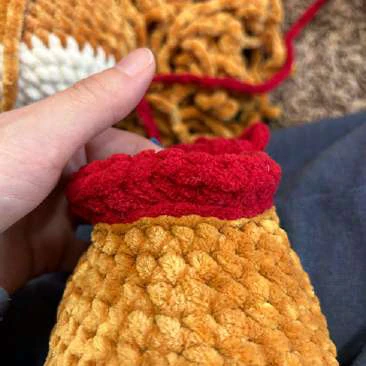
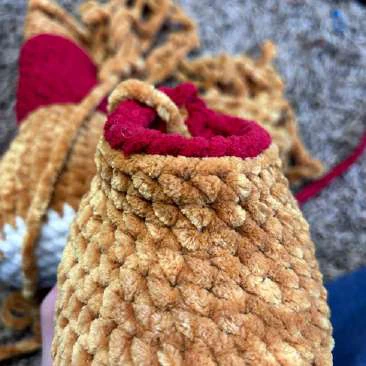
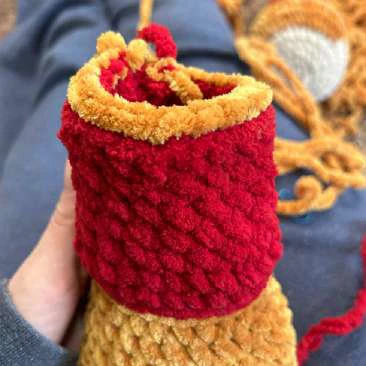
To color change, slst in the BLO of round 16 VERY LOOSELY with Crimson
(do not count this as a round) and then crochet round 17 as normal in the
BLO of the round of slip stitches. This will give a more solid color change.
Refer to the photos on the next page (pg. 28).
TOP HAT TEDDY CROCHET PATTERN
Make a round of slst in the BLO Sc in BLO of slip stitches. Color change back to original
with red. (This is round 17)
color with the same method.
Round 17-18:
Sc around (24) 2 ROUNDS
Round 19:
Sc, dec, (sc 2, dec) x5, sc (18)
Round 20-23: Sc around (18) 4 ROUNDS
Change color back to Mustard using the same color change method shown above.
Round 24-25: Sc around (18) 2 ROUNDS
Round 26:
(Sc, dec) x6 (12)
Round 27:
Pinch your legs closed and sc around both sides (6)
Leave a long tail for sewing, and fasten off. Then set aside for assembly
later on.
Top Hat
Part 1: Brim
Use ‘Black’ for Top Hat Teddy or ‘Charcoal’ for Rockstar Top Hat Teddy (4mm).
TOP HAT TEDDY CROCHET PATTERN
Round 1:
Mr 6 sc (6)
Round 2:
inc x6 (12)
Round 3:
(Sc, inc) x6 (18)
Round 4:
Sc, inc, (sc 2, inc) x5, sc (24)
Round 5:
(sc 3, inc) x6 (30)
Round 6:
Sc 2, inc, (sc 4, inc) x5, sc 2 (36)
Round 7:
(sc 5, inc) x6 (42)
Round 8:
Sc 3, inc, (sc 6, inc) x5, sc 3 (48)
Round 9:
(sc 7, inc) x6 (54)
Make a slst and fasten off. Leave a long tail for sewing and set aside for
assembly later on.
Part 2: Hat Top
Use ‘Black’ for Top Hat Teddy or start with ‘Charcoal’ for Rockstar Top Hat Teddy (4mm).
Round 1:
Mr 6 sc (6)
Round 2:
inc x6 (12)
Round 3:
(Sc, inc) x6 (18)
Round 4:
Sc, inc, (sc 2, inc) x5, sc (24)
Round 5:
(sc 3, inc) x6 (30)
Round 6:
Sc 2, inc, (sc 4, inc) x5, sc 2 (36)
Round 7:
BLO sc around (36)
Round 8-12:
Sc around (36) 5 ROUNDS
Round 13:
Sc 2, dec, (sc 4, dec) x5, sc 2 (30)
Round 14:
Sc around (30)
*** For Rockstar Top Hat Teddy, change color to Light Blue.
TIP: When color changing to light blue for Rockstar Top Hat Teddy: LOOSELY slst in BLO of round 14
with light blue. DO NOT COUNT THIS AS AN ADDITIONAL ROUND. Then crochet round 15 in the BLO of
the round of slip stitches. Continue on with the rest as normal. This creates a more solid color change.
For photo reference, refer to the photos on pg. 28. Crochet rounds 15-16 in light blue.
Round 15-16:
Sc around (30) 2 ROUNDS
TOP HAT TEDDY CROCHET PATTERN
Finish off with a slip stitch and then fasten off your piece. Leave a long tail
for sewing. Set aside to assemble later.
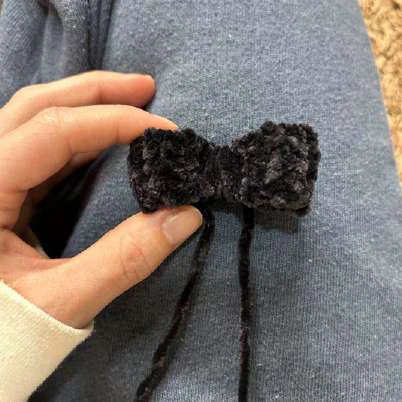
Bow Tie
Use ‘Black’ for Top Hat Teddy or ‘Charcoal’ for Rockstar Top Hat Teddy (4mm).
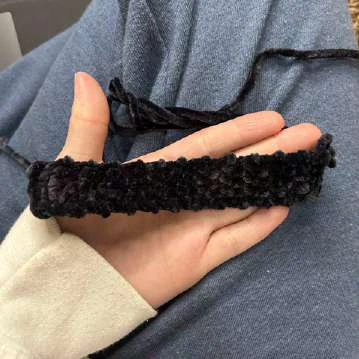
Leaving a long front tail, CH 5 and work in rows. End each row with a ch 1 and turn.
Round 1:
Starting in the 2nd ch from hook – sc 4, ch 1
Round 2-23:
Sc 4, ch 1, turn (4) 22 ROUNDS
Leave a long tail and fasten off. Follow the steps below and then set aside to
assemble later.
← This is what your bow should look like after finishing
up round 23.
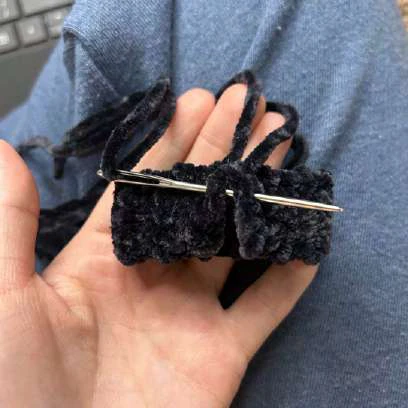
Step 1:
Fold it in half so that your beginning ch 5 meets
with round 23. Then sew the ch 5 to round 23. You
want to keep this seam in the center of the bow to
hide it underneath the center of the bow which we
will begin making in the next step.

TOP HAT TEDDY CROCHET PATTERN
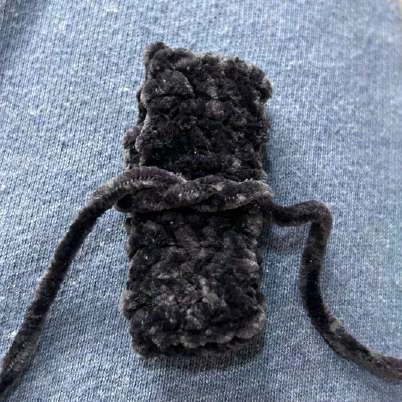
Step 2:
Using the front tail and the end tail of yarn we
just used to sew the ends together, wrap them
around the bow and tie a knot in the center.
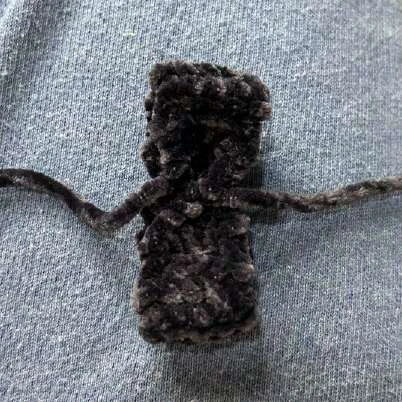
Step 3:
Pull as tightly as possible without breaking your
yarn. We want it to be tight enough where it
cinches the center, creating the bow effect.
Step 4:
Wrap your yarn ends around the center TIGHTLY
about 10-11 times (or however many times to get
your desired thickness), and then tie another knot
in the back to finish it off. Your bow is now
finished.
Skip to pg. 37 for General Assembly if you’re
crocheting Top Hat Teddy.



TOP HAT TEDDY CROCHET PATTERN
Additional Rockstar Top Hat Teddy Accessories
(Including Assembly)
Proceed with making the bracelets, earring, and shoulder pads if you’re
making Rockstar Top Hat Teddy. If not, skip to the general assembly
section on pg. 37.
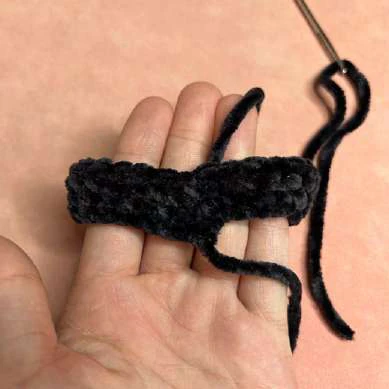
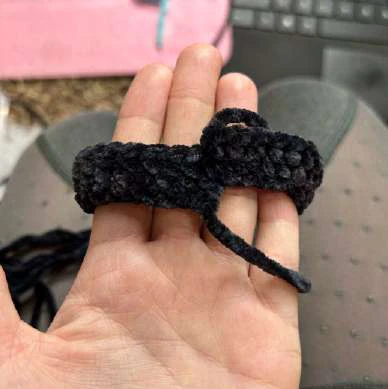
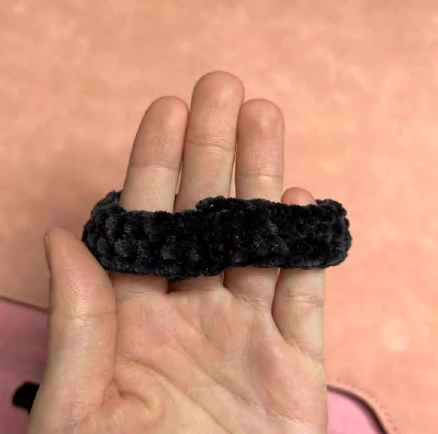
Part 1: Bracelets (Make 2)
Use the yarn color ‘Charcoal’ (4mm).
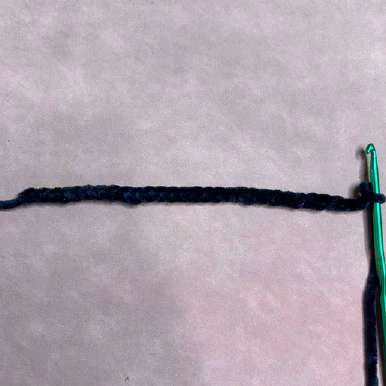
Leaving a long tail, ch 30 – when you begin round 1, start your first sc in the first
chain you made to begin crocheting in the round.
Tip: If you find that your bracelet needs to be larger or smaller to fit your Teddy’s arms better, make
your chain longer/shorter with more/less sc in your chain.
Round 1-2:
Sc 30 (30) 2 ROUNDS
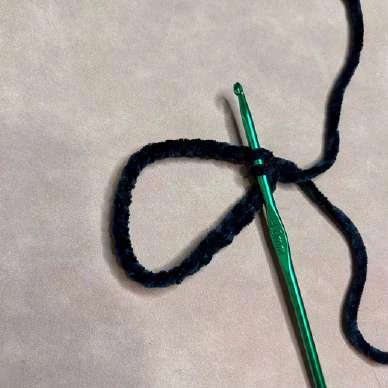
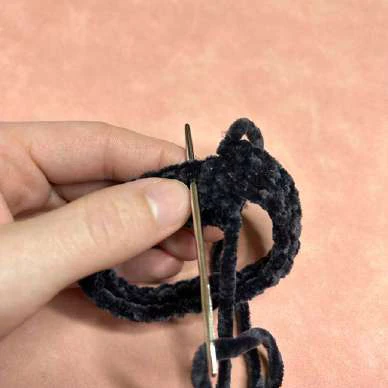
Make a slst and fasten off. We will want to even out the ends, which you can
see in more detailed instructions below, starting at step 3.

TOP HAT TEDDY CROCHET PATTERN



TOP HAT TEDDY CROCHET PATTERN
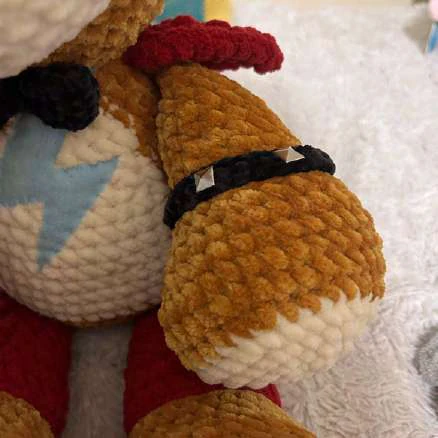
Part 2: Earring
Use the color ‘Crimson’ (6mm).
Leaving a long tail in the front, ch 9. Fasten off and leave a long tail at the end as
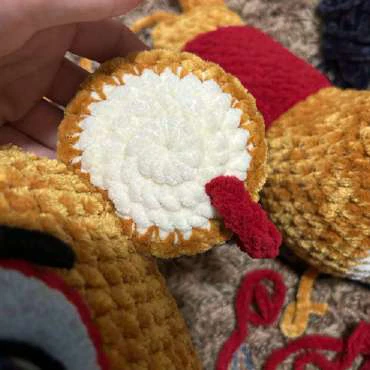
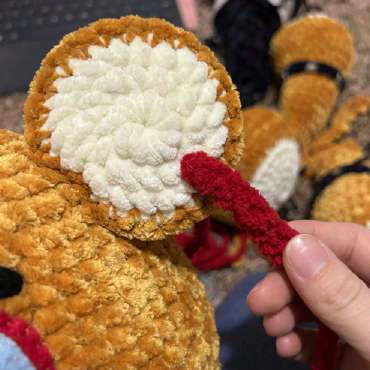
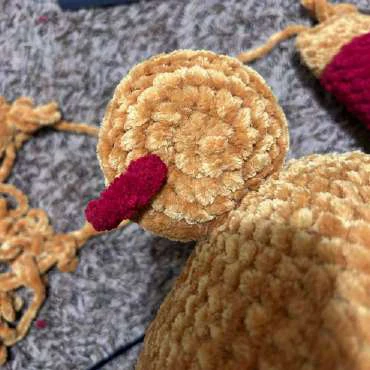
well. Refer to the photos below and the sewing instructions on top of pg. 35 for
further details.


TOP HAT TEDDY CROCHET PATTERN
To attach the earring, use a yarn needle to put one yarn tail between
rounds 3-4 from the front of the ear, bringing the yarn tail out the back of
the ear, through whichever stitch. Next, put the other yarn tail between
rounds 3-4 from the back of the ear, bringing the yarn tail out of the same
stitch as the other yarn tail. Tie these ends together and tuck them into
the ear.
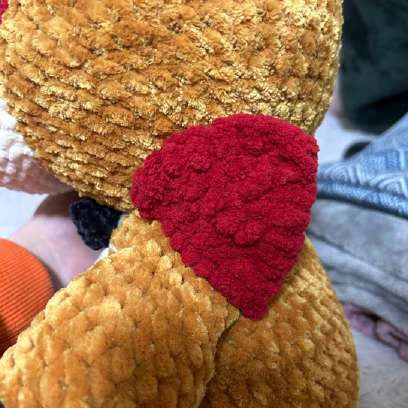
Part 3: Shoulder Pads (Make 2)
Use the color ‘Crimson’ (6mm).
Leaving a long tail, ch 8, turn your work, and work in rows.
Round 1:
Sc 7, ch 1, turn (7)
Round 2:
Dec, sc 5, ch 1, turn (6)
Round 3:
Dec, sc 4, ch 1, turn (5)
Round 4:
Dec, sc 3, ch 1, turn (4)
Round 5:
Dec, sc 2, ch 1, turn (3)
Round 6:
Dec, sc, ch 1, turn (2)
Round 7:
Dec (1)
Sc around the edges of the triangle, making 3 sc in the two bottom corners.
Leave another long tail for sewing and weave it to the bottom corner of the
triangle to be sewn onto the body from the bottom side with the ch 8 (The
other corner without a yarn tail).
TOP HAT TEDDY CROCHET PATTERN
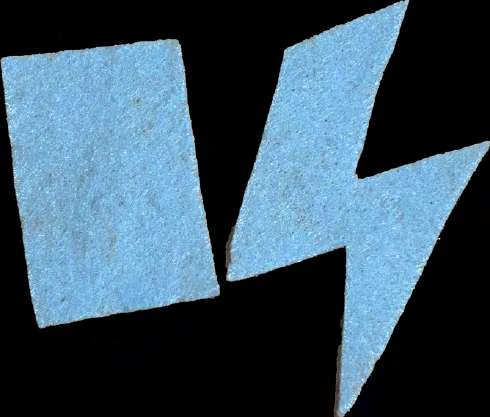
Part 4: Lightning Bolt
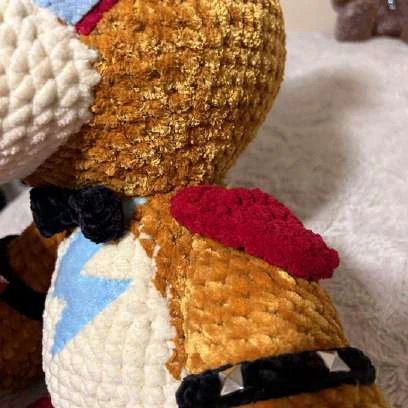
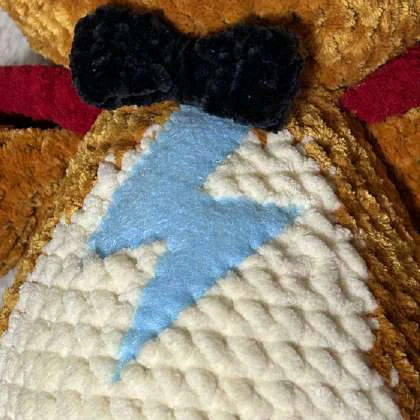
TOP HAT TEDDY CROCHET PATTERN
General Assembly
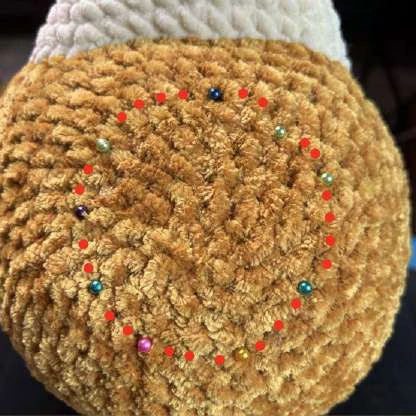
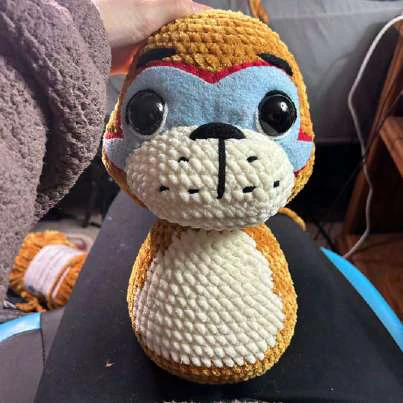
1. Attach the Head and Body
Sew the body onto the head. To do this, I place the head on top of the body
where I think it looks best, and then outline the body where I want it sewn
down with sewing pins. Using the pins as a guideline, begin sewing the
body to the head. Before you finish sewing on the head completely, stuff
the neck a little extra so it’s not floppy. Refer to the photos below:
Play around with the head and
Place pins down outlining where
body and center it accordingly.
you want the body sewn on. I
drew red dots in between the
sewing pins for an
idea of where I sewed down
the body.
TOP HAT TEDDY CROCHET PATTERN
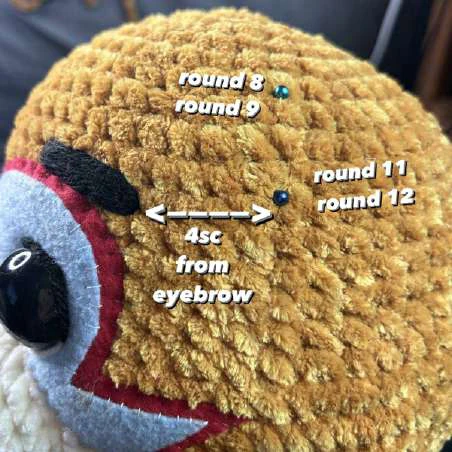
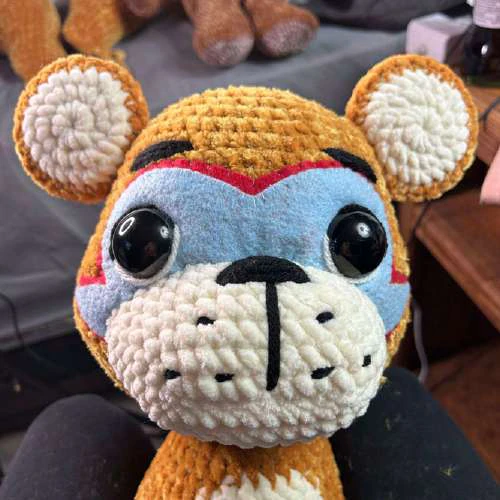
2. Sew on the Ears
Sew the ears onto the head. The tops
of the ears will be sewn between
rounds 8-9 and go down 3 rounds
between rounds 11-12. The ears are
placed 4 sc from the eyebrows. Refer
to the photo to the left, and do this
for both ears.
← Photo of what the ears look like
after sewn on.
TOP HAT TEDDY CROCHET PATTERN
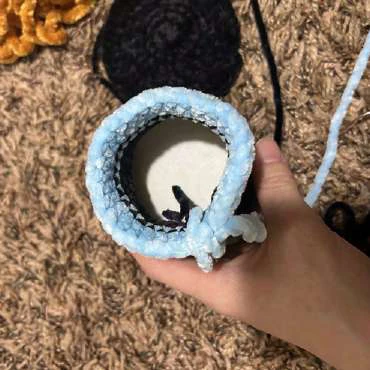
3. Assemble Top Hat
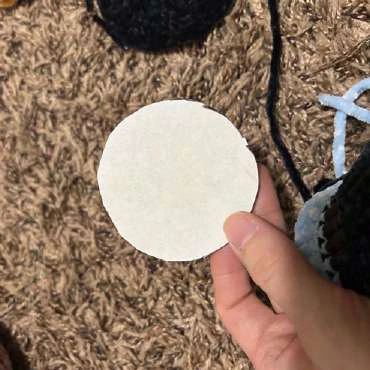
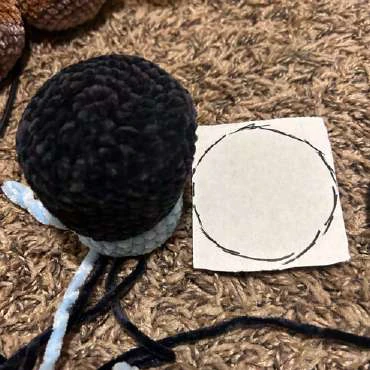
Use a piece of scrap cardboard to trace out the circle shape of the top of
the hat. This will be inserted into the hat to keep its shape. Cut out the
circle to fit and push it against the top of the inside of the hat. Reference
the photos above.
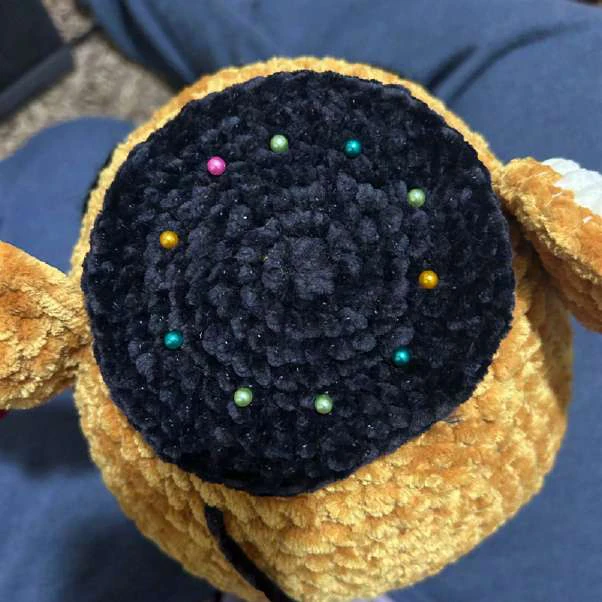
← Sewing pins represent where the brim was sewn
down to the head and where the hat top was sewn
onto the brim.
Line up the center/mr of the brim
and the center/mr of the top of
the head and pin it down.
Weave the brim’s sewing tail into
the bottom side of the brim up to
rounds 6-7. Between rounds 6-7
will be where we sew the brim onto
the head.
We will also sew the top hat piece
onto the brim between rounds 6-7
in the same spot. Sew the top hat
on about ¾ of the way and then
begin to stuff, and continue
sewing it shut.
TOP HAT TEDDY CROCHET PATTERN
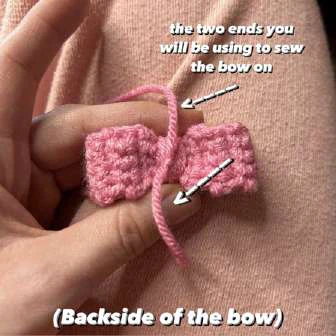
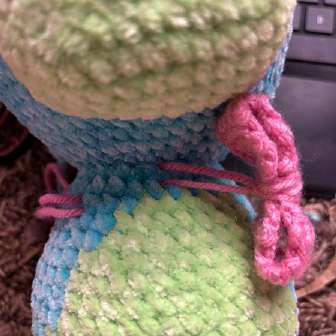
4. Sew on the Bow
Using a yarn needle, sew both tail ends of yarn into the neck. Put one yarn
tail into the center of the body where the head and body meet, and the
other yarn tail one row below that. Bring your yarn tails out from wherever
on the body and tie them off. You may also want to sew through the back
of the bow a few more times to make sure it’s secure. Refer to the photos
below.
TIP: If sewing the bow onto Rockstar Top Hat Teddy, sew the bow into 2 stitches horizontally where the head and
body meet since the Lightning Bolt will be in your way to sew it in vertically like you see below.

TOP HAT TEDDY CROCHET PATTERN
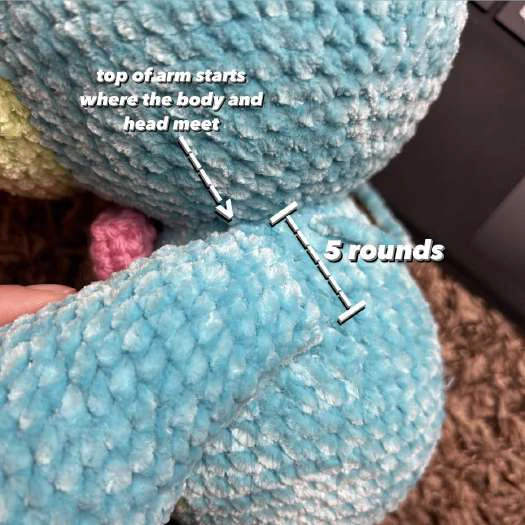
6. Sew on the Arms
The arms are sewn on starting
at the point where the head and
body meet.
With a slight angle, the arms
should vertically be sewn down
5 rounds. Refer to
the photo on the
← left.
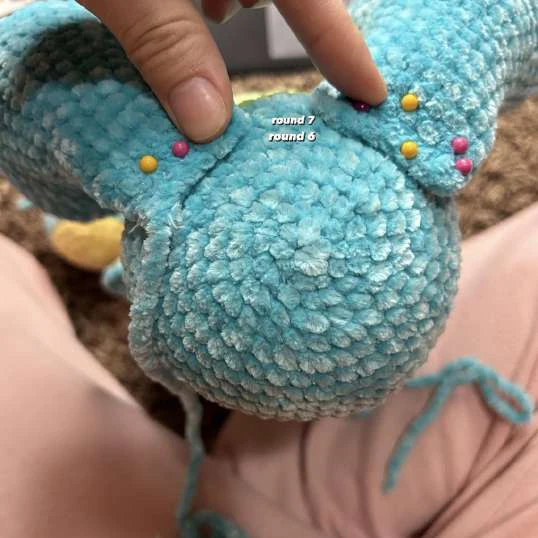
5. Sew on the Legs
The legs should be sewn between
rounds 6-7. Refer to the photo to
the right. →
TOP HAT TEDDY CROCHET PATTERN
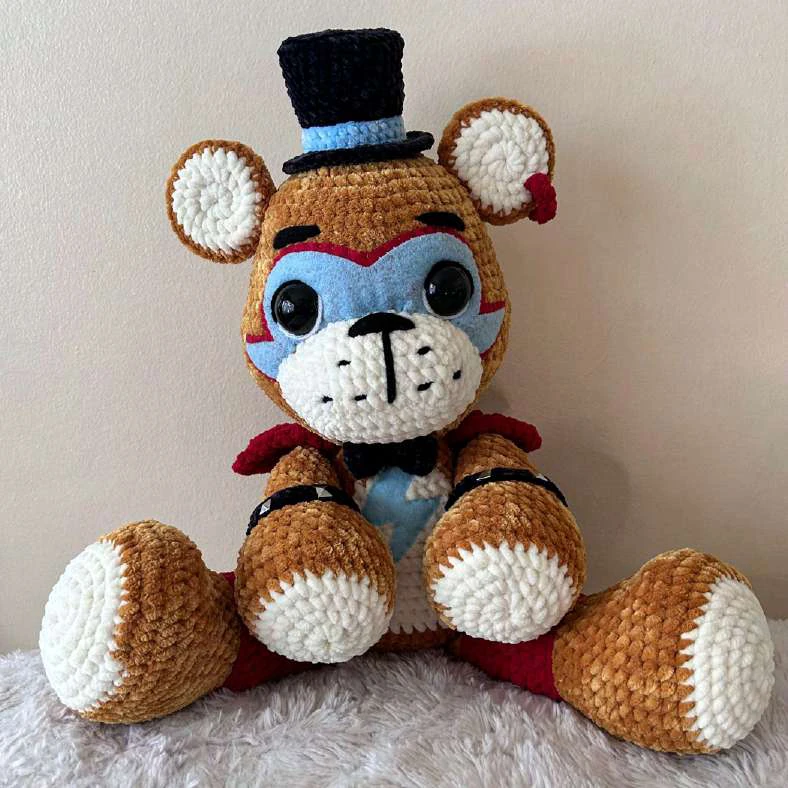
AND YOUR PLUSHIE IS FINISHED!
Recommended Digital Products
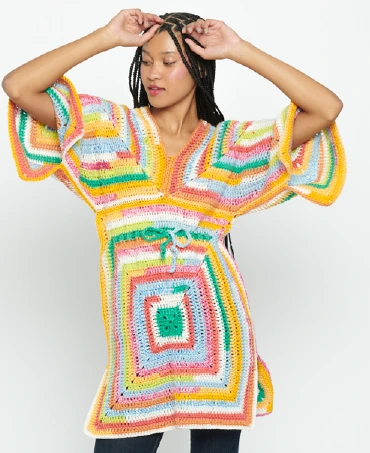
Handmade Crochet Tunic Pattern | Beginner-Friendly Colorful Striped Beach Cover-Up & Top PDF Pattern
$4.99

Handmade Crochet Corset Belt Pattern Boho Chic Waist Cincher with Busk & Ribbon Lacing Intermediate Crochet PDF Pattern
$4.99
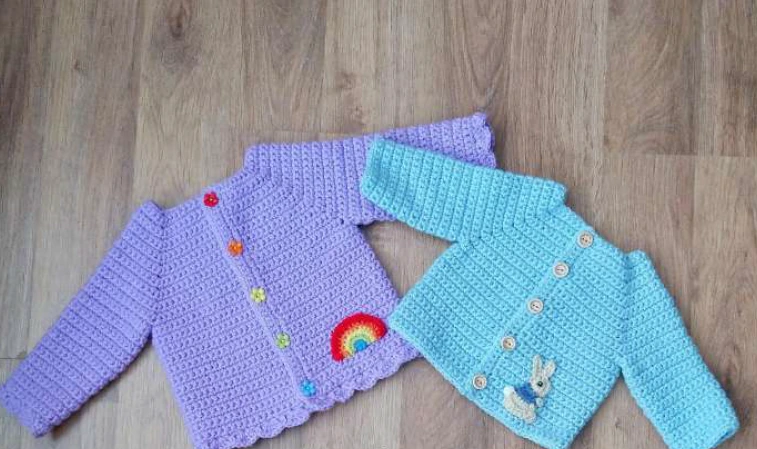
Simple Playdays Baby Cardigan Crochet Pattern PDF | Easy Unisex Newborn to 4 Years Sweater with Rainbow & Bunny Appliques
$4.99

The Ultimate Beginner’s Crochet Guide: Master 45+ Essential Techniques & Practical Projects
$5.99
Get this Crochet Pattern as a Free PDF
Enter your email to receive the PDF associated with this article.
Leave a Reply