
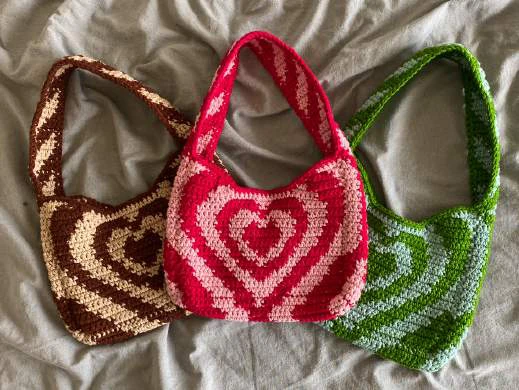
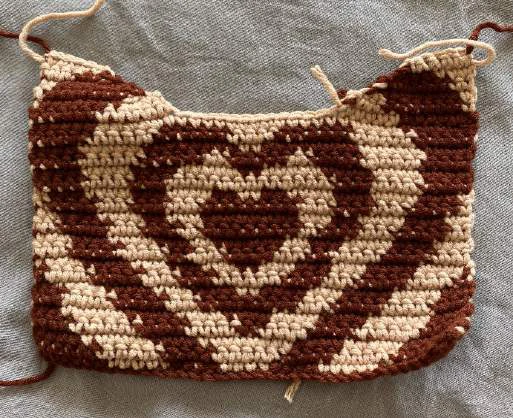
Heart shoulder bag
POWERPUFF HEART SHOULDER BAG
Crochet Pattern
Materials
NOTE: Feel free to use any size/type of yarn and the appropriate hook, just note that your
dimensions will then vary accordingly from mine. I chose to use standard milk cotton yarn (thick
weight 3) with a 4mm hook.
●
Three colours of yarn – recommended weight 3 or weight 4 (I used a weight 3 yarn which
is on the thicker end, so if you’re worried about the bag turning out a bit too small I
suggest going up to weight 4)
●
A crochet hook – recommended 4mm or larger
●
A pair of scissors
●
A yarn needle
●
Optional: stitch markers (you can always improvise with bobby pins, safety pins, etc.)
Dimensions
Below are the approximate dimensions of my shoulder bag – note that this will vary slightly
according to the type of yarn and hook size you use:
Width: 26cm
Height: 20cm
Strap length: 45cm
Construction
Instructions for this project will be split into the following sections:
1.
Creating the main body of the bag
2.
Creating the base/bottom of the bag
3.
Creating the strap of the bag
4.
Attaching the pieces of the bag together
5.
Adding the final edging
A note on the instructions
The pattern for this bag will include tapestry charts for the main body of the bag, the base of the
bag, and the strap of the bag. The bag is constructed entirely of single crochets, so if you find it
easier to follow a chart, go ahead and crochet along with the chart, making 1 single crochet in
every stitch indicated. However, if you aren’t as comfortable with reading off charts, or would
simply like to use the charts as a reference point to what your work should look like as you go
along, I’ve also included step-by-step written instructions for creating each part of the bag. Also
note that I reference the two colours used as C1 (Colour 1) – the darker colour, if you have one –
and C2 (Colour 2) – the lighter colour.
Changing colour
E.g. How to change colour from C1 to C2:
Make your last sc in C1 by inserting your hook through the st and pulling up a loop in C1.
However, do not yarn over and pull through a loop in C1 to complete the sc. Instead, yarn over
and pull through a loop in C2. From the next sc onwards, work in C2.
For example, if the instructions say, “5 scs in C1, change colour, 5 scs in C2,” on your 5th sc of
C1, complete the sc by pulling through a loop in C2. Then from the next st onwards, work 5 scs
in C2.
If the instructions say to, “Change colour, ch1 and turn your work,” at the end of a row, you
would make your last sc of the row in C1 and end it by pulling through in C2, as before, and
then end by chaining 1 in C2.
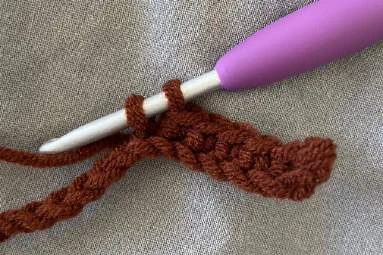
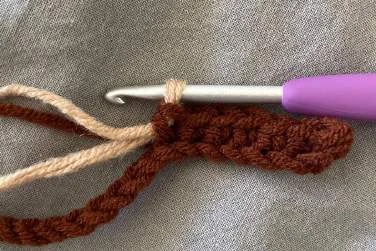
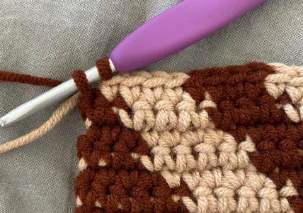
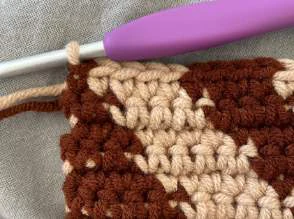
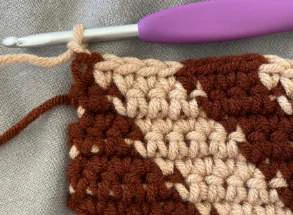
Note that when you are working in one colour, e.g. C1, hold the C2’s strand of yarn in line with
your row, and ensure you place your scs of C1 over the strand of C2 in order to hide the C2
(and vice versa when you’re working in C1).
A little tip; if you see too much of the other colour poking out through your work, this likely
means you’re not pulling tightly enough – when working one colour, e.g. C1, ensure you pull the
strand of C2 relatively tight as you crochet over it – this will help hide it better!
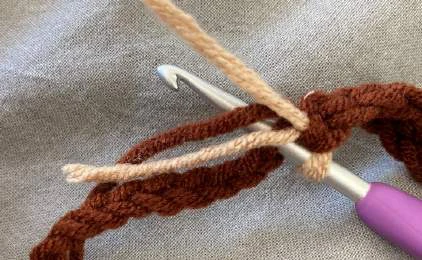
A final note on changing colours – any time you fasten off a row which has ended with you
holding two strands of yarn, it is good practice to tie a quick knot with the two colours once
you’ve chained one and cut both strands of yarn. This just helps to keep it all extra secure.
Abbreviations used – this pattern uses US crochet terminology
Ch = chain
Sc = single crochet
St = stitch
Ss = slip stitch
Sk = skip
INSTRUCTIONS
if you have any questions at all as you’re going through this pattern, please reach out to me by
you might be confused about.
One final note before you start – I’d recommend sewing in your ends as you go along, e.g. once
you finish one piece of the bag, sew in all the ends before you move onto making the next
piece. This will make it easier when it comes to attaching all the pieces of the bag together, and
will save you from having to sew in a ton of ends all at once at the end of the project.
Part 1: Creating the main body of the bag
Part 1A: Creating the rectangular portion of the main body
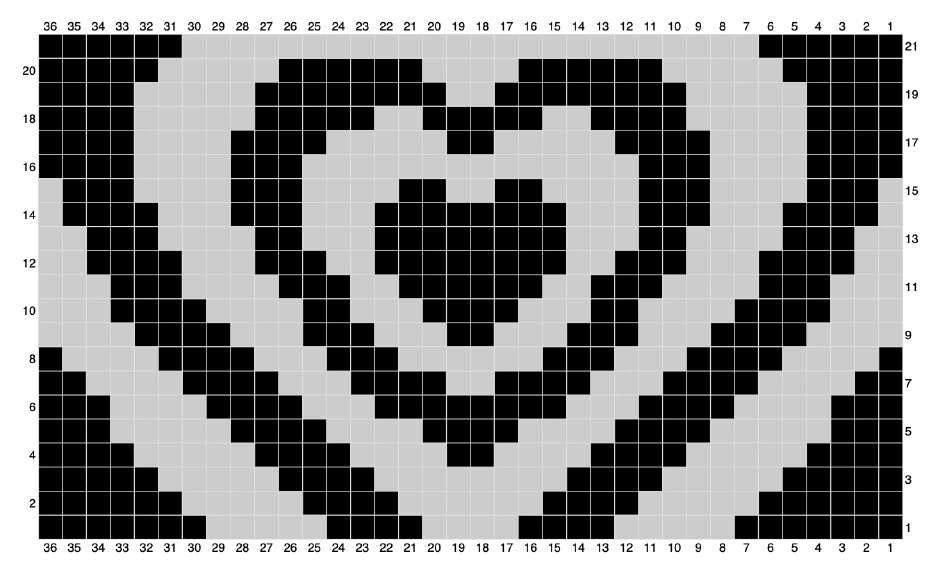
Tapestry chart: P1A
Chart legend: black = C1, grey = C2
Begin by chaining 37 in C1, and then follow the chart.
Do NOT fasten off once you finish – move onto part 1B (written instructions).
Written instructions: P1A
Begin by chaining 37 in C1.
ROW 1: [note – place the first sc in the second ch from your hook]
7 scs in C1, change colour, 5 scs in C2, change colour, 4 scs in C1, change colour, 4 scs in C2,
change colour, 4 scs in C1, change colour, 5 scs in C2, change colour, 7 scs in C1. Ch1 and
turn your work.
ROW 2:
6 scs in C1, change colour, 5 scs in C2, change colour, 4 scs in C1, change colour, 6 scs in C2,
change colour, 4 scs in C1, change colour, 5 scs in C2, change colour, 6 scs in C1. Ch1 and
turn your work.
ROW 3:
5 scs in C1, change colour, 5 scs in C2, change colour, 4 scs in C1, change colour, 8 scs in C2,
change colour, 4 scs in C1, change colour, 5 scs in C2, change colour, 5 scs in C1. Ch1 and
turn your work.
ROW 4:
4 scs in C1, change colour, 5 scs in C2, change colour, 4 scs in C1, change colour, 4 scs in C2,
change colour, 2 scs in C1, change colour, 4 scs in C2, change colour, 4 scs in C1, change
colour, 5 scs in C2, change colour, 4 scs in C1. Ch1 and turn your work.
ROW 5:
3 scs in C1, change colour, 5 scs in C2, change colour, 4 scs in C1, change colour, 4 scs in C2,
change colour, 4 scs in C1, change colour, 4 scs in C2, change colour, 4 scs in C1, change
colour, 5 scs in C2, change colour, 3 scs in C1. Ch1 and turn your work.
ROW 6:
3 scs in C1, change colour, 4 scs in C2, change colour, 4 scs in C1, change colour, 3 scs in C2,
change colour, 8 scs in C1, change colour, 3 scs in C2, change colour, 4 scs in C1, change
colour, 4 scs in C2, change colour, 3 scs in C1. Ch1 and turn your work.
ROW 7:
2 scs in C1, change colour, 4 scs in C2, change colour, 4 scs in C1, change colour, 3 scs in C2,
change colour, 4 scs in C1, change colour, 2 scs in C2, change colour, 4 scs in C1, change
colour, 3 scs in C2, change colour, 4 scs in C1, change colour, 4 scs in C2, change colour, 2 scs
in C1. Ch1 and turn your work.
ROW 8:
1 sc in C1, change colour, 4 scs in C2, change colour, 4 scs in C1, change colour, 3 scs in C2,
change colour, 3 scs in C1, change colour, 6 scs in C2, change colour, 3 scs in C1, change
colour, 3 scs in C2, change colour, 4 scs in C1, change colour, 4 scs in C2, change colour, 1 sc
in C1. Change colour, ch1 and turn your work.
ROW 9:
4 scs in C2, change colour, 4 scs in C1, change colour, 3 scs in C2, change colour, 3 scs in C1,
change colour, 3 scs in C2, change colour, 2 scs in C1, change colour, 3 scs in C2, change
colour, 3 scs in C1, change colour, 3 scs in C2, change colour, 4 scs in C1, change colour, 4 scs
in C2. Ch1 and turn your work.
ROW 10:
3 scs in C2, change colour, 4 scs in C1, change colour, 4 scs in C2, change colour, 2 scs in C1,
change colour, 3 scs in C2, change colour, 4 scs in C1, change colour, 3 scs in C2, change
colour, 2 scs in C1, change colour, 4 scs in C2, change colour, 4 scs in C1, change colour, 3 scs
in C2. Ch1 and turn your work.
ROW 11:
3 scs in C2, change colour, 3 scs in C1, change colour, 4 scs in C2, change colour, 3 scs in C1,
change colour, 2 scs in C2, change colour, 6 scs in C1, change colour, 2 scs in C2, change
colour, 3 scs in C1, change colour, 4 scs in C2, change colour, 3 scs in C1, change colour, 3 scs
in C2. Ch1 and turn your work.
ROW 12:
2 scs in C2, change colour, 4 scs in C1, change colour, 3 scs in C2, change colour, 3 scs in C1,
change colour, 2 scs in C2, change colour, 8 scs in C1, change colour, 2 scs in C2, change
colour, 3 scs in C1, change colour, 3 scs in C2, change colour, 4 scs in C1, change colour, 2 scs
in C2. Ch1 and turn your work.
ROW 13:
2 scs in C2, change colour, 3 scs in C1, change colour, 4 scs in C2, change colour, 2 scs in C1,
change colour, 3 scs in C2, change colour, 8 scs in C1, change colour, 3 scs in C2, change
colour, 2 scs in C1, change colour, 4 scs in C2, change colour, 3 scs in C1, change colour, 2 scs
in C2. Ch1 and turn your work.
ROW 14:
1 sc in C2, change colour, 4 scs in C1, change colour, 3 scs in C2, change colour, 3 scs in C1,
change colour, 3 scs in C2, change colour, 8 scs in C1, change colour, 3 scs in C2, change
colour, 3 scs in C1, change colour, 3 scs in C2, change colour, 4 scs in C1, change colour, 1 sc
in C2. Ch1 and turn your work.
ROW 15:
1 sc in C2, change colour, 3 scs in C1, change colour, 4 scs in C2, change colour, 3 scs in C1,
change colour, 4 scs in C2, change colour, 2 scs in C1, change colour, 2 scs in C2, change
colour, 2 scs in C1, change colour, 4 scs in C2, change colour, 3 scs in C1, change colour, 4 scs
in C2, change colour, 3 scs in C1, change colour, 1 sc in C2. Change colour, ch1 and turn your
work.
ROW 16:
4 scs in C1, change colour, 4 scs in C2, change colour, 3 scs in C1, change colour, 14 scs in
C2, change colour, 3 scs in C1, change colour, 4 scs in C2, change colour, 4 scs in C1. Ch1 and
turn your work.
ROW 17:
4 scs in C1, change colour, 4 scs in C2, change colour, 4 scs in C1, change colour, 5 scs in C2,
change colour, 2 scs in C1, change colour, 5 scs in C2, change colour, 4 scs in C1, change
colour, 4 scs in C2, change colour, 4 scs in C1. Ch1 and turn your work.
ROW 18:
4 scs in C1, change colour, 5 scs in C2, change colour, 5 scs in C1, change colour, 2 scs in C2,
change colour, 5 scs in C1, change colour, 2 scs in C2, change colour, 4 scs in C1, change
colour, 5 scs in C2, change colour, 4 scs in C1. Ch1 and turn your work.
ROW 19:
4 scs in C1, change colour, 5 scs in C2, change colour, 8 scs in C1, change colour, 2 scs in C2,
change colour, 8 scs in C1, change colour, 5 scs in C2, change colour, 4 scs in C1. Ch1 and
turn your work.
ROW 20:
5 scs in C1, change colour, 5 scs in C2, change colour, 6 scs in C1, change colour, 4 scs in C2,
change colour, 6 scs in C1, change colour, 5 scs in C2, change colour, 5 scs in C1. Ch1 and
turn your work.
ROW 21:
6 scs in C1, change colour, 24 scs in C2, change colour, 6 scs in C1. Ch1 and turn your work –
move onto part 1B.
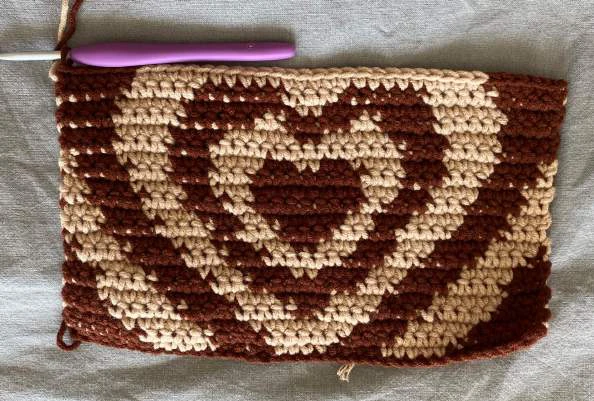
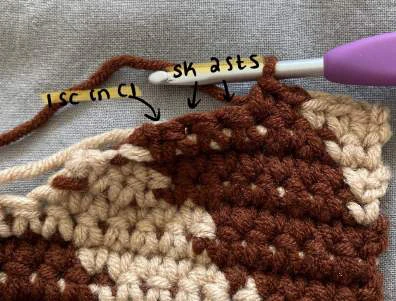
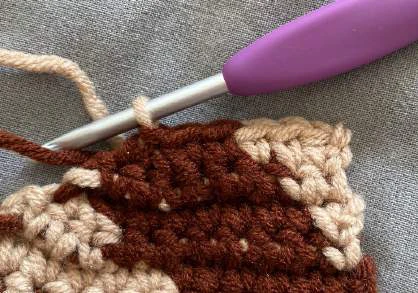
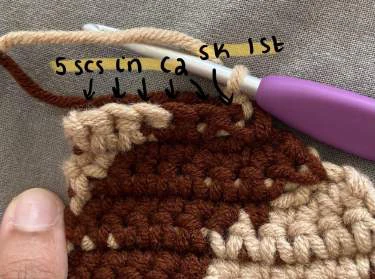
Part 1B: Making decreasing top section on first side
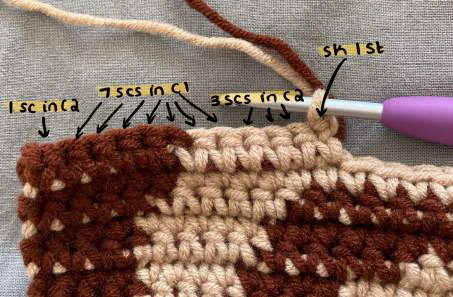
ROW 22:
6 scs in C1, change colour, 6 scs in C2. Ch1 and turn your work.
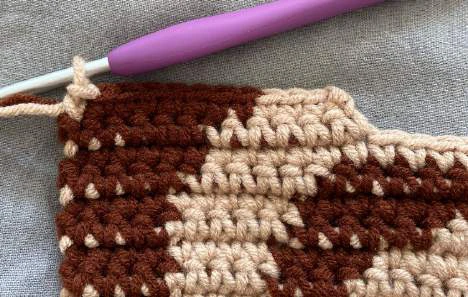
ROW 23:
Sk 1 st, 3 scs in C2, change colour, 7 scs in C1, change colour, 1 sc in C2. Ch1 and turn your
work.
ROW 24:
1 sc in C2, change colour, 7 scs in C1, sk 2 sts, 1 sc in C1. Ch1 and turn your work.
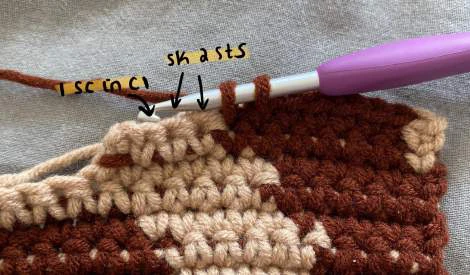
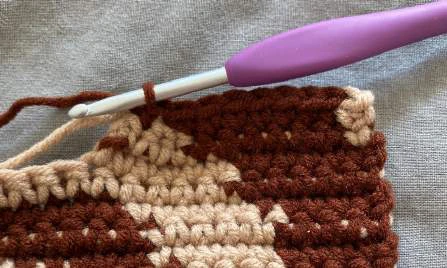
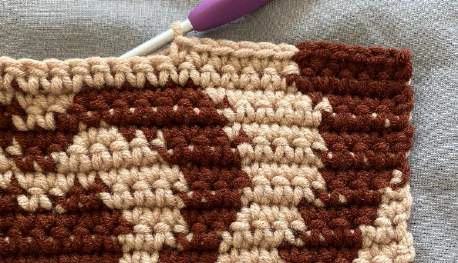
ROW 25:
Sk 1 st, 6 scs in C1, change colour, 2 scs in C2. Ch1 and turn your work.
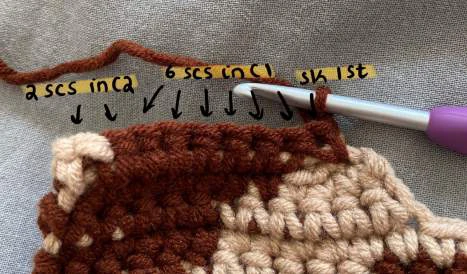
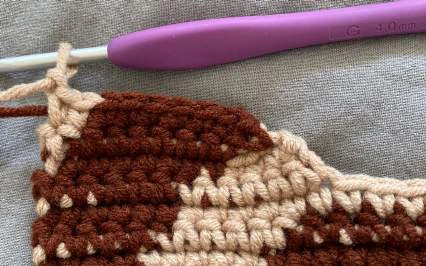
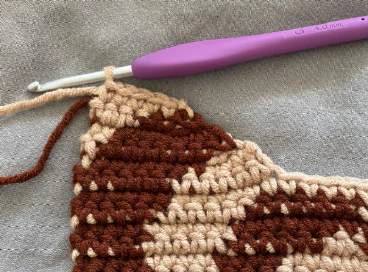
ROW 26:
3 scs in C2, change colour, 2 scs in C1, sk 2 sts, 1 sc in C1. Change colour, ch1 and turn your
work.
ROW 27:
Sk 1 st, 5 scs in C2. Ch1 and fasten off.
Part 1C: Making decreasing top section on other side
Attach your yarn in C1 to the other corner of your main body, ch1 and repeat ROW 22 – ROW 27
from part 1B.
One side of the main body of your bag is now complete. Repeat all the steps above one more
time to create the other side of your bag.
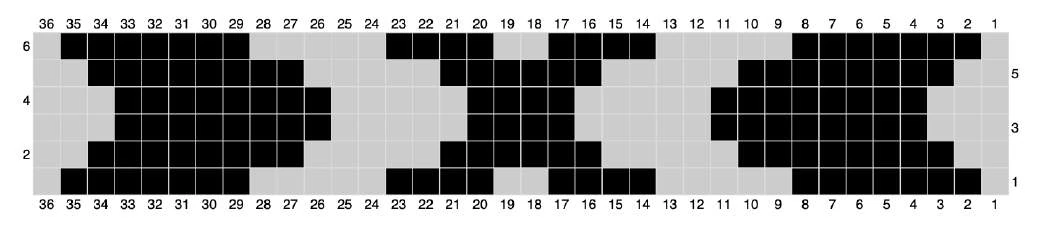
Part 2: Creating the base/bottom of the bag
Tapestry chart: P2
Chart legend: black = C1, grey = C2
Begin by chaining 37 in C2, then follow the chart. Once finished, ch1 and fasten off.
Written instructions: P2
Begin by chaining 37 in C2.
ROW 1: [note – place the first sc in the second ch from your hook]
1 sc in C2, change colour, 7 sc in C1, change colour, 5 sc in C2, change colour, 4 sc in C1,
change colour, 2 sc in C2, change colour, 4 sc in C1, change colour, 5 sc in C2, change colour,
7 sc in C1, change colour, 1 sc in C2. Ch1 and turn your work.
ROW 2:
2 sc in C2, change colour, 8 sc in C1, change colour, 5 sc in C2, change colour, 6 sc in C1,
change colour, 5 sc in C2, change colour, 8 sc in C1, change colour, 2 sc in C2. Ch1 and turn
your work.
ROW 3:
3 sc in C2, change colour, 8 sc in C1, change colour, 5 sc in C2, change colour, 4 sc in C1,
change colour, 5 sc in C2, change colour, 8 sc in C1, change colour, 3 sc in C2. Ch1 and turn
your work.
ROW 4:
3 sc in C2, change colour, 8 sc in C1, change colour, 5 sc in C2, change colour, 4 sc in C1,
change colour, 5 sc in C2, change colour, 8 sc in C1, change colour, 3 sc in C2. Ch1 and turn
your work.
ROW 5:
2 sc in C2, change colour, 8 sc in C1, change colour, 5 sc in C2, change colour, 6 sc in C1,
change colour, 5 sc in C2, change colour, 8 sc in C1, change colour, 2 sc in C2. Ch1 and turn
your work.
ROW 6:
1 sc in C2, change colour, 7 sc in C1, change colour, 5 sc in C2, change colour, 4 sc in C1,
change colour, 2 sc in C2, change colour, 4 sc in C1, change colour, 5 sc in C2, change colour,
7 sc in C1, change colour, 1 sc in C2. Ch1 and fasten off – the base of your bag is now
complete.
Part 3: Creating the strap of the bag
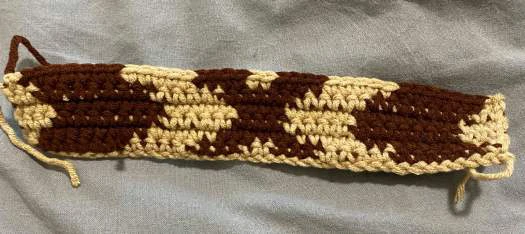
The instructions for the strap are split into 3 different parts – the first 27 rows, the middle 57 (or
more) rows, and the last 27 rows.
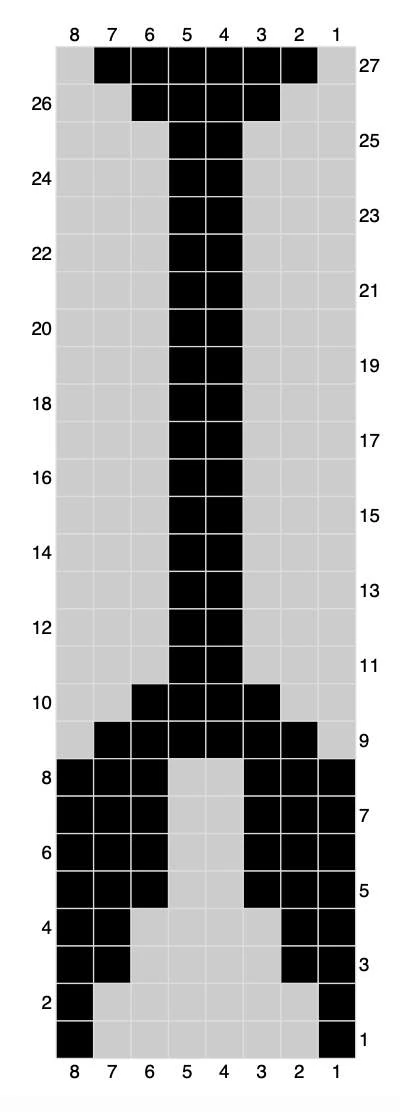
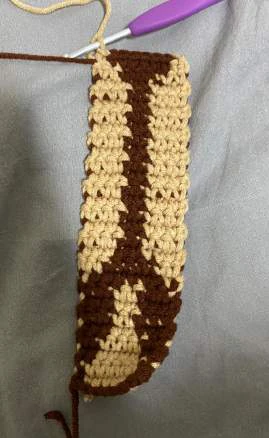
Part 3A: The first 27 rows of the strap
Tapestry chart: P3A
Chart legend: black = C1, grey = C2
Begin by chaining 9 in C1, and then follow the chart. Do NOT fasten off once you finish – move
onto part 3B.
Written instructions: P3A
Begin by chaining 9 in C1.
ROW 1 – ROW 2: [note – place the first sc of ROW 1 in the second ch from your hook]
1 sc in C1, change colour, 6 scs in C2, change colour, 1 sc in C1. Ch1 and turn your work.
ROW 3 – ROW 4:
2 scs in C1, change colour, 4 scs in C2, change colour, 2 scs in C1. Ch1 and turn your work.
ROW 5 – ROW 7:
3 scs in C1, change colour, 2 scs in C2, change colour, 3 scs in C1. Ch1 and turn your work.
ROW 8:
3 scs in C1, change colour, 2 scs in C2, change colour, 3 scs in C1. Change colour, ch1 and
turn your work.
ROW 9:
1 sc in C2, change colour, 6 scs in C1, change colour, 1 sc in C2. Ch1 and turn your work.
ROW 10:
2 scs in C2, change colour, 4 scs in C1, change colour, 2 scs in C2. Ch1 and turn your work.
ROW 11 – 25:
3 scs in C2, change colour, 2 scs in C1, change colour, 3 scs in C2. Ch1 and turn your work.
ROW 26:
2 scs in C2, change colour, 4 scs in C1, change colour, 2 scs in C2. Ch1 and turn your work.
ROW 27:
1 sc in C2, change colour, 6 scs in C1, change colour, 1 sc in C2. Change colour, ch1 and turn
your work (do NOT fasten off – move onto part 3B). If you’d like, add a stitch marker to mark this
row – this may make it easier when attaching the strap to the main body, however it’s not
absolutely not compulsory.
Part 3B: The middle 57 (or more) rows of the strap
Tapestry chart: P3B
Chart legend: black = C1, grey = C2
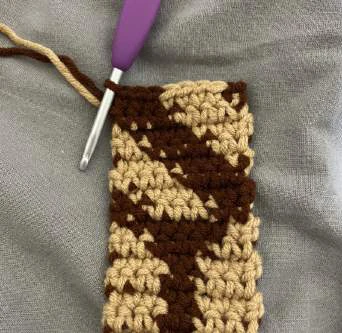
Repeat rows 1-8 a total of 7 times (or as many times as you’d like, if you want a longer strap –
just ensure to repeat a full set of the 8 rows). After you’ve done this, repeat the pattern for the
first row one more time but this time, change colour at the end of the row. Do NOT fasten off yet
– move onto part 3C.
Written instructions: P3B
ROW 1:
2 scs in C1, change colour, 4 scs in C2, change colour, 2 scs in C1. Ch1 and turn your work.
ROW 2:
3 scs in C1, change colour, 4 scs in C2, change colour, 1 sc in C1. Change colour, ch1 and turn
your work.
ROW 3:
4 scs in C2, change colour, 4 scs in C1. Change colour, ch1 and turn your work.
ROW 4:
1 sc in C2, change colour, 4 scs in C1, change colour, 3 scs in C2. Ch1 and turn your work.
ROW 5:
2 scs in C2, change colour, 4 scs in C1, change colour, 2 scs in C2. Ch1 and turn your work.
ROW 6:
3 scs in C2, change colour, 4 scs in C1, change colour, 1 sc in C2. Change colour, ch1 and turn
your work.
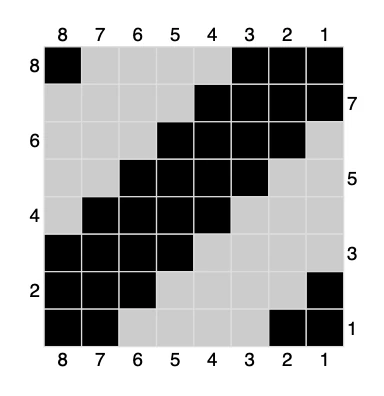
ROW 7:
4 scs in C1, change colour, 4 scs in C2. Change colour, ch1 and turn your work.
ROW 8:
1 sc in C1, change colour, 4 scs in C2, change colour, 3 scs in C1. Ch1 and turn your work.
ROW 9 – ROW 56: Repeat ROW 1 – ROW 8 six more times, for a total of 7 sets. If you’d like a
longer strap, feel free to repeat these rows as many times as you’d like, just make sure to do a
repeat of all 8 rows.
ROW 57: 2 scs in C1, change colour, 4 scs in C2, change colour, 2 scs in C1. Change colour,
ch1 and turn your work.
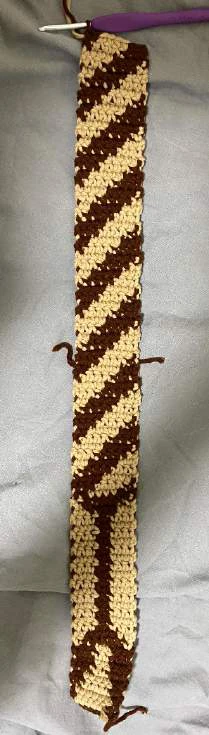
Part 3C: The last 27 rows of the strap
Tapestry chart: P3C
Chart legend: black = C1, grey = C2
We will now just be working the chart from part 3A in reverse. Once you finish, ch1 and fasten
off -your strap is now complete!
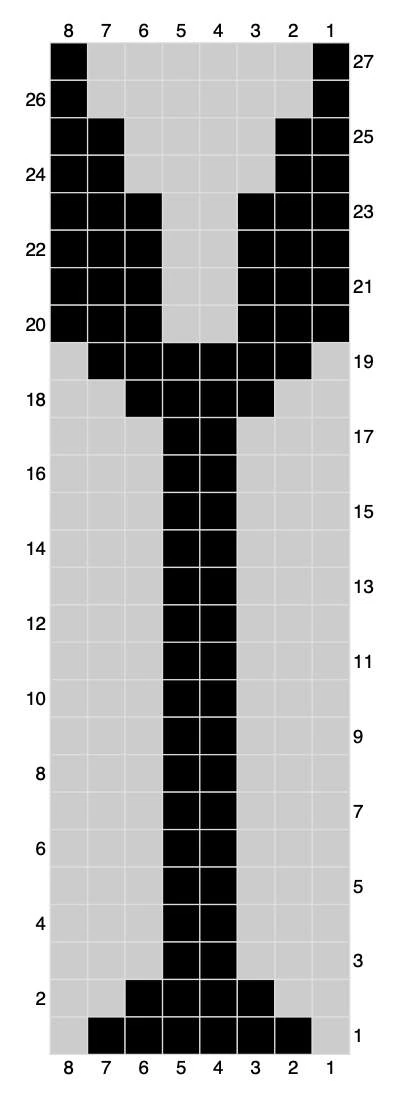
Written instructions: P3C
We will now just be working the instructions from part 3A in reverse.
ROW 1:
1 sc in C2, change colour, 6 scs in C1, change colour, 1 sc in C2. Ch1 and turn your work. If
you’d like, add a stitch marker to mark this row – this may make it easier when attaching the
strap to the main body, however it’s not absolutely not compulsory.
ROW 2:
2 scs in C2, change colour, 4 scs in C1, change colour, 2 scs in C2. Ch1 and turn your work.
ROW 3 – ROW 17:
3 scs in C2, change colour, 2 scs in C1, change colour, 3 scs in C2. Ch1 and turn your work.
ROW 18:
2 scs in C2, change colour, 4 scs in C1, change colour, 2 scs in C2. Ch1 and turn your work.
ROW 19:
1 sc in C2, change colour, 6 scs in C1, change colour, 1 sc in C2. Change colour, ch1 and turn
your work.
ROW 20 – ROW 23:
3 scs in C1, change colour, 2 scs in C2, change colour, 3 scs in C1. Ch1 and turn your work.
ROW 24 – ROW 25:
2 scs in C1, change colour, 4 scs in C2, change colour, 2 scs in C1. Ch1 and turn your work.
ROW 26 – ROW 27:
1 sc in C1, change colour, 6 scs in C2, change colour, 1 sc in C1. Ch1 and fasten off – your strap
is now complete.
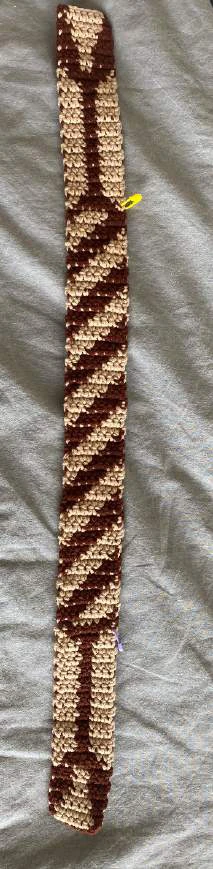
Part 4: Attaching the pieces of the bag together
Now that all 4 pieces of your bag are ready – the two sides of the main body, the base, and the
strap – we can begin to attach them together.
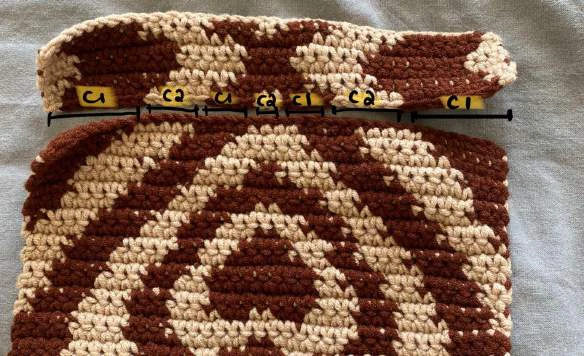
First we will work on attaching the two sides of the bag to the base.
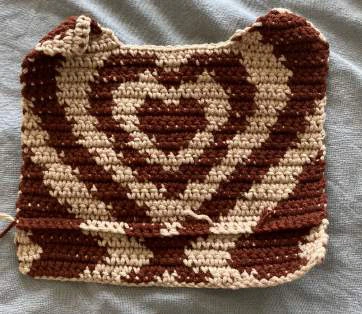
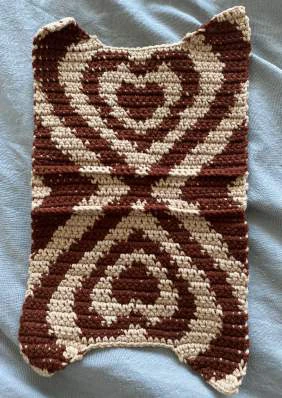
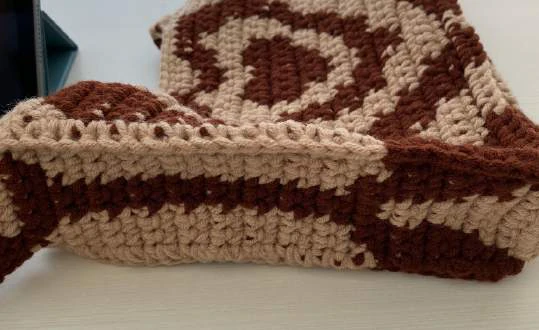
Align the base of the bag and one side of the main body as shown in the image below. Attach
yarn in C1 through the corner of both pieces, and ch1. We will now be placing scs through both
layers to attach the two pieces. You’re welcome to just place scs in C1 as you go along, or you
can change colours in line with the way the colours change along the first row of the base as
shown in the pictures that follow (please refer to ROW 1 of the base instructions for the stitch
count if you’d like to be exact, but just doing it approximately works just as well).
Honestly, it won’t make a massive difference either way! For a little more perfection the second
way works, but otherwise just going with one colour is probably easier and will work just fine as
well.
Once you’ve placed scs all the way along the two pieces, ch1 and fasten off.
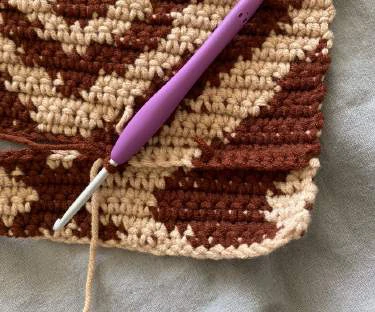
Repeat these steps to attach the other side of the bag to the base.
We will now work to attach the strap to the bag. First we will attach the base of the strap to the
base of the bag – to do so, attach yarn in C2 through both corners of the base and strap and
ch1. Place scs in C2 through both layers as you go along – note there won’t be exact stitches to
go through, just place the scs wherever you find a space, and try your best to keep it straight
and aligned. Once you’ve reached the end of the base of the bag and strap, ch1 and fasten off.
Now that we’ve attached the strap to the bottom of our bag, we’ll attach one side of the strap to
one side of the main body, then to the other.
Begin by attaching yarn in C1 by going through both the bottom corner of the strap and the bag
as shown in the following picture.
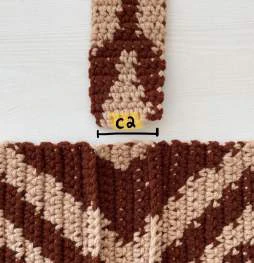
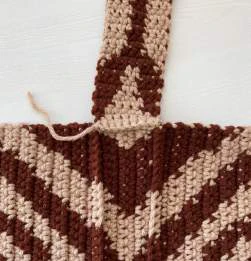
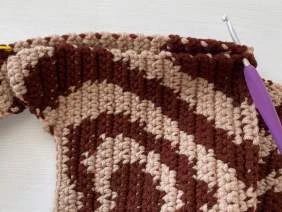
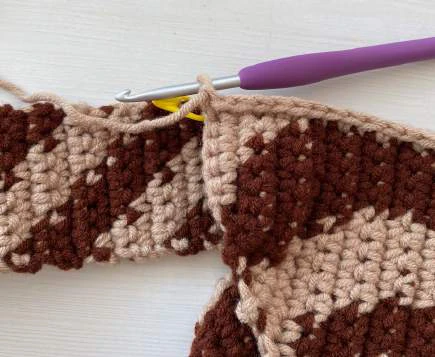
To attach these two pieces, we will once again be placing scs through both layers. Again, you
can choose to place scs only in C1, or change colours as shown below. Remember – it won’t
make too much of a difference, so if you feel a little unsure about changing colours, don’t worry
about it and just stick to C1. As you go along, try to align the top of your bag to the 27th row of
the strap – where you might have placed a stitch marker previously. Once you reach the top of
the bag and the stitch marker, ch1 and fasten off.
Now that the strap is attached to the bottom and to one side of the main body, repeat the
previous few steps to attach the strap to the other side of the main body.
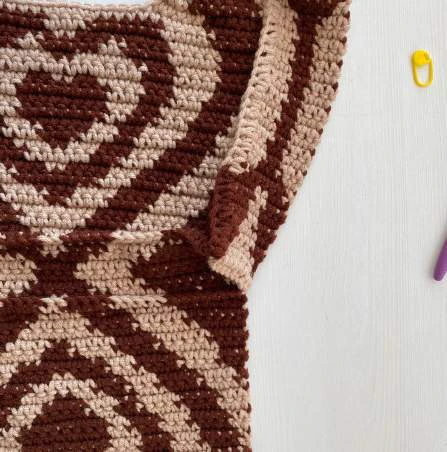
Now the strap is fully attached to one side of your bag! Repeat all the previous steps to attach
the strap to the other side of the bag – make sure you don’t twist the strap as you bend it over to
reach the other side of the base.
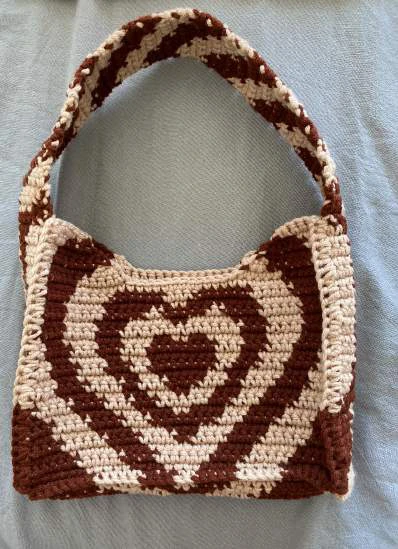
Once you’ve finished attaching the strap to your bag, turn it inside out to hide the seams where
we’ve attached the pieces together.
Part 5: Adding the final edging
To finish the bag off, we will be adding a trim in C1 along both sides of the bag. This step is
optional, but I’d highly recommend it as it’s quite simple and will give your bag a much cleaner
look!
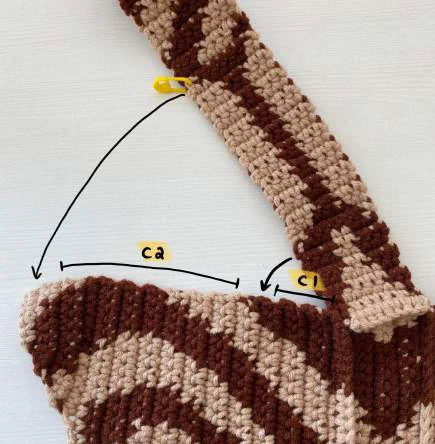
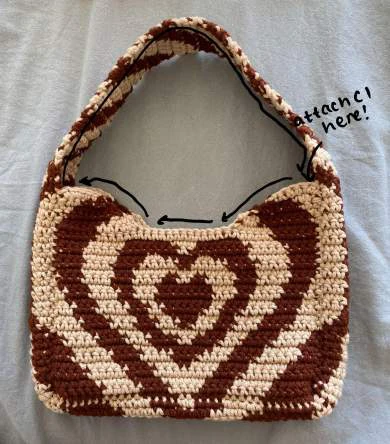
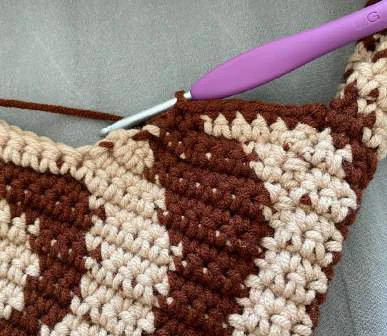
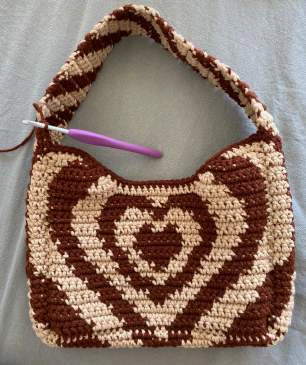
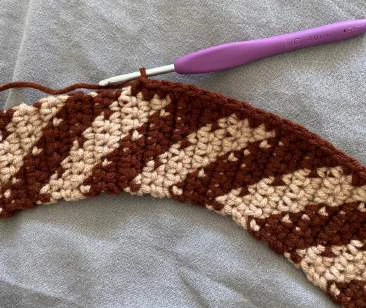
Begin by attaching your yarn in C1 as shown in the diagram below, and ch1. We will now be
placing scs in C1 all along the top of the bag and along one side of the strap, following the flow
shown in the picture below. Do note that you won’t always have exact stitches to place your scs
in – just place them wherever you find a space! Once you’ve gone all the way around, and
reached the first sc you made again (where you attached the yarn), ss into this first sc, ch1 and
fasten off.
Now that we’ve finished the trim along one side, repeat these steps to add the trim to the other
side of your bag.
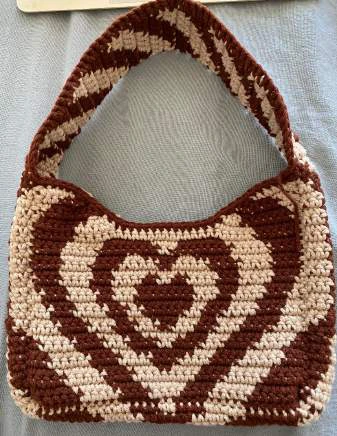
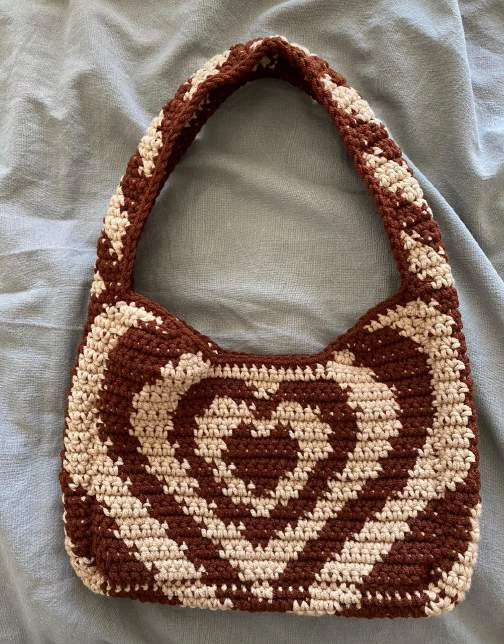
Your powerpuff heart shoulder bag is now complete!
Recommended Digital Products
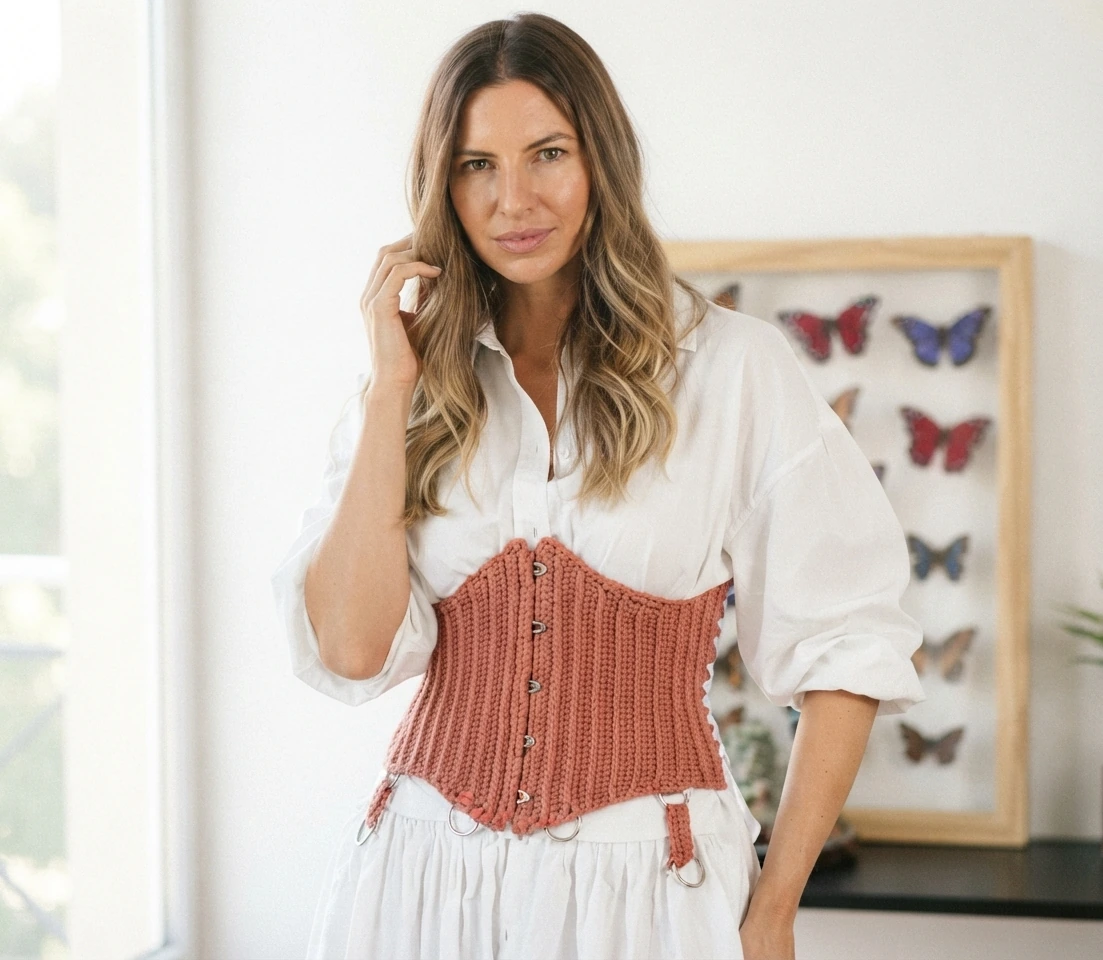
Handmade Crochet Corset Belt Pattern Boho Chic Waist Cincher with Busk & Ribbon Lacing Intermediate Crochet PDF Pattern
$4.99
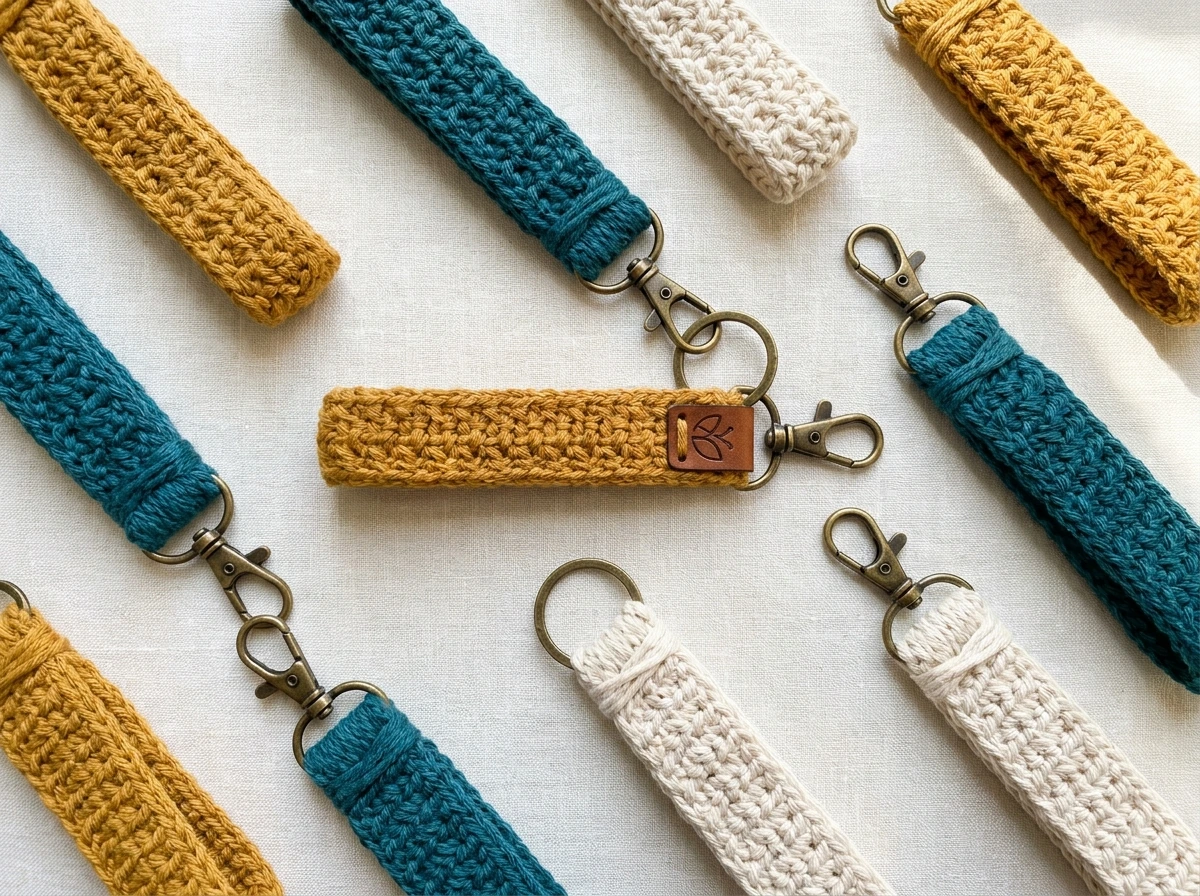
The Highline Wristlet Keychain Crochet Pattern: Quick, Textured & Market-Ready Accessory
$3.99

The Ultimate Beginner’s Crochet Guide: Master 45+ Essential Techniques & Practical Projects
$5.99

From Loop to Perfection: The Ultimate Step-by-Step Crochet Master Guide
$9.99
Get this Crochet Pattern as a Free PDF
Enter your email to receive the PDF associated with this article.
Leave a Reply