
Frog door stopper
CROCHET FROG DOOR-STOPPER
MATERIALS NEEDED
Worsted Yarn – any #4 yarn
– green = one skein is plenty
– black / white / red = very little amts
Safety eyes – 10 mm
Stuffing
Stuffing Beads for weight
Nylon stocking / mesh bag for beads
G Hook
Measuring tape
Scissors / Darning Needle
Stitch markers
2 round buttons, size 2 1/4” OR thick
cardboard cut out to that size – used in mouth
to keep flat
STITCHES – US TERMS
Ch – Chain
Sc – Single Crochet
Hdc – Half Double Crochet
Slip Stitch – not abbreviated
( # ) – number of stitches in row
BLO – back loop
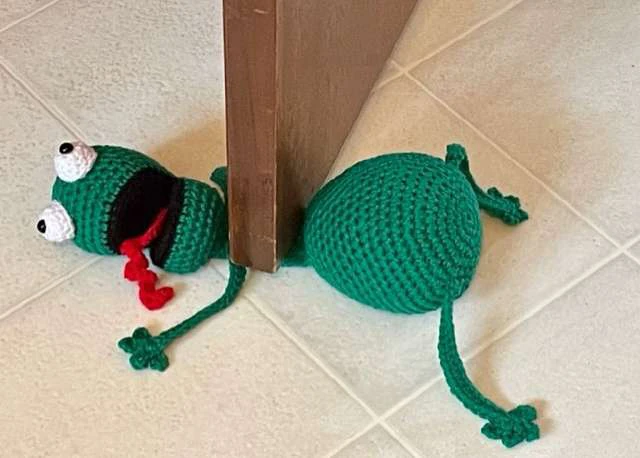
INSTRUCTIONS FOR CROCHET FROG DOOR-STOPPER
****PATTERN ONLY****
TOP OF HEAD – working in ROUNDS
ROW 1
With black yarn, use the magic circle method if you choose OR chain 2
and single crochet 6 in first chain space (6)
ROW 2
(increase row) sc 2x in each stitch from row one
*inc x 6* around (12)
ROW 3
(increase row) sc 2x in first stitch then (once) 1sc in next stitch,
*inc then 1sc* around (18)
ROW 4
(increase row) sc 2x in first stitch then 1sc in next 2 stitches
*inc, 1sc, 1sc* around (24)
ROW 5
(increase row) sc 2x in first stitch then 1sc in next 3 stitches
*inc, 1sc, 1sc, 1sc * around (30)
CHANGE TO GREEN YARN
ROW 6
BACK LOOP for this row only
sc around each stitch (no increasing) (30)
ROW 7
sc around each stitch (no increasing) (30)
ROW 8
sc around each stitch (no increasing) (30)
ROW 9
sc around each stitch (no increasing) (30)
ROW 10
sc around each stitch (no increasing) (30)
ROW 11
sc around each stitch (no increasing) (30)
insert button here or cutout cardboard piece to keep flat – secure it if you choose, I
secured my button by sewing it on with the final knot inside so you can't see it from the
outside
ROW 12
(decrease row) 1sc in next 2 stitches then decrease
*1sc, 1sc, dec * x 7
sc in last 2 stitches (23)
ROW 13
(decrease row) 1sc in next 2 stitches then decrease
*1sc, 1sc, dec * x 5
dec and 1sc in last 3 stitches (17)
ROW 14
sc around each stitch (no dec / inc) (17)
insert bead bag here for weight before it gets too small of an opening
**you will be putting regular stuffing to finish off the “stuffing of the head” after the bean
bag. Keep stuffing as we decrease. If your stitching is loose and you see the white stuffing
or bean bag, you can also use the same colour green yarn to stuff it. We are not using too
much yarn so it's not a big expense to use yarn to stuff the head**
ROW 15
(decrease row) decrease then 1sc
*dec and 1sc * x 5 then one more decrease (11)
ROW 16
(decrease row) decrease x 5 then sc in last stitch
*dec x5 * then 1sc (6)
ROW 17
cinch last 6 stitches together tightly and finish off
BOTTOM OF HEAD – working in ROUNDS
ROW 1
With black yarn, use the magic circle method if you choose OR chain 2
and single crochet 6 in first chain space (6)
ROW 2
(increase row) sc 2x in each stitch from row one
*inc x 6* around (12)
ROW 3
(increase row) sc 2x in first stitch then (once) 1sc in next stitch,
*inc then 1sc* around (18)
ROW 4
(increase row) sc 2x in first stitch then 1sc in next 2 stitches
*inc, 1sc, 1sc* around (24)
ROW 5
(increase row) sc 2x in first stitch then 1sc in next 3 stitches
*inc, 1sc, 1sc, 1sc * around (30)
CHANGE TO GREEN YARN
ROW 6
BACK LOOP for this row only
sc around each stitch (no increasing) (30)
ROW 7
sc around each stitch (no increasing) (30)
ROW 8
sc around each stitch (no increasing) (30)
ROW 9
sc around each stitch (no increasing) (30)
insert button / cardboard piece
**I recommend using green yarn to stuff the remainder of the bottom of the head**
ROW 10
(decrease row) *dec, 1sc * x 10 (20)
ROW 11
(decrease row) *dec, 1sc * x 10 (10)
ROW 12
cinch the remainder 10 stitches tightly, finish off
TONGUE – using RED yarn
Chain 25, turn, 3sc in first chain from hook, sc in next chain, repeat until there is 5 chains
remaining. SC in last 5 chains. Finish off
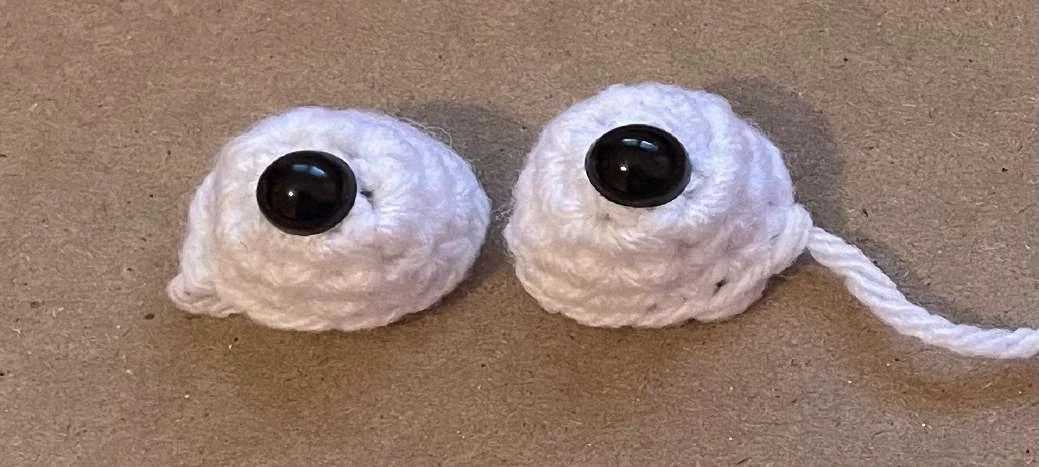
EYES – using WHITE yarn, make 2
ROW 1
using the magic circle OR chain 2 and sc x5 in first chain space
ROW 2
(increase row) 2sc in each stitch (10)
ROW 3
sc around (10)
ROW 4
sc around (10)
finish off
INSERT safety eyes in the top of the eyes made. When using the chain 2 method you end up
with a tiny “hole” in the top of the eyes perfect for inserting the safety eyes. No they are not
too big for the safety eyes to fall out if secured properly
BODY OF FROG – working in ROUNDS – green yarn
ROW 1
Using the magic circle method if you choose OR chain 2
and single crochet 6 in first chain space (6)
ROW 2
(increase row) sc 2x in each stitch from row one
*inc x 6* around (12)
ROW 3
(increase row) sc 2x in first stitch then (once) 1sc in next stitch,
*inc then 1sc* around (18)
ROW 4
(increase row) sc 2x in first stitch then 1sc in next 2 stitches
*inc, 1sc, 1sc* around (24)
ROW 5
(increase row) sc 2x in first stitch then 1sc in next 3 stitches
*inc, 1sc, 1sc, 1sc * around (30)
ROW 6
(increase row) sc 2x in first stitch then 1sc in next 4 stitches
*inc, 1sc, 1sc, 1sc, 1sc * around (36)
ROW 7
(increase row) sc 2x in first stitch then 1sc in next 5 stitches
*inc, 1sc, 1sc, 1sc, 1sc, 1sc * around (42)
ROW 8
(increase row) sc 2x in first stitch then 1sc in next 6 stitches
*inc, 1sc, 1sc, 1sc, 1sc, 1sc, 1sc * around (48)
ROW 9
sc around (48)
ROW 10
sc around (48)
ROW 11
sc around (48)
ROW 12
(decrease row) dec then 1sc in next 6 stitches
*dec, 1sc, 1sc, 1sc, 1sc, 1sc, 1sc * 6x (42)
ROW 13
sc around (42)
ROW 14
(decrease row) dec then 1sc in next 5 stitches
*dec, 1sc, 1sc, 1sc, 1sc, 1sc * 6x (36)
ROW 15
sc around (36)
ROW 16
sc around (36)
ROW 17
sc around (36)
ROW 18
(decrease row) dec then 1sc in next 4 stitches
*dec, 1sc, 1sc, 1sc, 1sc * 6x (30)
ROW 19
sc around (30)
ROW 20
sc around (30)
** start stuffing body as we'll be decreasing more and more. You can also insert another
bean bag here for weight as well. My stitching is on the tighter side so I didn't need to
use yarn to stuff the body here. You can – it's ok **
ROW 21
(decrease row) dec then 1sc in next 3 stitches
*dec, 1sc, 1sc, 1sc * 6x (24)
ROW 22
(decrease row) dec then 1sc in next 2 stitches
*dec, 1sc, 1sc * 6x (18)
ROW 23
(decrease row) dec then 1sc
*dec, 1sc * 6x (12)
ROW 24
decrease around x 6 (6)
ROW 25
cinch around last 6 stitches and finish off
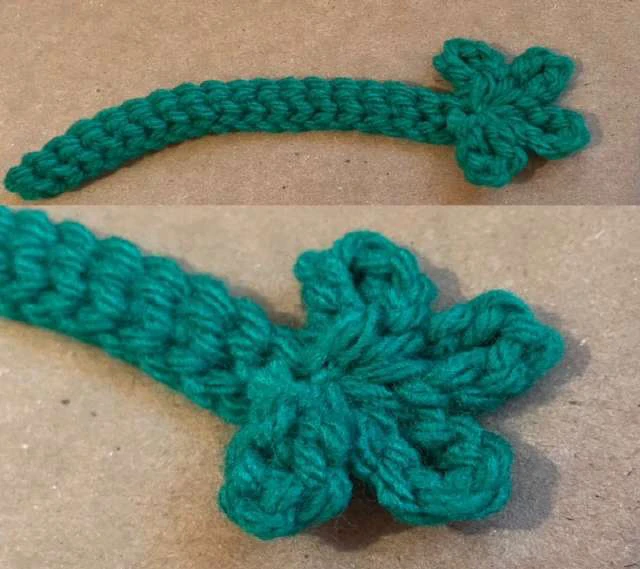
ARMS AND LEGS – make 2 of each – green yarn
Chain 21, turn
sc in chain closest to hook (20)
once at the end – do not finish off – chain 6 and slip stitch to the first chain, repeat that 3
more times to end up with 4 “finger / toes”
finish off after the 4th slip stitch. Sometimes there will be a small hole where you did
you slip stitches, sew up with the yarn tails once you have finished off
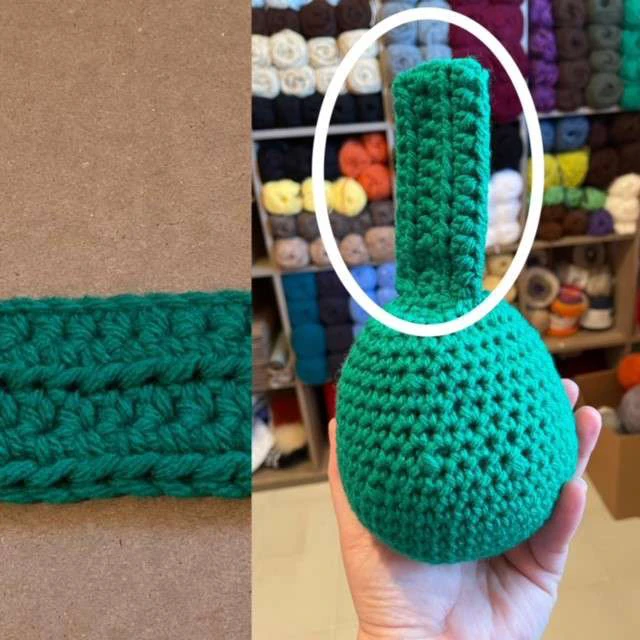
NECK – green yarn (works out to approx 6” before folding)
Chain 27, turn
HDC starting in 2nd chain from hook (25)
HDC 4 more rows
Since the neck is constantly on the floor, I have made it this long so that I can fold over to make
it thicker – sew up the sides; sewing up the bottom not so important as we will be attaching this
to the body.
NOW THAT YOU ALL THE PARTS MADE – LETS PUT TOGETHER !!
FIRST
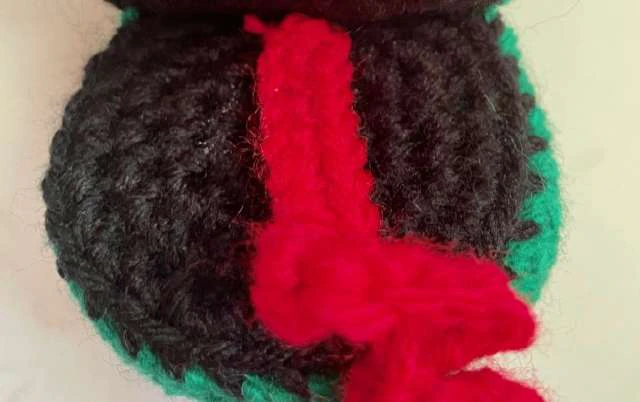
Sew the tongue to the back of the bottom of head. Sew it up to the centre of the
black circle so it doesn't move that much
SECOND
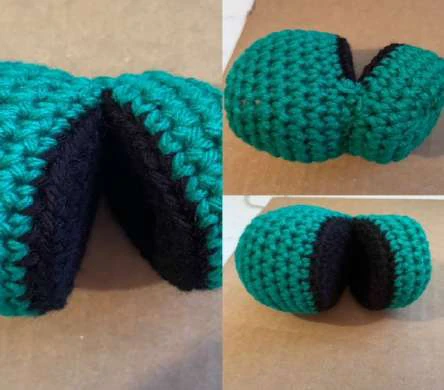
you will now be sewing the top and bottom parts of the head together. You will
only sew it over 10 stitches as you want to make sure the, now mouth, works.
Shown without the tongue attached as I was crazy before I put the head together and didn't sew
the tongue in first – that's why I know you should and I've instructed you to do this 🙂
THIRD step
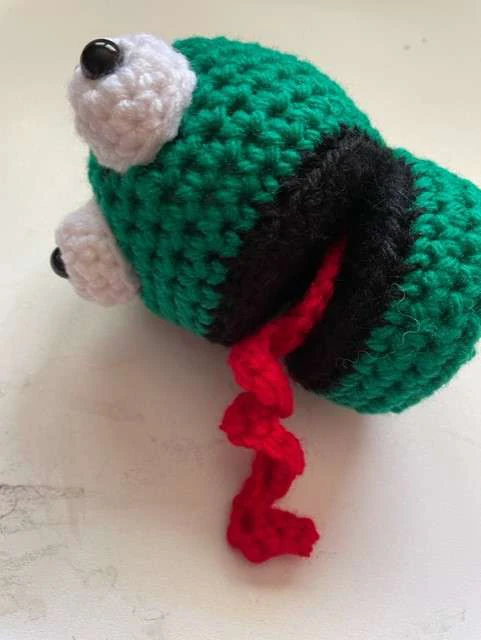
Attach eyes to top of head
FORTH step
Lets sew the legs onto the frog body. Place them on the bottom of the larger part
of the body.
As well, lets sew the neck onto the top of the body.
FIFTH step
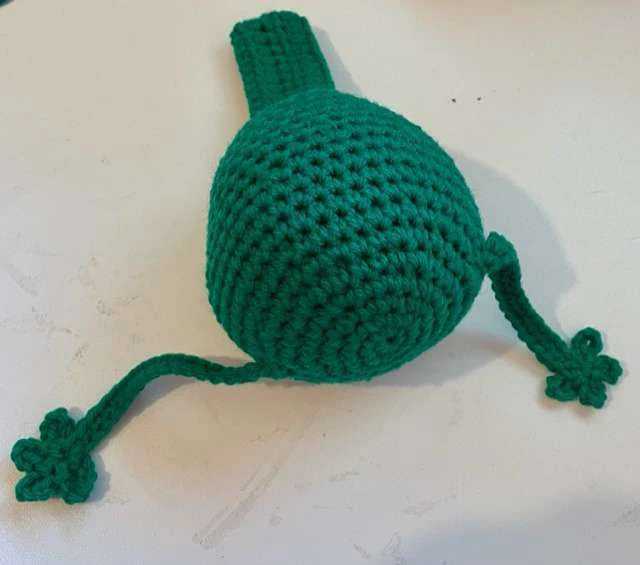
Sew the arms onto the neck. Place them about a half inch from the top of the
neck as we still have to sew the neck and head together
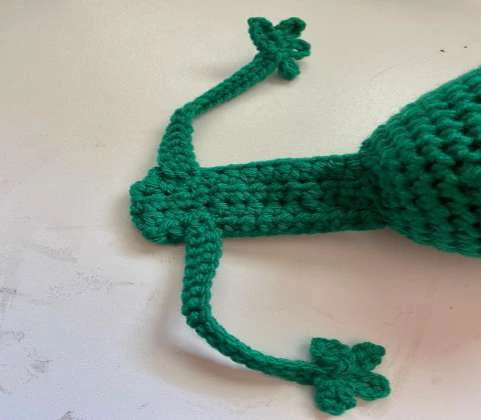
SIXTH step
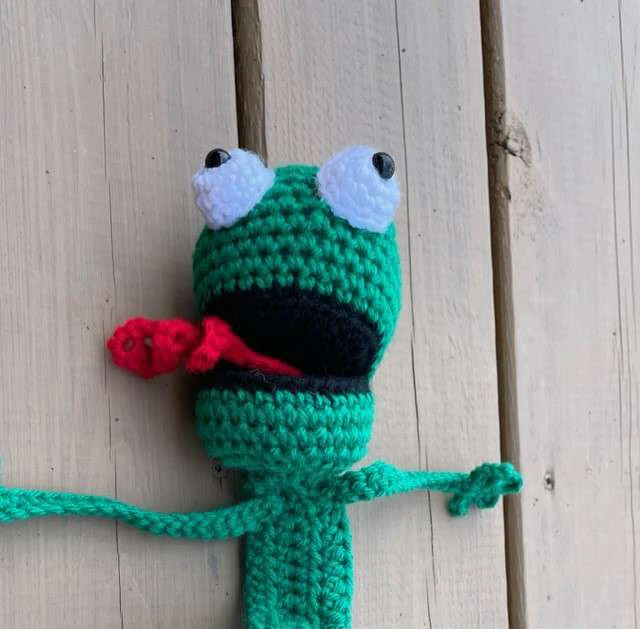
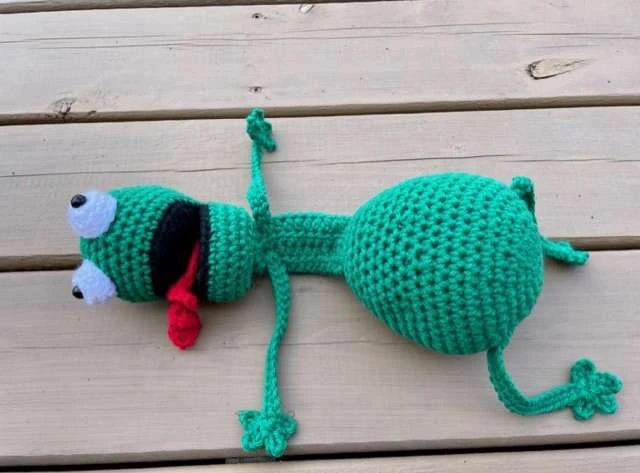
We're here – lets sew the neck onto the bottom of the head – in the middle
WE ARE DONE !!
Recommended Digital Products

The Ultimate Beginner’s Crochet Guide: Master 45+ Essential Techniques & Practical Projects
$5.99

From Loop to Perfection: The Ultimate Step-by-Step Crochet Master Guide
$9.99
The Ultimate Crochet Handbook: Essential Techniques, Color Theory & 80+ Step-by-Step Patterns
$19.99
Master the Art of Crochet from Scratch – Ultimate Digital Guide with 8 Step-by-Step Projects!
$19.99
Get this Crochet Pattern as a Free PDF
Enter your email to receive the PDF associated with this article.
Leave a Reply