
Cosmopolitan Gloves
COSMOPOLITAN GLOVES
– A CROCHET PATTERN –
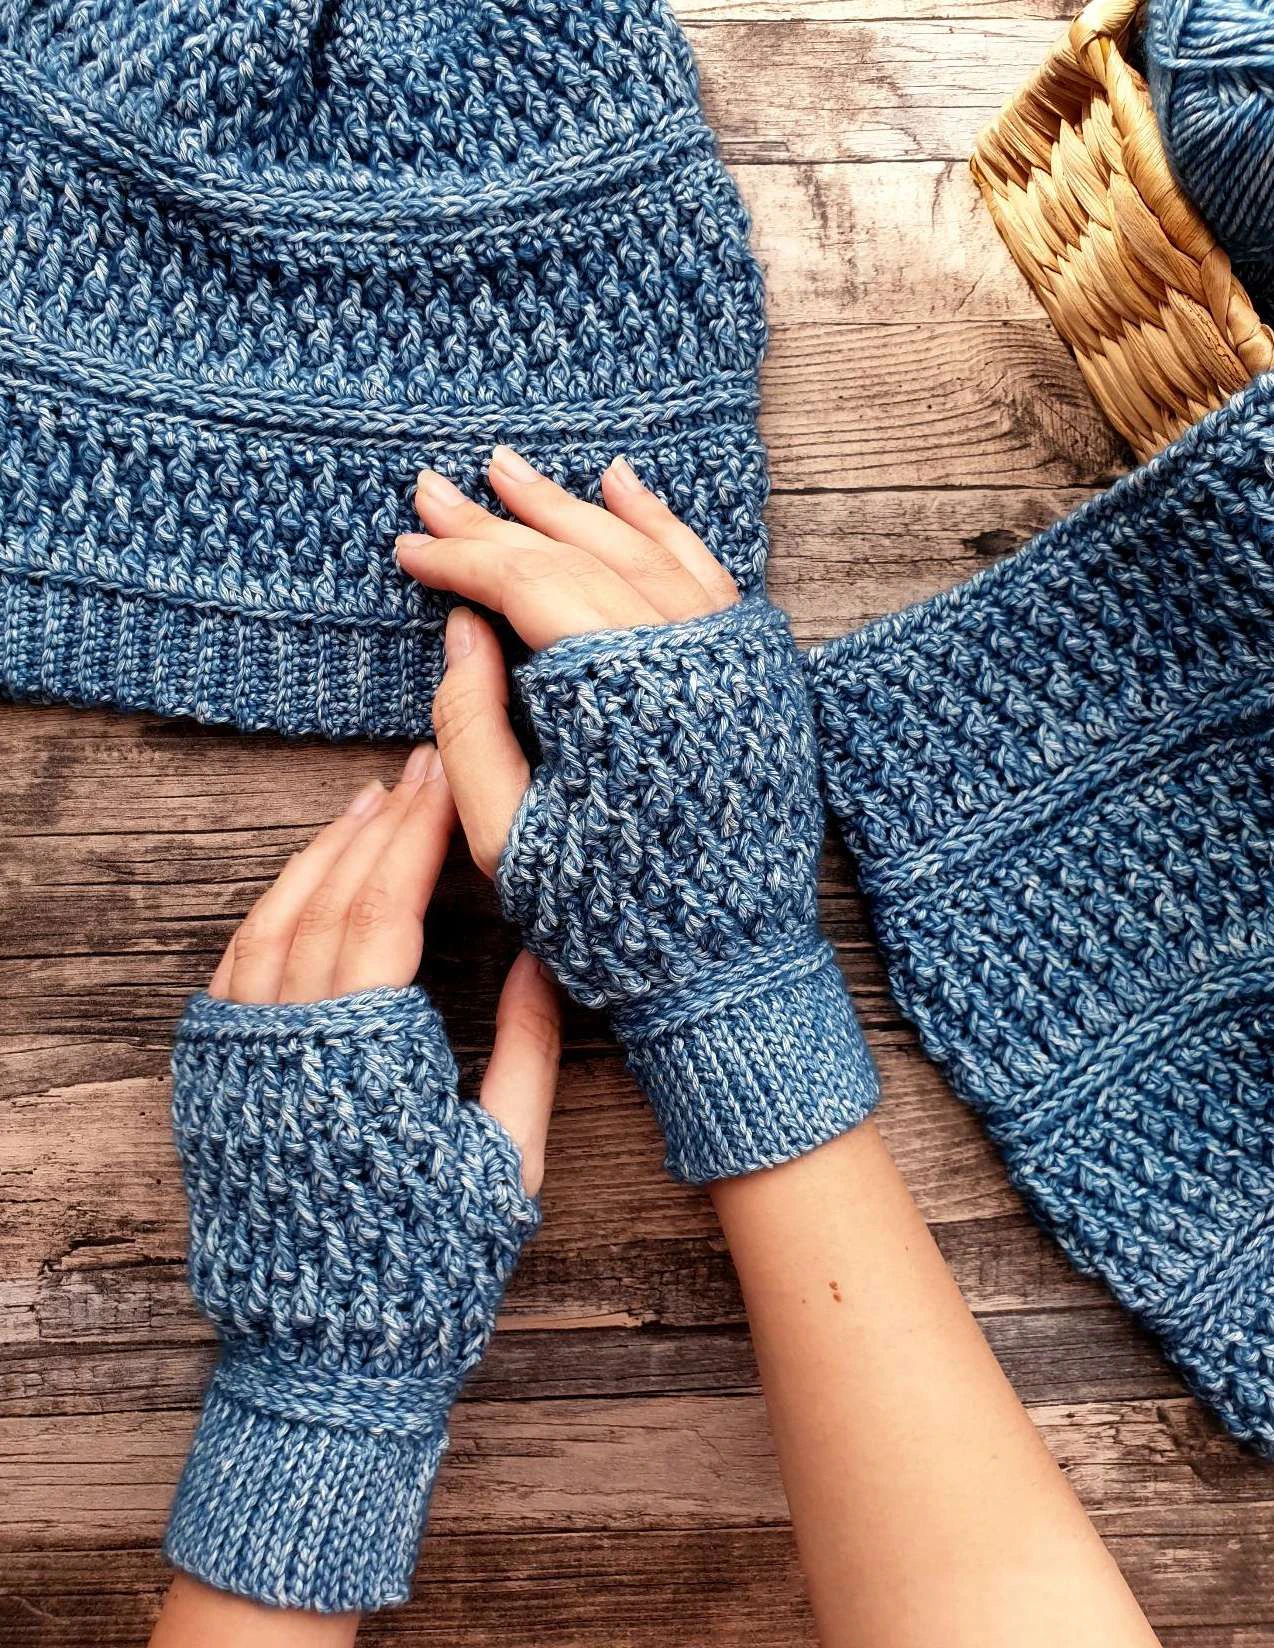
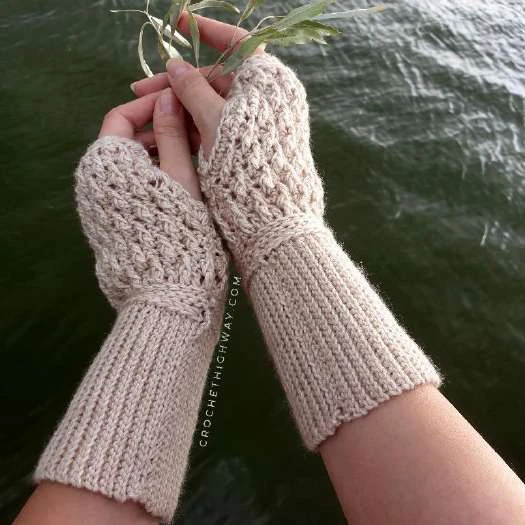
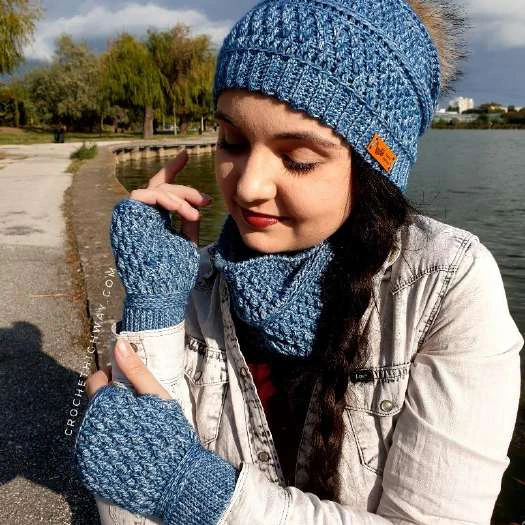
Keep your hands warm in style with these chic and customizable fingerless gloves and get used to
the praise and admiration when you let people know that yes, you made them yourself! The
stretchy yet sturdy ribbed cuff will gently hug your wrists while the ever-so-beautiful alpine stitch
will truly make you stand out from the crowd. Make yourself and your little ones a pair or two, or
stock up for your next craft fair – a pair will only take you a couple of hours to make!
CONTENTS
Pattern notes ……………………………………………………………………………………………………………………………………………………………………… 4
Written instructions ………………………………………………………………………………………………………………………………………………………….6
Adjustment ideas …………………………………………………………………………………………………………………………………………………………..9
Consolidated pattern ……………………………………………………………………………………………………………………………………………………… 10
About the designer …………………………………………………………………………………………………………………………………………………………. 12
PATTERN NOTES
The glove has a fitted construction with 0 to 2 cm (0 to .75”) of negative ease around the wrist and
knuckles. We first crochet the cuff using slip stitches in the back loop only for a stretchy yet thick and
durable ribbing, then we continue working the glove flat in turned rows. We then fold the glove in half
and join it at the sides, leaving an opening for the thumb. A round of single crochet stitches is added
around the opening for the thumb.
Level of difficulty: Intermediate.
It’s very important to work slip stitches loosely.
CH 1 and CH 2 do not count as stitches.
Materials Needed
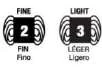
Yarn: CYC 2 fine / sport / baby or CYC 3 DK / light weight yarn.
Sample shown uses Stonewashed by Scheepjes (sport weight), but you can substitute any
sport or DK weight yarn you can meet gauge with. Testers have also tried out this pattern in
fingering weight with great results.
Hook: 3.5mm for cuff and 5mm for body, or sizes needed to obtain gauge.
Notions: Tape measure, scissors, darning needle, 2 stitch markers.
Sizing, Finished Measurements
Sizes are written as follows: 1 (2, 3, 4, 5) and correspond to toddler (child, adult S, M, L). The glove sizing
is based on the hand circumference taken around the palm of your hand, just beneath the knuckles
(don’t include the thumb in the measurement) and fits a hand of 13 (15, 18, 20, 22) cm / 51⁄8 (6, 7, 77⁄8, 85⁄8)”.
The wrist circumference is intentionally left out since you will make the cuff long enough to fit your wrist.
Glove measurements (short cuff)
Glove measurements (extended cuff)
Total length
8.25 (10.5, 13.5, 15.25, 16.5) cm
Total length
12.75 (15.75, 20, 21.25, 23.25) cm
3¼ (41⁄8, 53⁄8, 6, 6½)”
5 (6¼, 77⁄8, 83⁄8, 91⁄8)”
Cuff length
3 (3, 3.5, 4, 4) cm
Cuff length
7.5 (8.25, 9, 9.75, 10.5) cm
11⁄8 (11⁄8, 13⁄8, 1½, 1½)”
3 (3¼, 3½, 37⁄8, 41⁄8)”
Yardage
Size
Short cuff
Extended cuff
55 m / 60 yds
92 m / 100 yds
64 m / 70 yds
100 m / 110 yds
124 m / 135 yds
165 m / 180 yds
140 m / 153 yds
200 m / 220 yds
150 m / 164 yds
215 m / 235 yds
Gauge
Cuff: 13.5 STS and 20 rows = 5 cm (2”) in bloSLST using
3.5mm/smaller hook
Body: 16 STS and 16 rows = 10 cm (4”) in alpine stitch using
5mm/main hook (see photo tutorial here)
Stitches & Abbreviations (standard US terminology)
ST(S)
stitch (stitches)
CH
chain
SC
single crochet
DC
double crochet
SL ST
slip stitch
BLO
back loop only
bloDC
DC worked in the back loop only
bloSLST
SL ST worked in the back loop only
bloDC2TOG
DC worked 2 together in the back loop only
SK
skip, skipped
YO
yarn over
RS
right side
WS
wrong side
PM
place marker
prev
previous
rem
remaining, remain, remains
sp(s)
space (spaces)
beg
beginning
PERSONAL NOTES
I’m making size:
……………………………………………………………….………
Yarn brand:
……………………………………………………………….………
Hook(s) used:
……………………………………………………………….………
Total yardage:
……………………………………………………………….………
Finished measurements:
……………………………………………………………….………
Other notes:
……………………………………………………………….………
……………………………………………………………….………
……………………………………………………………….………
……………………………………………………………….………
……………………………………………………………….………
……………………………………………………………….………
……………………………………………………………….………
……………………………………………………………….………
……………………………………………………………….………
……………………………………………………………….………
……………………………………………………………….………


WRITTEN INSTRUCTIONS
CUFF (3.5MM HOOK)
The short and extended cuffs only differ in terms of the length of the foundation chain. Work rows
marked A for the short cuff, or rows marked B for the extended cuff. The foundation chain can be made
shorter or longer, as per preference.
Note: Work SL STS loosely. Leave a long beg tail to use for joining later.
Row 1A (short cuff): CH 9 (9, 10, 11, 11), working in the top loop of CH, SL ST in 2nd CH from hook and in
each CH across. Turn. (8, 8, 9, 10, 10 SL ST)
Row 2A: CH 1, bloSLST in each SL ST across. Turn. (8, 8, 9, 10, 10 bloSLST)
Row 1B (extended cuff): CH 21 (23, 25, 27, 29), working in the top loop of CH, SL ST in 2nd CH from hook
and in each CH across. Turn. (20, 22, 24, 26, 28 SL ST)
Row 2B: CH 1, bloSLST in each SL ST across. Turn. (20, 22, 24, 26, 28 bloSLST)
Repeat row 2 until the cuff fits snugly around the wrist. End with an even number of rows. Note how
many rows you work so you can repeat for the other glove. Sample shows a cuff with 64 rows for a wrist
circumference of 16 cm (6¼”). Do not fasten off. Move to Body.
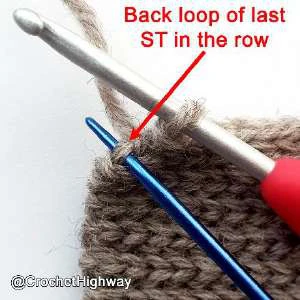
Note: The last ST in the row is easy to miss (photo 1), mark it so you don’t accidentally skip it.
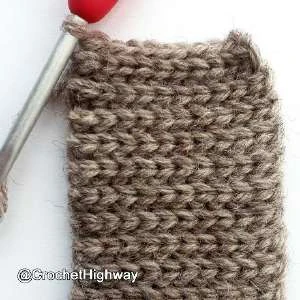
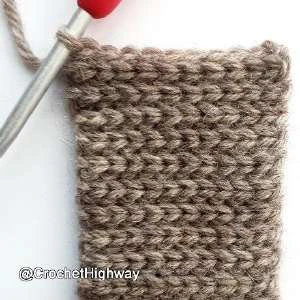
Every couple of rows stop and pull the band horizontally to even out the stitches since they tend
to tighten up (photos 2 & 3).
Photo 1
Photo 2
Photo 3
BODY (5MM HOOK)
Note: From row 1 onward, the total ST count does not change.
Rotate your work so that you are now working in the row ends.
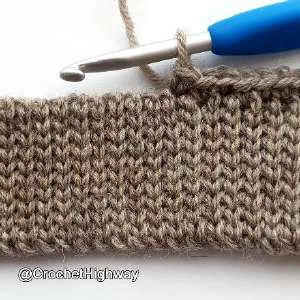
Row 1 (RS): CH 1 and place 20 (24, 28, 32, 36) SC evenly across, working in
between each of the ribbing ridges (photo 4). Turn. (20, 24, 28, 32, 36 ST)
Note: If you find it difficult to insert main hook through the gaps
in between the bloSLST rows, use a smaller hook for Row 1 and
work the SCs loosely (e.g., 4mm instead of 5mm).
Row 2: CH 1, SL ST in 1st ST and in each ST across. Turn.
Row 3: CH 1, bloSLST in 1st ST and in each ST across. Turn.
Rows 4-6: Repeat row 3.
Important note: The length of the horizontal ribbing created in rows 2-6 should align with the
ribbed cuff – it shouldn’t pull the cuff in. In other words, the horizontal ribbing detail should
never be narrower than the ribbed cuff when laid flat on the table. Otherwise, it will pull the
glove in after seaming, which will make it difficult to fit around the wider part of the hand and
sit too tightly around the wrist. Go to Adjustment Ideas for suggestions on how to avoid this.
Row 7: CH 2, bloDC in 1st ST and in each ST across. Turn.
Row 8: CH 1, SC in 1st ST and in each ST across. Turn.
Row 9: CH 2, FPDC around first DC from 2 rows below, SK 1st SC from prev row and DC in next SC, *FPDC
around next DC from 2 rows below, SK next SC from prev row and DC in next SC. Repeat from * across. Turn.
Row 10: CH 1, SC in 1st ST and in each ST across. Turn.
Row 11: CH 2, DC in first SC from prev row, SK next FPDC from 2 rows below and FPDC around next DC,
*DC in next SC from prev row, SK next FPDC from 2 rows below and FPDC around next DC. Repeat
from * across until 2 STS rem. DC in last 2 STS. Turn.
Row 12: CH 1, SC in 1st ST and in each ST across. Turn.
Size 1 only: Repeat rows 9-11, 1 more time. Go to row 17.
Size 2 only: Repeat rows 9-11, 1 more time. Go to row 13.
Size 3 only: Repeat rows 9-12, 2 more times, ending last rep at row 11 (7 total rows). Go to row 13.
Size 4 only: Repeat rows 9-12, 3 more times, ending last rep at row 9 (9 total rows). Go to row 13.
Size 5 only: Repeat rows 9-12, 3 more times, ending last rep at row 11 (11 total rows). Go to row 13.
Photo 4
Note: If making a custom length, end the alpine pattern either on row 9, or on row 11 and
account for 1 cm (3⁄8”) for rows 13-17. Note how many rows you work so you can repeat for the
other glove.
Row 13: Repeat row 2.
Rows 14-17: Repeat row 3.
Your last row will be on the WS. Fasten off, leaving a long tail and go to Assembly.
ASSEMBLY
We will now join the two sides of the glove using the mattress stitch.
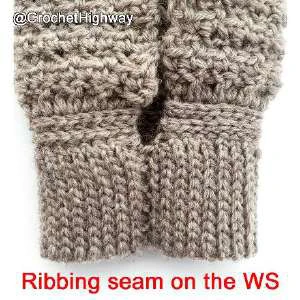
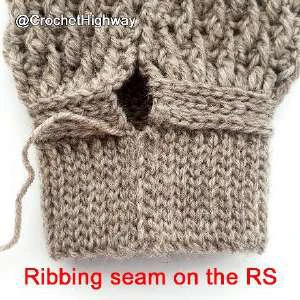
Step 1: Fold the glove with RS facing
out and use the beg tail to join
together the ribbing, going through
both loops of the last row of ribbing
and both loops of the foundation
chain. We’re joining the ribbing on the
RS in order to get a cleaner seam (see
photos 5 and 6).
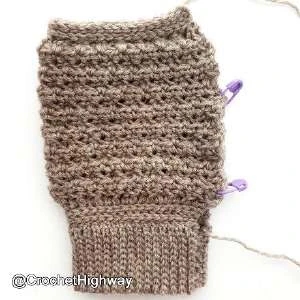
Step 2: Turn the glove inside out and
fold it again. Roughly separate the
glove in thirds using stitch markers
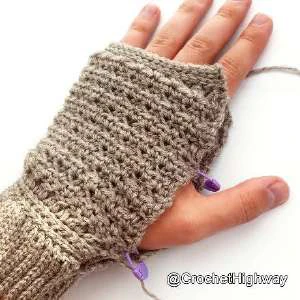
(photo 7). Try the glove on at this point
and adjust the placement of the stitch
markers to find the best position of the
thumb opening (photo 8).
Photo 5
Photo 6
Photo 7
Photo 8
Step 3: Continue using the beg tail to join the edges up to the first stitch marker. Still working with WS
facing out, use the finishing tail to join the edges up to the second stitch marker.
Step 4: Check that the hole created fits the thumb comfortably and make any necessary adjustments.
When you are happy with the fit, seam the edges again going in the opposite direction for a more secure
join. Fasten off and go to Thumb.
THUMB
With RS facing out and using your main hook, join yarn with a SL ST anywhere along the open edge, CH
1 and place 2 SC in the side of every DC row and 1 SC in the side of every SC row. Go around and SL ST in
top of 1st SC. Fasten off, weave in ends.
Adjustment Ideas
After assembly, the horizontal ribbing (rows 2-6) should sit snugly on the wrist and be stretchy enough
to fit over the wider part of the hand. When laid flat, rows 2-6 of the body should have roughly the same
width as the length of the ribbed cuff. If this section tends to pull the glove in, making it
uncomfortable/difficult to fit around the wrist, try one or all of the following:
A. Crochet rows 2-6 extra loosely, going up a full hook size if needed.
B. Block the horizontal ribbing more aggressively to gain some stretch.
C. If rows 2-6 still tend to taper in, modify the stitch count, like so:
1.
Take your total row count for the ribbed cuff (let’s say 48 for a hypothetical size 1), divide it
by 2 and work that many stitches on rows 1-6 (24 STS).
2.
On row 7, place as many bloDC2TOGs as you need in order to return to the stitch count
written in the pattern for your size. In the example above, we need to work 4 bloDC2TOGs in
order to renturn to the initial stitch count of 20.
3.
Place the decreases so that the FPDCs from row 9 are worked around them. The
corresponding written instructions in our example will look like this:
Row 7: CH 2, bloDC2TOG, DC in next 7 STS, bloDC2TOG, DC in next 5 STS, bloDC2TOG, DC in
next 3 STS, bloDC2TOG, DC in last ST (20 sts).
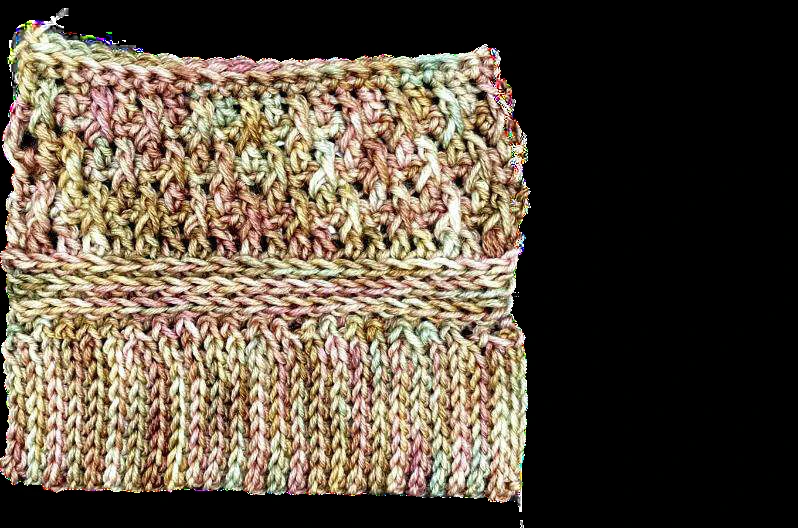
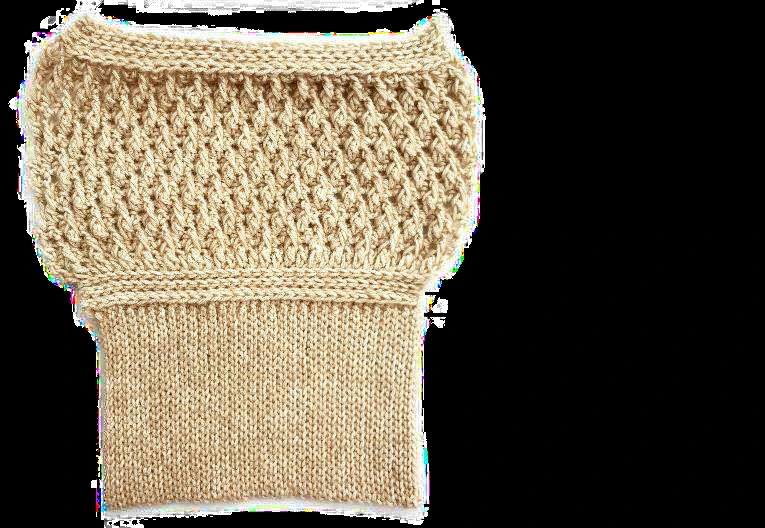
Below are 2 examples of how your glove should look like prior to seaming. Note how the horizontal
ribbing is never narrower than the cuff.
Photo 9 shows a size 1 glove with 50 short cuff rows and
20 STS throughout the body of the glove (roughly 1 ST
per 2.5 cuff rows). The horizontal SL STs are worked
extra loosely using a larger hook. The ribbed cuff, the
horizontal ribbing and the alpine pattern are all the
same width to accommodate the hand proportions of
a toddler. An additional 2-4 SCs may be added to row 7
to make the horizontal ribbing even wider.
Photo 10 shows a size 4 glove with 64 extended cuff
rows and 32 STS throughout the body (precisely 1 ST per
2 cuff rows). The horizontal SL STs are worked using the
main hook. The alpine pattern extends beyond the cuff
to accommodate the larger palm of an adult, but the
horizontal ribbing is the same width as the ribbed cuff.
CONSOLIDATED PATTERN
CUFF (3.5MM HOOK)
The short and extended cuffs only differ in terms of the length of the foundation chain. Work rows
marked A for the short cuff, or rows marked B for the extended cuff. The foundation chain can be made
shorter or longer, as per preference.
Note: Work SL STS loosely. Leave a long beg tail to use for joining later.
Row 1A (short cuff): CH 9 (9, 10, 11, 11), working in the top loop of CH, SL ST in 2nd CH from hook and in
each CH across. Turn. (8, 8, 9, 10, 10 SL ST)
Row 2A: CH 1, bloSLST in each SL ST across. Turn. (8, 8, 9, 10, 10 bloSLST)
Row 1B (extended cuff): CH 21 (23, 25, 27, 29), working in the top loop of CH, SL ST in 2nd CH from hook
and in each CH across. Turn. (20, 22, 24, 26, 28 SL ST)
Row 2B: CH 1, bloSLST in each SL ST across. Turn. (20, 22, 24, 26, 28 bloSLST)
Repeat row 2 until the cuff fits snugly around the wrist. End with an even number of rows. Note how
many rows you work so you can repeat for the other glove. Sample shows a cuff with 64 rows for a wrist
circumference of 16 cm (6¼”). Do not fasten off. Move to Body.
Note: The last ST in the row is easy to miss (photo 1), mark it so you don’t accidentally skip it.
Every couple of rows stop and pull the band horizontally to even out the stitches since they tend
to tighten up (photos 2 & 3).
BODY (5MM HOOK)
Note: From row 1 onward, the total ST count does not change.
Rotate your work so that you are now working in the row ends.
Row 1 (RS): CH 1 and place 20 (24, 28, 32, 36) SC evenly across, working in between each of the ribbing
ridges (photo 4). Turn. (20, 24, 28, 32, 36 ST)
Note: If you find it difficult to insert main hook through the gaps in between the bloSLST rows,
use a smaller hook for Row 1 and work the SCs loosely (e.g., 4mm instead of 5mm).
Row 2: CH 1, SL ST in 1st ST and in each ST across. Turn.
Row 3: CH 1, bloSLST in 1st ST and in each ST across. Turn.
Rows 4-6: Repeat row 3.
Important note: The length of the horizontal ribbing created in rows 2-6 should align with the
ribbed cuff – it shouldn’t pull the cuff in. In other words, the horizontal ribbing detail should
never be narrower than the ribbed cuff when laid flat on the table. Otherwise, it will pull the
glove in after seaming, which will make it difficult to fit around the wider part of the hand and
sit too tightly around the wrist. Go to Adjustment Ideas for suggestions on how to avoid this.
Row 7: CH 2, bloDC in 1st ST and in each ST across. Turn.
Row 8: CH 1, SC in 1st ST and in each ST across. Turn.
Row 9: CH 2, FPDC around first DC from 2 rows below, SK 1st SC from prev row and DC in next SC, *FPDC
around next DC from 2 rows below, SK next SC from prev row and DC in next SC. Repeat from * across. Turn.
Row 10: CH 1, SC in 1st ST and in each ST across. Turn.
Row 11: CH 2, DC in first SC from prev row, SK next FPDC from 2 rows below and FPDC around next DC,
*DC in next SC from prev row, SK next FPDC from 2 rows below and FPDC around next DC. Repeat
from * across until 2 STS rem. DC in last 2 STS. Turn.
Row 12: CH 1, SC in 1st ST and in each ST across. Turn.
Size 1 only: Repeat rows 9-11, 1 more time. Go to row 17.
Size 2 only: Repeat rows 9-11, 1 more time. Go to row 13.
Size 3 only: Repeat rows 9-12, 2 more times, ending last rep at row 11 (7 total rows). Go to row 13.
Size 4 only: Repeat rows 9-12, 3 more times, ending last rep at row 9 (9 total rows). Go to row 13.
Size 5 only: Repeat rows 9-12, 3 more times, ending last rep at row 11 (11 total rows). Go to row 13.
Note: If making a custom length, end the alpine pattern either on row 9, or on row 11 and account
for 1 cm (3⁄8”) for rows 13-17. Note how many rows you work so you can repeat for the other glove.
Row 13: Repeat row 2.
Rows 14-17: Repeat row 3.
Your last row will be on the WS. Fasten off, leaving a long tail and go to Assembly.
ASSEMBLY
We will now join the two sides of the glove using the mattress stitch.
Step 1: Fold the glove with RS facing out and use the beg tail to join together the ribbing, going through
both loops of the last row of ribbing and both loops of the foundation chain. We’re joining the ribbing
on the RS in order to get a cleaner seam (see photos 7 and 8).
Step 2: Turn the glove inside out and fold it again. Roughly separate the glove in thirds using stitch
markers (photo 9). Try the glove on at this point and adjust the placement of the stitch markers to find
the best position of the thumb opening (photo 10).
Step 3: Continue using the beg tail to join the edges up to the first stitch marker. Still working with WS
facing out, use the finishing tail to join the edges up to the second stitch marker.
Step 4: Check that the hole created fits the thumb comfortably and make any necessary adjustments.
When you are happy with the fit, seam the edges again going in the opposite direction for a more secure
join. Fasten off and go to Thumb.
THUMB
With RS facing out and using your main hook, join yarn with a SL ST anywhere along the open edge, CH
1 and place 2 SC in the side of every DC row and 1 SC in the side of every SC row. Go around and SL ST in
top of 1st SC. Fasten off, weave in ends.
Recommended Digital Products

The Ultimate Beginner’s Crochet Guide: Master 45+ Essential Techniques & Practical Projects
$5.99

From Loop to Perfection: The Ultimate Step-by-Step Crochet Master Guide
$9.99
The Ultimate Crochet Handbook: Essential Techniques, Color Theory & 80+ Step-by-Step Patterns
$19.99
Master the Art of Crochet from Scratch – Ultimate Digital Guide with 8 Step-by-Step Projects!
$19.99
Get this Crochet Pattern as a Free PDF
Enter your email to receive the PDF associated with this article.
Leave a Reply