
Colorblock Cardigan
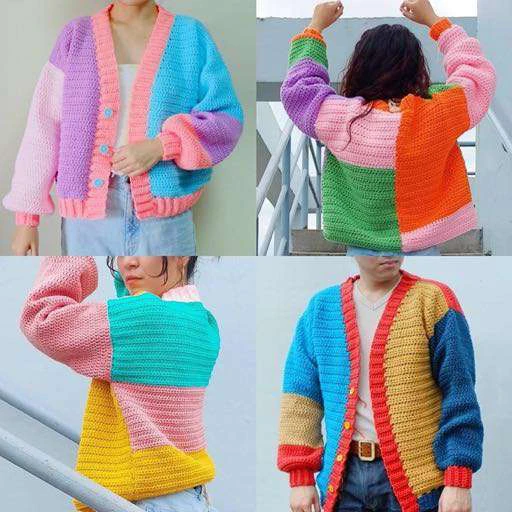
COLORBLOCK OVERSIZED CARDIGAN
(Beginner-friendly Written Pattern)
OVERVIEW
This colorblock oversized dream cardigan is originally made of 5-ply milk cotton (80% cotton, 20% acrylic),
worsted weight yarn. This cardigan is created by working on the front panels first followed by the sleeves then the
back panel. Afterwards, the panels and sleeves are attached together followed by the addition of ribbings and
buttons. The pattern for this cardigan is composed of simple stitches and provides you liberty in customizing the
color layout. You can even add appliques afterwards if you want!
COLORBLOCK OVERSIZED DREAM CARDIGAN CROCHET PATTERN
MATERIALS
●
Hook size 5.0mm
●
Worsted weight yarn of your colors of choice (You can use as many colors as you want!)
o
XS – 400g
o
S – 600g
o
M – 800g
o
L – 1,000g
o
XL – 1,200g
o
XXL 1,400g
If you want to achieve the same color block pattern that I did, I used an equal amount of yarns of different
colors. e.g. For size S, I used 150g of each yarn color (total of 4 colors)
●
Stitch markers
●
Tapestry needle
●
Scissors
●
Measuring tape
●
Buttons
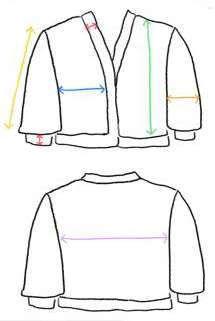
MEASUREMENTS (inches)
XS
S
M
L
XL
XXL
Ribbings
Front panel width
Front panel length
Sleeve length
to measure
Sleeve width
to measure
Back panel width
You can check the pattern tester gallery to see how the different cardigan sizes fit different body shapes and sizes.
Page 2 of 29
COLORBLOCK OVERSIZED DREAM CARDIGAN CROCHET PATTERN
TERMINOLOGIES (US)
●
sl st – slip stitch
●
ch – chain
●
st – stitch
●
sc – single crochet
●
hdc – half double crochet
●
dc – double crochet
●
BLOsc – back loop only sc
●
BLOhdc – back loop only hdc
Note: ch 2 at the beginning of each row does NOT count as a stitch.
GAUGE
●
5” x 5” square = 17 hdc x 12 rows
Please refer to this gauge if you are using a different weight of yarn or hook size so that you will be able to
easily adjust your number of stitches.
SIZING GUIDE
●
The number of stitches per size follows: XS, (S, M, L, XL, XXL).
e.g. Chain 10 (15, 20, 25, 30, 35)
It means:
if you are a size XS, chain 10.
if you are a size S, chain 15.
if you are a size M, chain 20.
if you are a size L, chain 25.
if you are a size XL, chain 30.
if you are a size XXL, chain 35.
●
If only one number is indicated, it is applicable for all sizes.
READING GUIDE
●
All texts including photos are to be read from left to right
●
Correct side means the side that should be facing outside. Most panels are created facing the correct side.
Page 3 of 29
COLORBLOCK OVERSIZED DREAM CARDIGAN CROCHET PATTERN
CUSTOMIZING THE PATTERN
ADJUSTING THE SIZE
Because it is composed of basic stitches, the pattern is very easy to customize.
●
Increase/ decrease your number of chain stitches to achieve your desired width. When you customize the
width, make sure that the total width of your front panels plus the width of your ribbing is equal to the
total width of the back panel.
Width of back panel = width of right + left front panels + width of ribbing
In this pattern, all ribbings have a width of 2 inches
●
Add/ subtract rows to achieve your desired length. When you customize the length, make sure that all
front and back panels have the same number of rows.
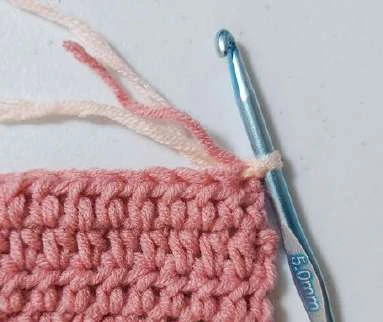
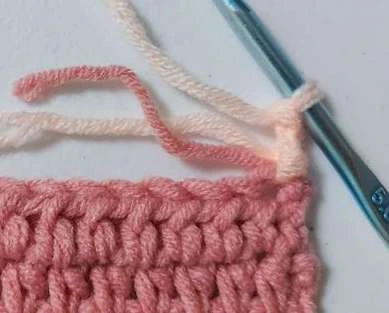
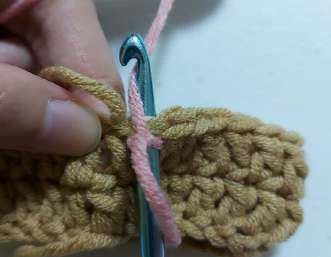
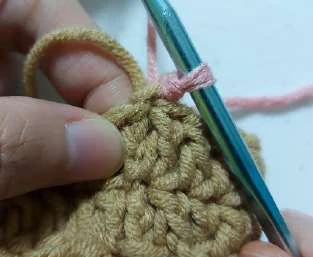
CHANGING COLORS
You can change colors and create as many color blocks as you want!
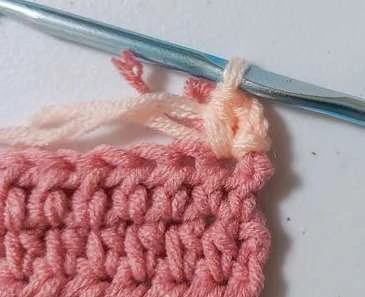
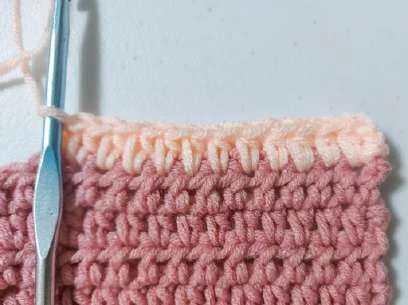
To change colors while doing the front and back panels:
1.
After you secure the end of your row and fasten off the yarn, choose the next yarn color that you want to
use and create a slip knot.
2.
Insert the hook onto the stitch where you ended. Create a sl st. Ch2. Hdc on the same st. You can now
start working on your row with your new yarn color.
Page 4 of 29
COLORBLOCK OVERSIZED DREAM CARDIGAN CROCHET PATTERN
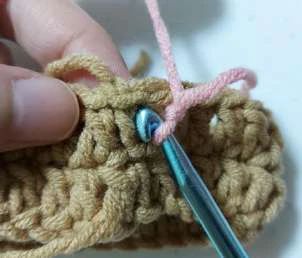
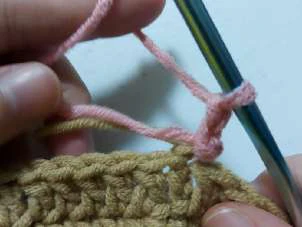
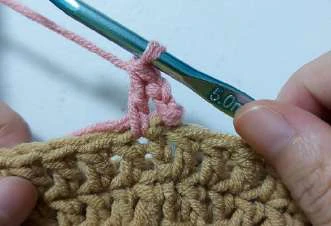
To change colors while doing the sleeves:
1.
After you secure the end of your row and fasten off the yarn, choose the next yarn color that you want to
use and create a slip knot.
2.
Insert the hook onto the stitch where you ended. Create a sl st, ch2, dc on the next st. You can now start
working on your row with your new yarn color.
Note: When you change color while doing the sleeves, always do the dc on the next st EXCEPT when you are
working on the 1st row of the sleeve (row right after the cuff).
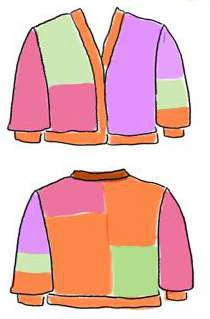
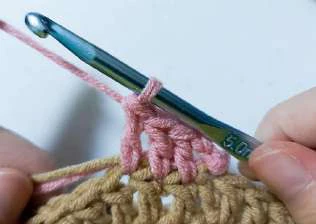
Tip: It helps to plan your desired colorblock layout ahead of time so you’ll know when to change colors.
Sample layout:
Page 5 of 29
COLORBLOCK OVERSIZED DREAM CARDIGAN CROCHET PATTERN
CROCHETING THE COLORBLOCK OVERSIZED CARDIGAN
NOTE: Make sure that you use the same tension all throughout the project so that all panels will have the same
sizes/ dimensions.
FRONT PANELS
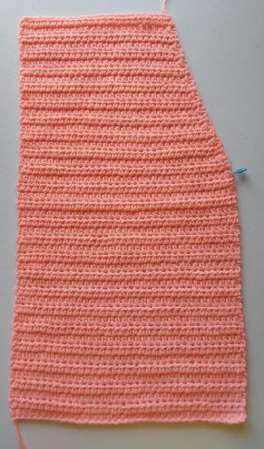
For the front panels, you will start working from the bottom all the way up until you start doing the alternating
decrease – non-decrease rows to create the V-shape on the upper half of the cardigan.
FRONT PANEL 1
Using your color of choice:
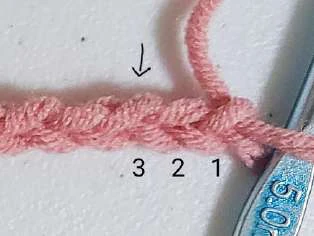
Step 1. Chain 35 (39, 43, 47, 51, 55).
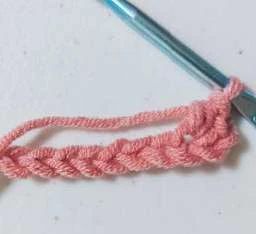
Step 2. Skip 2ch then hdc on the 3rd ch from the hook.
Step 3. Hdc on each ch until you reach the end of the row. You should have a total of 33 (37, 41, 45, 49, 53) hdcs.
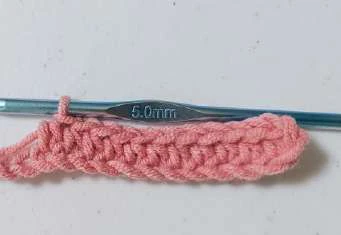
Step 4. Ch 2. Flip your work then hdc on the same st. Hdc on each of the next sts until you reach the end of the
row.
Step 5. Repeat Step 4 until you make a total of 24 (26, 28, 30, 32, 34) rows.
You will now start working on the upper part of the cardigan. To do the V-shape you will start making the
alternating decrease – non-decrease rows
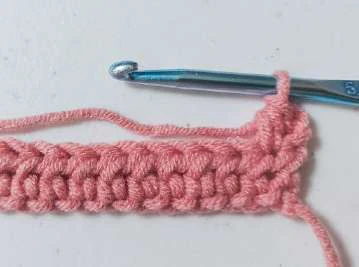
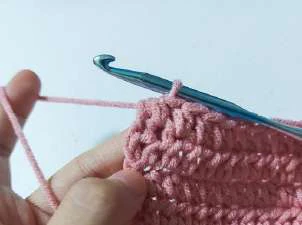
Step 6. Ch 2. Flip your work then hdc on the same st. Hdc on each of the next sts until you reach the last 2 sts. For
the last 2 sts, make an hdc2tog (decrease row).
Page 6 of 29
COLORBLOCK OVERSIZED DREAM CARDIGAN CROCHET PATTERN
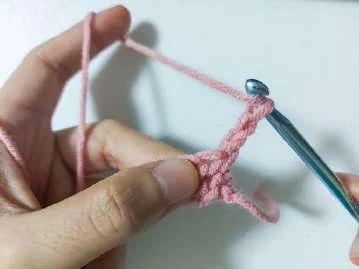
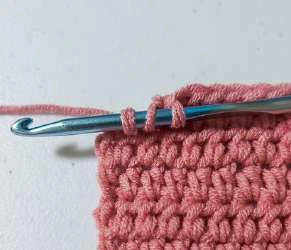
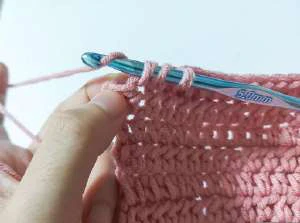
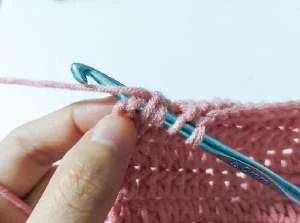
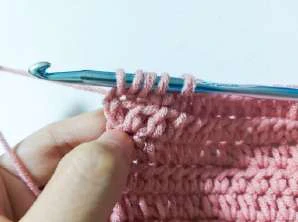
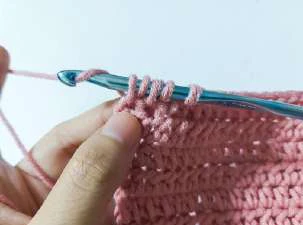
To make an hdc2tog, yarn over, insert hook into the stitch, yarn over and pull up a loop (3 loops on the
hook), yarn over, insert hook into the next stitch, yarn over and pull up a loop (5 loops on the hook), yarn
over and pull through all 5 loops on the hook.
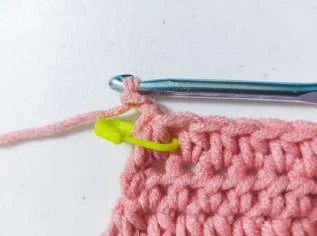
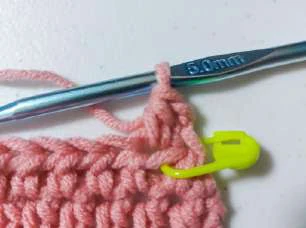
Put a stitch marker on your hdc2tog to remind you which side you are going to do the hdc2tog. The stitch marker
will also help you count the rows for the upper part of the cardigan.
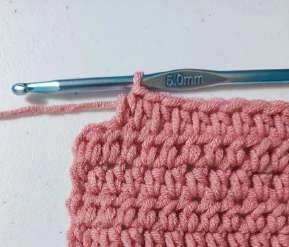
Step 7. Ch 2. Flip your work then hdc on the same st. Hdc on each of the next sts until you reach the end of the row
(non-decrease row).
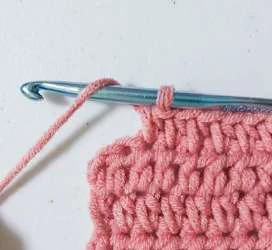
Step 8. Ch 2. Flip your work then hdc on the same st. Hdc on each of the next sts until you reach the last 2 sts. For
the last 2 sts, make an hdc2tog (decrease row).
Page 7 of 29
COLORBLOCK OVERSIZED DREAM CARDIGAN CROCHET PATTERN
Step 9. Repeat steps 7-8 until you make a total of 18 (20, 22, 24, 26, 28) rows starting from the row where you
placed the stitch marker. Include the row with the stitch marker when counting.
Step 10. After the last hdc on the last row, ch 1 and fasten off.
If you ended the row on the outer side of the panel (the one with a straight edge), leave a tail that is 3x
longer than the length of the last row of the front panel.
If you ended the row on the inner side of the panel (the one with the V-Shape), leave a tail long enough
for weaving.
FRONT PANEL 2
Using your color of choice:
For the lower half of the front panel 2, repeat steps 1-5 of the front panel 1.
You will now start working on the upper part of the cardigan. To do the V-shape you will start making the
alternating decrease – non-decrease rows.
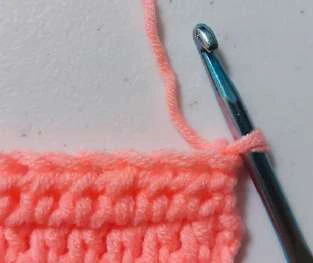
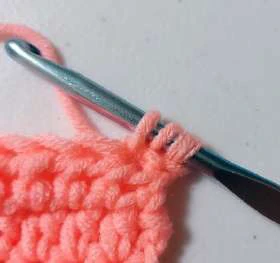
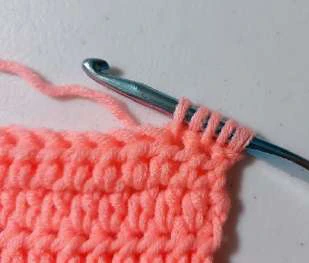
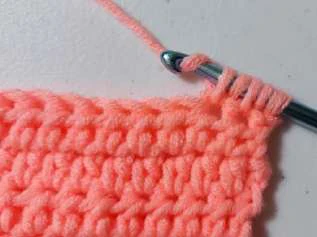
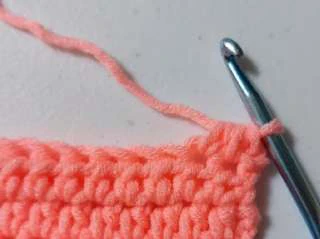
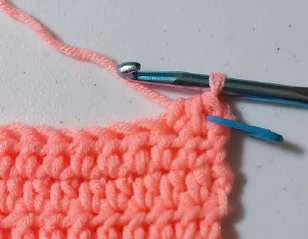
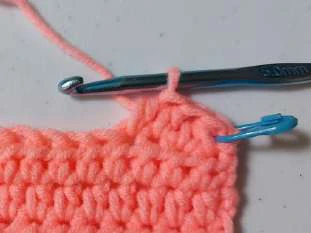
Step 6. Ch 1. Flip your work then make an hdc2tog on the first 2 sts. Hdc on each of the next sts until you reach the
end of the row (decrease row).
Put a stitch marker on your hdc2tog to remind you which side you are going to do the hdc2tog. The stitch marker
will also help you count the rows for the upper part of the cardigan.
Page 8 of 29
COLORBLOCK OVERSIZED DREAM CARDIGAN CROCHET PATTERN
Step 7. Ch 2. Flip your work then hdc on the same st. Hdc on each of the next sts until you reach the end of the row
(non-decrease row).
Step 8. Ch 1. Flip your work then make an hdc2tog on the first 2 sts. Hdc on each of the next sts until you reach the
end of the row (decrease row).
Step 9. Repeat steps 7-8 until you make a total of 18 (20, 22, 24, 26, 28) rows starting from the row where you
placed the stitch marker. Include the row with the stitch marker when counting.
Step 10. After the last hdc on the last row, ch 1 and fasten off.
If you ended the row on the outer side of the panel (the one with a straight edge), leave a tail that is 3x
longer than the length of the last row of the front panel.
If you ended the row on the inner side of the panel (the one with the V-Shape), leave a tail long enough
for weaving.
NOTE: If you want to change the color of your front panels along the way, follow the instructions under
Customizing the Pattern part (page 4)
SLEEVES
For the sleeves, you will start working from the cuff ribbing then to the sleeve which is worked in rounds.
CUFF RIBBING
Using your color of choice:
Step 1. Chain 10.
Step 2. Hdc on the 3rd chain from the hook. Hdc until you reach the end of the row. You should now have a total of
8hdcs.
Page 9 of 29
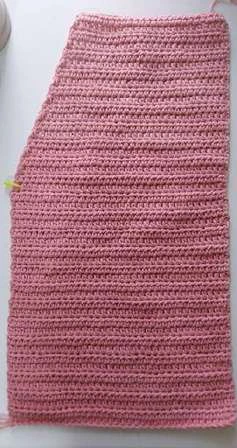
COLORBLOCK OVERSIZED DREAM CARDIGAN CROCHET PATTERN
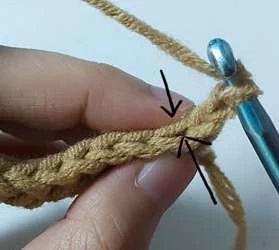
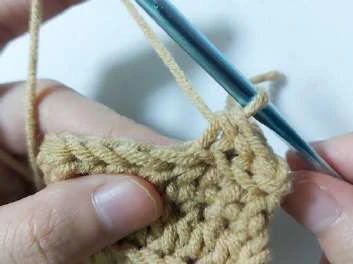
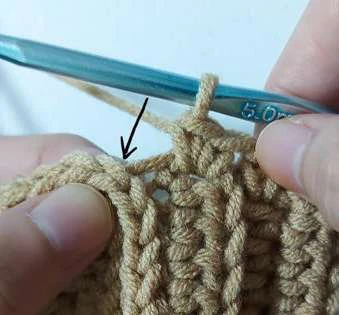
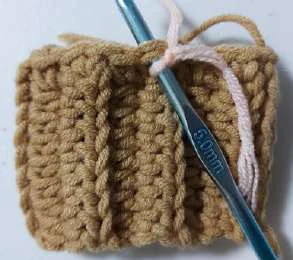
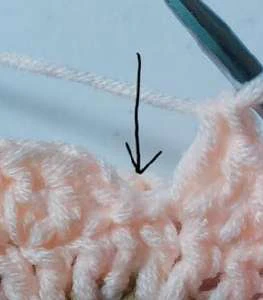
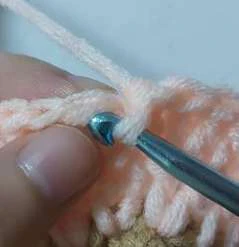
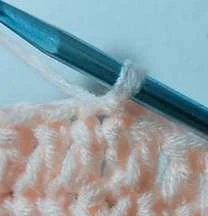
Step 3. Ch2. Flip your work. Do a BLOhdc until you reach the end of the row. Make sure you have a total of 8 hdcs.
To do a BLOhdc, make sure you insert your hdc on the back loop only of each st (see arrow on the image
below).
Step 4. Repeat step 3 until you make a total of 12 (13,14,15,16,17) rows or until the length of the cuff ribbing when
stretched covers your entire wrist. Make sure you are comfortable. Some materials stretch less so you might want
to add a few more rows.
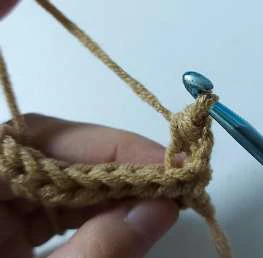
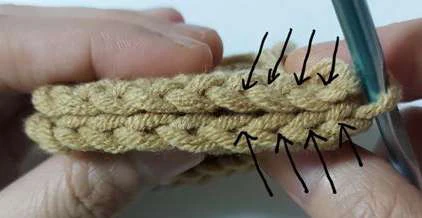
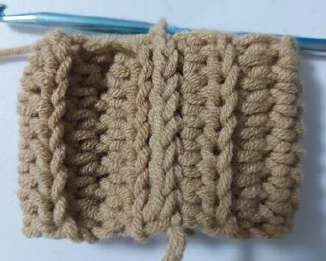
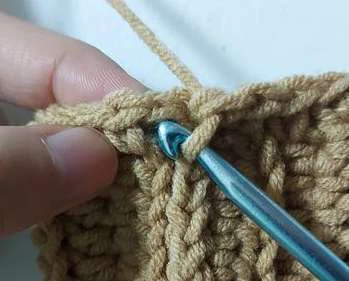
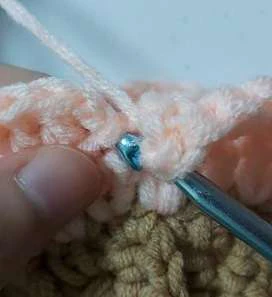
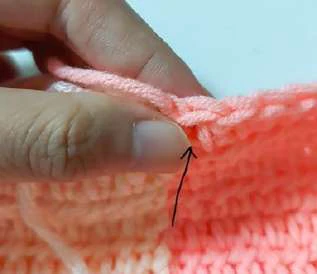
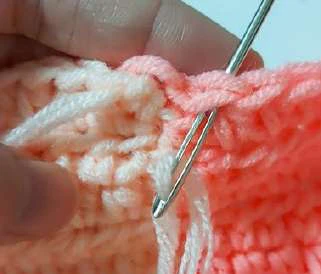
Step 5. Now you will attach both ends of the cuff ribbing by doing a sl st on the inner loops only (see arrows on the
image below).
Page 10 of 29
COLORBLOCK OVERSIZED DREAM CARDIGAN CROCHET PATTERN
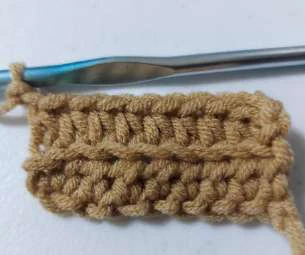
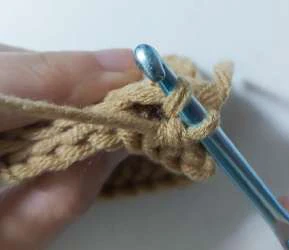
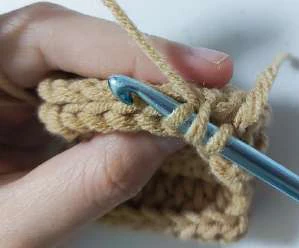
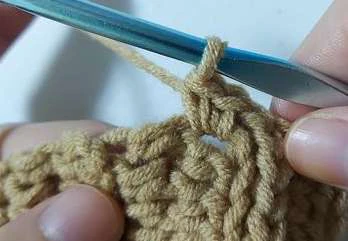
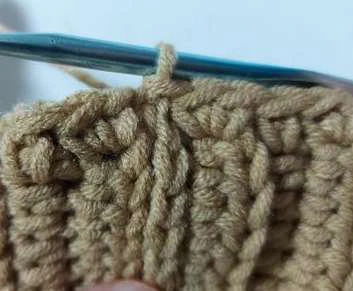
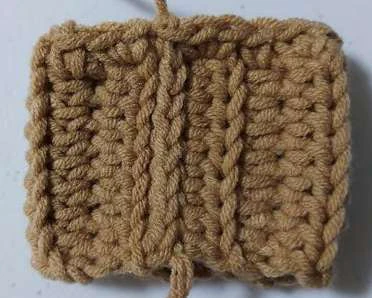
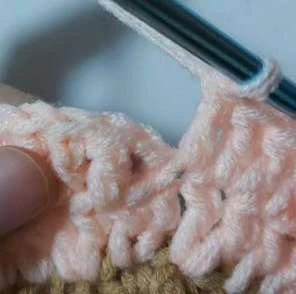
Step 6. Once you reach the end of the row, make 2sc on the 1st hdc post then 1 sc on the next hdc post.
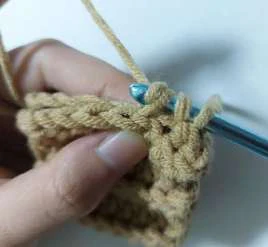
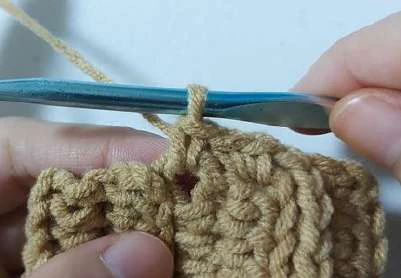
Step 7. Place alternating 2sc then 1 sc on each of the next hdc posts until you reach the end. When you reach the
end of the row, sl st on the st before the 1st sc that you created (see arrow on the photo below).
End of the row
Page 11 of 29
COLORBLOCK OVERSIZED DREAM CARDIGAN CROCHET PATTERN
SLEEVES
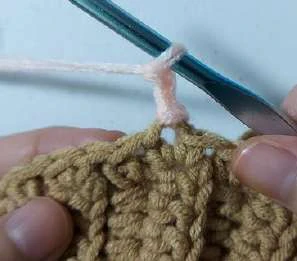
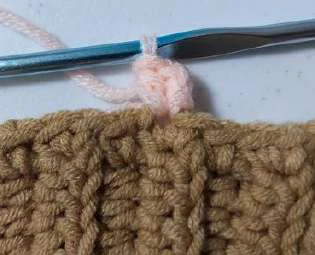
If you are using the same yarn that you used for the cuff: Ch2 then dc on the same st (then go to Step 2)
If you are using a color different from the cuff:
Step 1. Insert the hook into any st in the row. Sl st. Ch2 then dc on the same st.
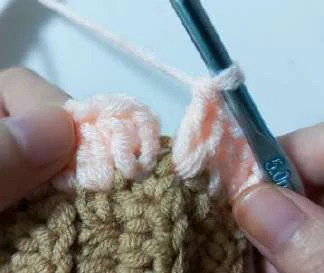
Step 2. 2dc on the next st. Do the alternating 1dc and 2dc on each of the next sts until you reach the end of the
row. Sl st on the 1st dc of the row.
End of the row
Step 3. Ch2. Dc on the next st then 2 dc on the next st.
Page 12 of 29
COLORBLOCK OVERSIZED DREAM CARDIGAN CROCHET PATTERN
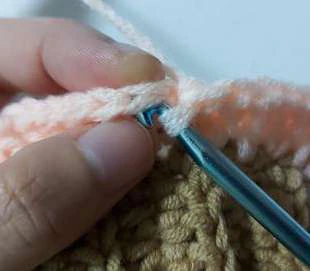
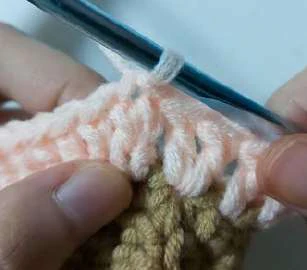
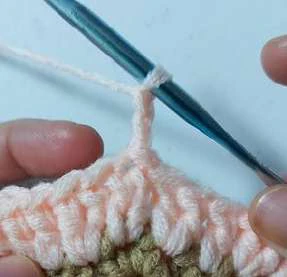
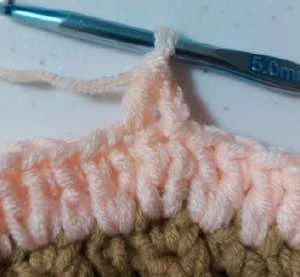
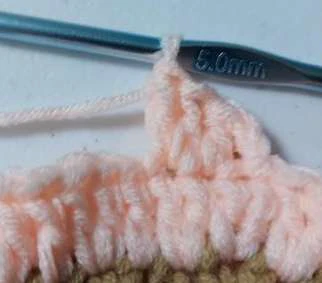
Step 4. Do the alternating 1dc and 2dc on each of the next sts until you reach the end of the row.
If you ended your row with 1dc, add 2dc on the same stitch where you placed the ch2 at the start of the
row (see arrow on the image below). Sl st on the 1st dc of the row.
If you ended your row with 2dc, add 1dc on the same stitch where you placed the ch2 at the start of the
row (see arrow on the image below). Sl st on the 1st dc of the row.
End of the row
You may repeat steps 3-4 if you want to achieve fuller/ wider sleeves.
Step 5. Ch2. DC on the same st. 1dc on each of the next 2 sts. Then 2dcs on the next st.
Step 6. Place 1dc into each of the next 3 sts then 2dcs on the next st. Repeat this step until you reach the end of
the row. Sl st on the 1st dc of the row.
Step 7. Ch2. DC on the next st then 1 dc on each of the next sts until you reach the end of your row. Add another dc
on the same stitch where you placed the ch2 at the start of the row. Sl st on the 1st dc of the row.
Step 8. Ch2. Dc on the same st then 1 dc on each of the next sts until you reach the end of the row. Sl st on the 1st
dc of the row.
Step 9. Repeat steps 7-8 until you reach your desired sleeve length.
Step 10. After the last dc on the last row, ch 1, cut the yarn leaving a tail with a length that is equal to 4x the length
of your front panels. You will use this tail later when you attach the different panels together.
NOTE: If you want to change the color of your sleeves along the way, follow the instructions under Customizing
the Pattern part (page 5).
Page 13 of 29
COLORBLOCK OVERSIZED DREAM CARDIGAN CROCHET PATTERN
Repeat Step 1 from the cuff ribbing until Step 10 of the sleeves to create the 2nd sleeve.
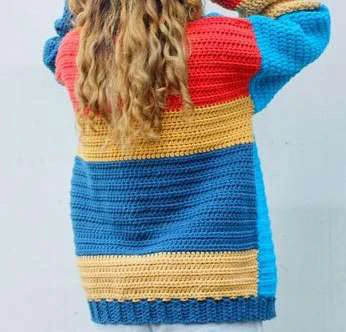
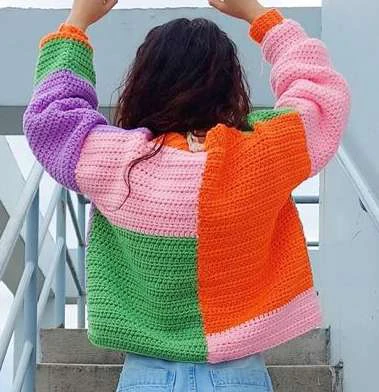
BACK PANEL
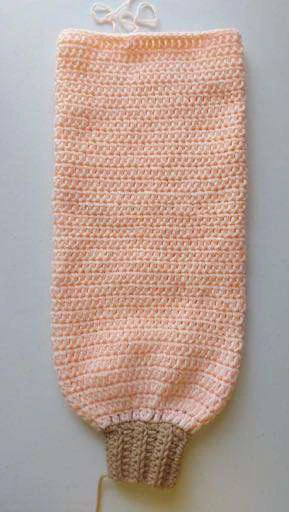
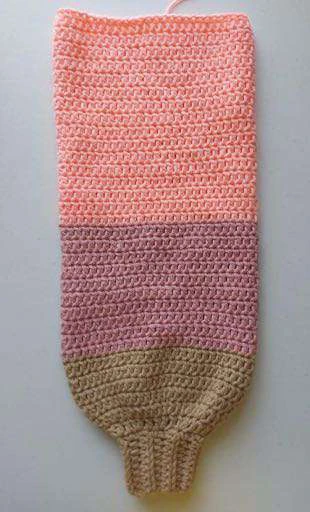
For the back panel, you can design it in two ways:
1.
Horizontal layers of different colors – simple and perfect for beginners or for those who want minimal
sewing.
2.
Colorblock pattern – requires sewing using the mattress stitch or any other stitch you are comfortable
with
Page 14 of 29
COLORBLOCK OVERSIZED DREAM CARDIGAN CROCHET PATTERN
DESIGN 1: Horizontal Layers
NOTE: Identify how you want to layout your colors first, as well as how you want to match it with the front
panels and sleeves. To make sure that the rows of the back panel will match with the rows of the front panel,
start working from the bottom, all the way up.
Using your color of choice:
Step 1. Chain 76 (84, 92, 100, 108, 116). Hdc on the 3rd chain from the hook. Hdc on each of the next sts until you
reach the end of the row.
Step 2. Ch 2. Flip your work then hdc on the same st. Hdc on each of the next sts until you reach the end of the
row.
Step 3. Repeat Step 2 until you reach your desired length for that color. Cut the yarn and fasten off.
Step 4. To start with your new color, create a slip knot with your new yarn color, sl st on the st where you ended.
Step 5. Ch2. Flip your work then hdc on the same st. Hdc on each of the next sts until you reach the end of the row.
Step 6. Repeat Step 5 until you reach your desired length for that color. Ch1, cut the yarn and fasten off.
Do as many color changes as you want by repeating steps 4-6.
Make sure that the total number of rows of the back panel match the total number of rows of your front panel.
DESIGN 2: Colorblock Pattern
For this design, you are basically doing the same steps for Design 1 except you create 2 separate back panels and
sew them together.
Using your color of choice:
Step 1. Chain 39 (43, 47, 51, 55, 59). Hdc on the 3rd chain from the hook. Hdc on each of the next sts until you
reach the end of the row.
Step 2. Ch 2. Flip your work then hdc on the same st. Hdc on each of the next sts until you reach the end of the
row.
Step 3. Repeat Step 2 until you reach your desired length for that color. Cut the yarn and fasten off.
Step 4. To start with your new color, create a slip knot with your new yarn color, sl st on the st where you ended.
Step 5. Ch2. Flip your work then hdc on the same st. Hdc on each of the next sts until you reach the end of the row.
Step 6. Repeat Step 5 until you reach your desired length for that color. Ch1, cut the yarn and fasten off.
Do as many color changes as you want by repeating steps 4-6.
Make sure that the total number of rows of the back panel match the total number of rows of your front panel.
You have now created the other half of your back panel. To create the remaining half, repeat steps 1-6 using your
other color choices.
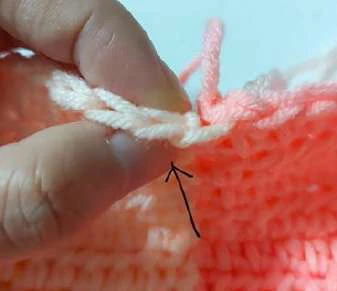
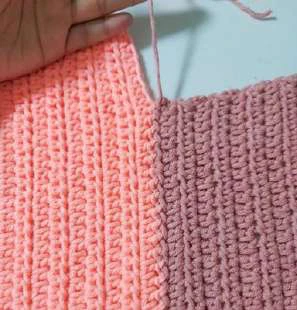
Once you have created the two halves of your back panel, you have to connect them using the mattress stitch.
Page 15 of 29
COLORBLOCK OVERSIZED DREAM CARDIGAN CROCHET PATTERN
Doing the Mattress Stitch
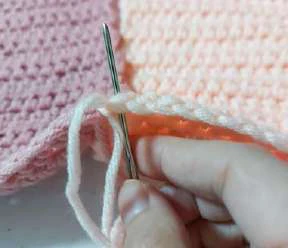
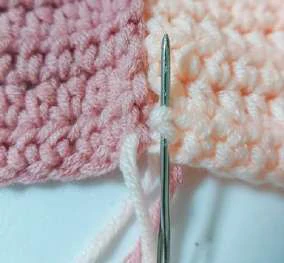
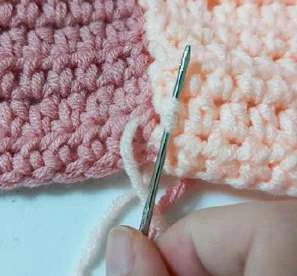
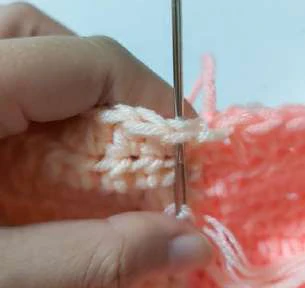
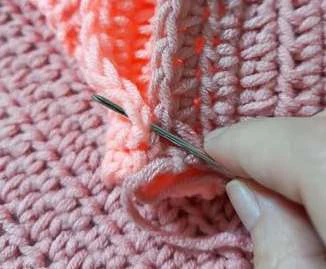
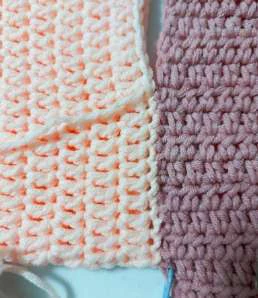
The mattress stitch is like tying your shoelaces, you work from side to side, inserting the laces from the bottom
going up. To do the mattress stitch, align the rows that you want to connect. Select the yarn color that you want to
use. Please note that when doing the mattress stitch, the stitches will be invisible so it is okay to use a different
yarn color. Work facing the correct side of the panels (correct side means the side that should be facing outside)
Step 1. Cut a yarn with a length equal to 3x the length of your back panel.
Step 2. Using your tapestry needle, insert the yarn through the first stitch on the right panel from the bottom going
up. Leave enough end (1-2 inches) for weaving.
Step 3.Then Insert the yarn through the first stitch on the left panel from the bottom going up.
Page 16 of 29
COLORBLOCK OVERSIZED DREAM CARDIGAN CROCHET PATTERN
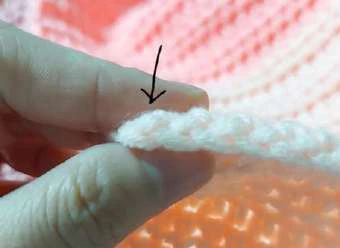
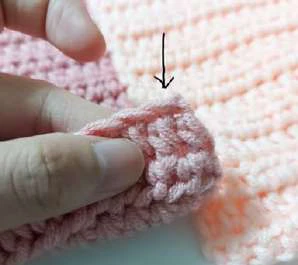
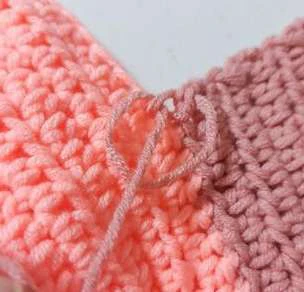
Step 4. To secure your first stitch, insert the yarn once more through the first stitch on the right panel from the
bottom going up. Then to the first stitch on the left from the bottom going up. You can make a single knot to make
sure that the ends are secured.
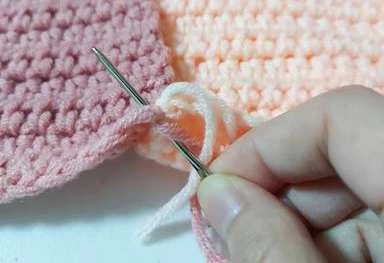
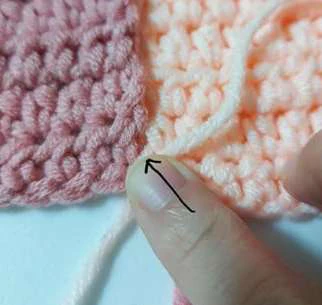
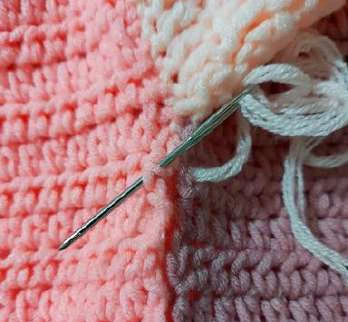
From this point forward, you will be working on the outermost post of each row (for rows where the outermost
stitch is the ch2, work on the ch2). When inserting the needle, remember to always get at least 2 loops from the
outermost post to make sure that the connection will be sturdy and secure.
Step 5. Insert the needle to the outermost post of the opposite panel, from the bottom going up, do the same to
the other panel. Do this until you reach the post on the last row. Make sure that the rows match while you are
stitching them together.
Page 17 of 29
COLORBLOCK OVERSIZED DREAM CARDIGAN CROCHET PATTERN
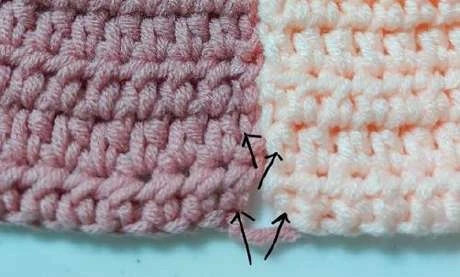
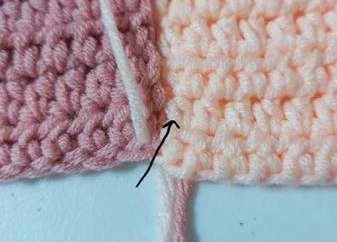
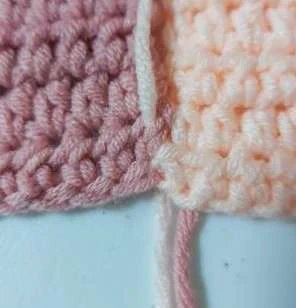
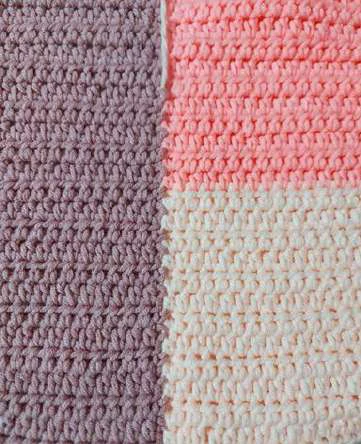
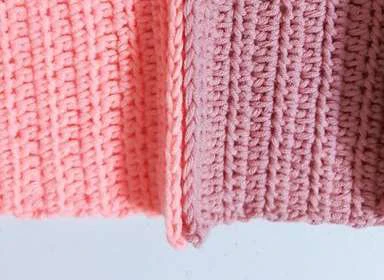
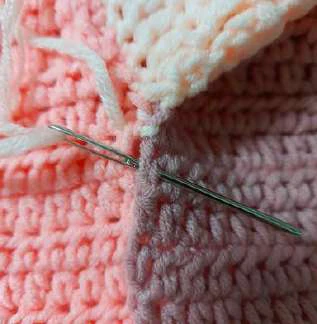
(As you can see in the photo below, the stitches should be invisible. Pull the thread slightly to make sure the stitches
are sturdy but don’t pull too tightly that your work might scrunch up.)
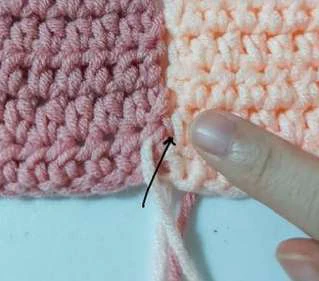
Step 6. To end the mattress stitch, you will basically do the same steps as when you started. *Insert the yarn
through the first stitch on the right from the bottom going up. Insert the yarn through the first stitch on the left
from the bottom going up. Repeat again from * to secure your last stitch. Make a single knot then fasten off.
Tip: If you are having difficulties doing the mattress stitch, you can also try using sc or any other stitch that you are
more comfortable with.
Page 18 of 29
COLORBLOCK OVERSIZED DREAM CARDIGAN CROCHET PATTERN
ATTACHING THE PANELS AND SLEEVES
Attaching the front and back panels together:
You will start by attaching the top portion of the front panel to the top portion of the back panel through the
mattress stitch. Make sure that the rows match. Work facing the correct side of the panels (correct side means the
side that should be facing outside).
Step 1. Start sewing from the outer edge going to the middle part of the cardigan by doing steps 1-3 under the
“Doing the Mattress Stitch” (page 16).
Step 2. For the next stitches, continue stitching from side to side, inserting from the bottom going up, until you
reach the last stitch in your front panel.
Step 3. Make a single knot then fasten off.
Do the same for the other side. You have now created the shoulder part of your cardigan!
Page 19 of 29
COLORBLOCK OVERSIZED DREAM CARDIGAN CROCHET PATTERN
Attaching the sleeve to the body:
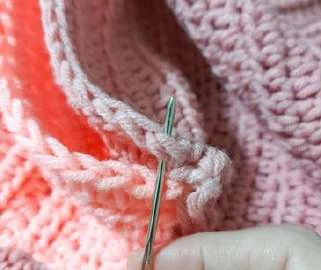
For this part, you will use mattress stitch to attach the sleeves to the front and back panel then down to attach the
sides of the cadigan. Work facing the correct side (correct side means the side that should be facing outside).
Note:if you are more comfortable using sc or any other stitch when connecting panels together, you may also use
those.
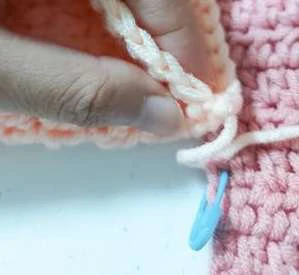
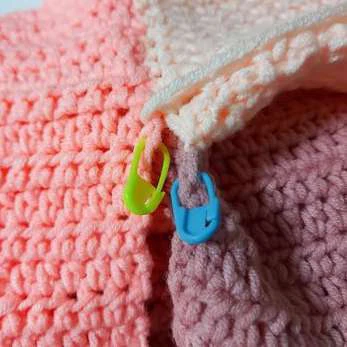
Step 1. Fold your sleeves in such a way that the seam will be positioned at the bottom (underarm area).
Step 2. Using your stitch markers, mark the topmost portion of the sleeves, then mark the rows in your front and
back panel where you want to attach the sleeves. Make sure that the position in the front is similar to the position
in the back panel.
e.g. If you put the stitch marker on the 20th row of the front panel, make sure to also put the stitch marker
on the 20th row of the back panel.
Tip: when determining where to attach the sleeves, you might want to stretch out the sleeves a little bit
more.
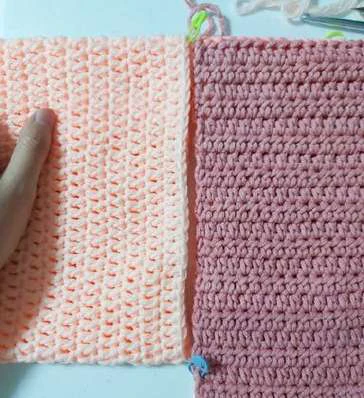
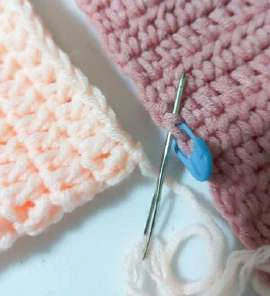
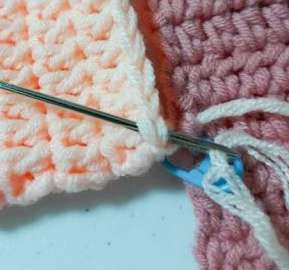
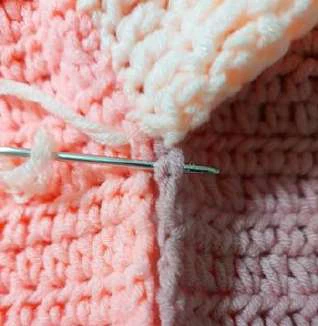
Step 3. Attach the sleeves to the front panel first by doing the mattress stitch. You will work from the underarm
area all the way up to the shoulders.
Since you left a long tail for the sleeves, you will start the mattress stitch by inserting the needle to the
outermost post of your marked row in the front panel.
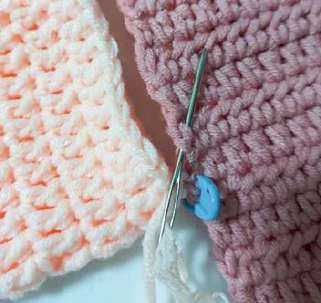
Continue doing the mattress stitch all the way up. Take note of the topmost stitch of the sleeve where you
placed the stitch marker. This stitch should be connected to the topmost portion of the cardigan.
Tip: When attaching the sleeve, 1 post in the panel is not necessarily equal to 1 stitch in the sleeve.
Sometimes you have to make 2 mattress stitches in a single post in the front panel to match the stitches in
the sleeves.
Page 20 of 29
COLORBLOCK OVERSIZED DREAM CARDIGAN CROCHET PATTERN
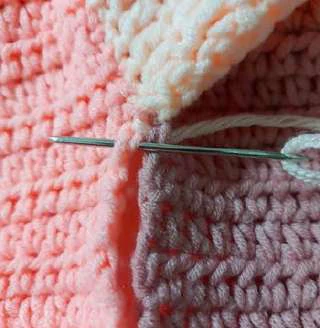
Step 4. Once you reach the uppermost row of the front panel and your st with the stitch marker, continue the
mattress stitch to the back panel.
Step 5. From this, continue doing the mattress stitch all the way down to attach the sleeve to the back panel. Your
last stitch should be on the marked row at the back panel.
From this point, you will continue doing the mattress stitch to attach the sides of the cardigan.
Before starting, make sure that your rows are aligned. Attach the sides by following Steps 5-6 under the “Doing the
Mattress Stitch” (page 17).
Page 21 of 29
COLORBLOCK OVERSIZED DREAM CARDIGAN CROCHET PATTERN
Repeat from Step 1 to connect the sleeve on the other side of the cardigan.
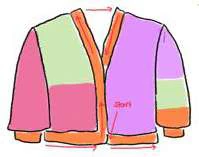
RIBBING
For the ribbing, you will start working from the bottom of the left panel (left when worn) all the way back until you
reach the right front panel, then all the way up to the neck then down to the left panel (see photo below and
follow the arrows). Work facing the correct side (correct side means the side that should be facing outside).
Page 22 of 29
COLORBLOCK OVERSIZED DREAM CARDIGAN CROCHET PATTERN
Using your desired yarn color:
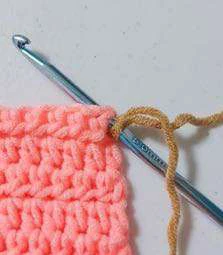
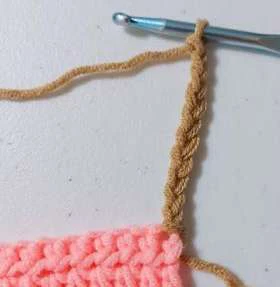
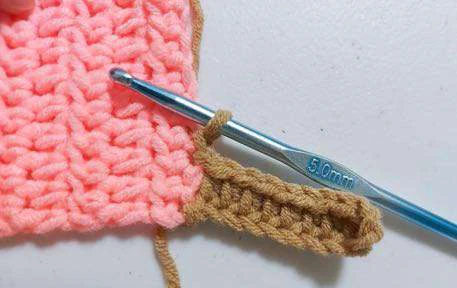
Step 1. Create a slip knot. Insert your hook into the first st at the bottom of your left front panel (left side when
worn/ refer to the image above).
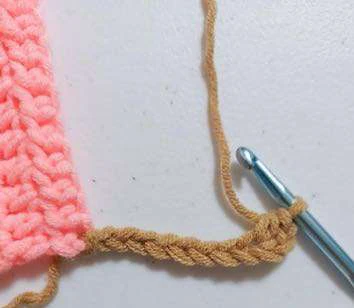
Step 2. Ch 10. Hdc on the 3rd ch from the hook. Hdc on each of the next sts. You should have a total of 8 hdcs.
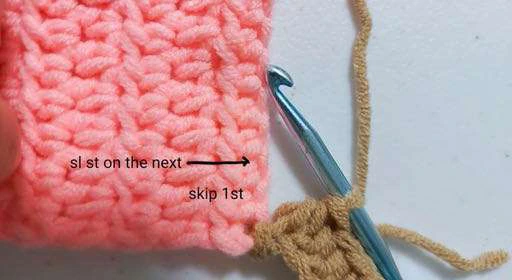
Step 3. Skip 1 st, sl st on the next.
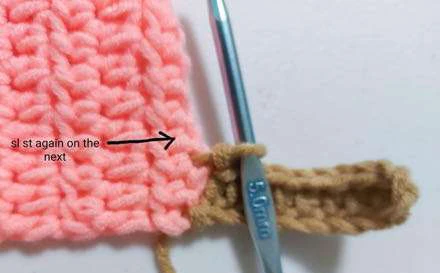
Step 4. Sl st again on the next st. Flip your work. BLOhdc on each of the next sts. Make sure you still have 8 hdcs.
Tip: If you are having difficulty identifying where to put the hdc after you flip your work, you can add a stitch marker
at the last hdc you created before doing a sl st.
Step 5. Ch2. Flip your work. BLOhdc on each of the next sts.
Page 23 of 29
COLORBLOCK OVERSIZED DREAM CARDIGAN CROCHET PATTERN
Step 6. Repeat steps 3-5 until you reach the last st on your other front panel.
If you did Step 4 on your last row, continue to step 8 below.
If you did step 5 on your last row and you only have 1 st remaining, do the sl st on this remaining st. Ch 1.
Cut the yarn then fasten off.
If you did step 5 on your last row and you have 2 sts remaining, skip 1 st, do the sl st on the next remaining
st. Ch 1. Cut the yarn then fasten off.
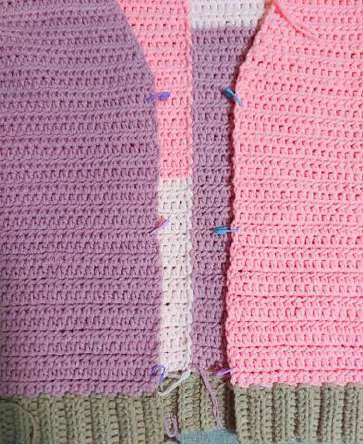
Before you proceed, identify which parts you want to attach your buttons to. You will attach the buttons on the left
side (when worn), and the buttonholes on the right. Mark these parts using your stitch markers. You can use as
many buttons as you want.
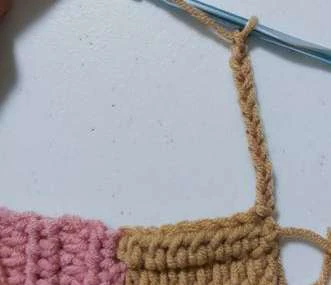
Step 7. Create a slip knot. Insert your hook into the last stitch that you made.
Step 8. Ch 10. Hdc on the 3rd ch from the hook. Hdc on each of the next sts. You should have a total of 8 hdcs.
Page 24 of 29
COLORBLOCK OVERSIZED DREAM CARDIGAN CROCHET PATTERN
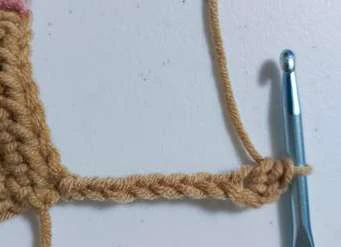
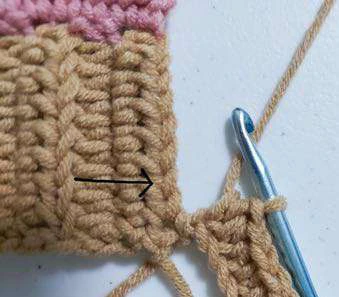
Step 9. Skip 1st, sl st on the next (see arrow below).
Step 10. Sl st again on the next st. Flip your work. BLOhdc on each of the next sts. Make sure you still have 8 hdcs.
Step 11. Ch2. Flip your work. BLOhdc on each of the next sts.
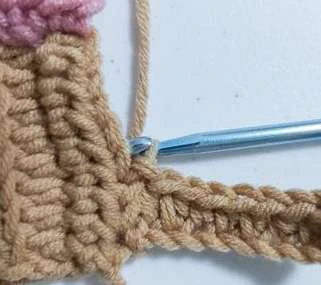
Step 12. Repeat steps 9-11 until you reach the last st of the bottom ribbing (see arrow on the photo below). Sl st on
this last st.
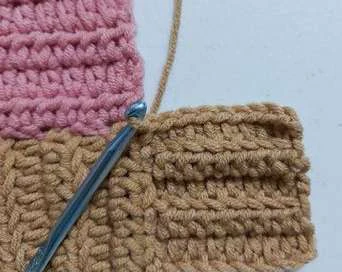
Page 25 of 29
COLORBLOCK OVERSIZED DREAM CARDIGAN CROCHET PATTERN
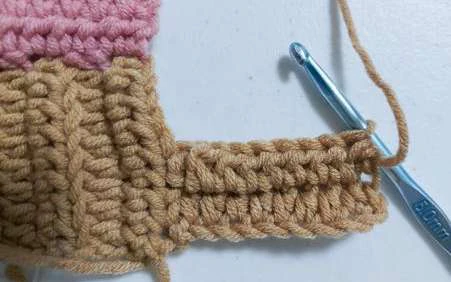
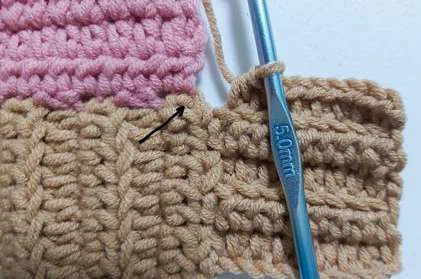
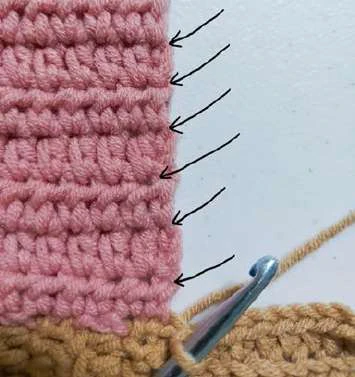
Now you’ve reached the front panel. You will crochet the ribbing to the cardigan by making a sl st on the outermost
posts of the panels (see arrows below). You should create 1 row of ribbing per 1 row of hdcs of your front panels.
Step 13. Sl st again on the outer post. Flip your work. BLOhdc on each of the next sts. Make sure you still have 8
hdcs.
Step 14. Ch2. Flip your work. BLOhdc on each of the next sts. Sl st on the outer post.
Step 15. Repeat steps 13-14 until you reach the uppermost row of your front panel.
Page 26 of 29
COLORBLOCK OVERSIZED DREAM CARDIGAN CROCHET PATTERN
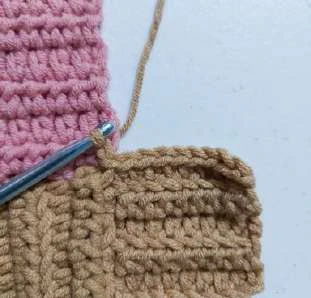
For row/s where you placed the stitch markers, you are going to place the buttonholes.
For these rows, you are going to skip the 5th st from the front panel. Instead of doing BLOhdc, ch1, skip 1 st then
BLOhdc on the next. BLOhdc till you reach the end of the row. Make sure that your button can fit the ch1 space that
you created.
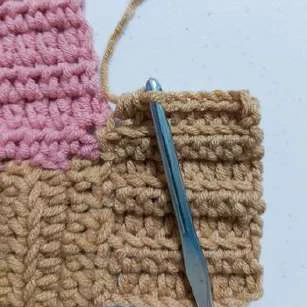
Step 16. Once you’ve reached the uppermost row of your front panel:
If you did step 13 on the uppermost row:
Ch2. Flip your work. BLOhdc on each of the next 4 sts, then BLOsc on each of the next 4 sts.
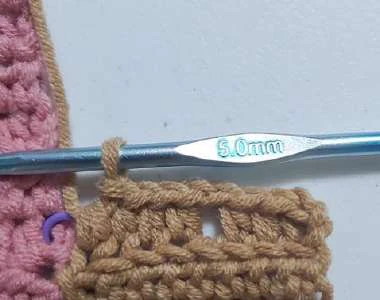
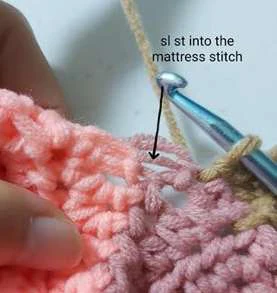
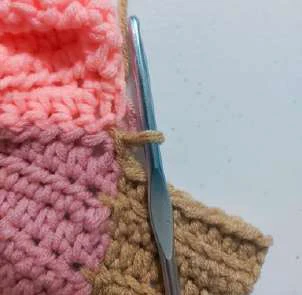
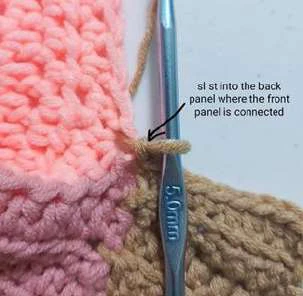
Sl st into the mattress stitch connecting the front and back panel. Then sl st into the st at the back panel
where the front panel is connected.
Flip your work, BLOsc on each of the next 4 sts, BLOhdc on each of the next 4 sts.
Ch2 flip your work. BLOhdc on each of the next sts.
Skip 1 st, sl st on the next.
If you did Step 14 on the uppermost row:
Sl st on the post.
Sl st into the mattress stitch connecting the front and back panel. Flip your work, BLOsc on each of the
next 4 sts, BLOhdc on each of the next 4 sts.
Ch2 flip your work. BLOhdc on each of the next 4 sts. BLOsc on each of the next 4 sts.
Sl st into the st at the back panel where the front panel is connected.
Step 17. Sl st again on the next. Flip your work.
Step 18. BLOhdc on each of the next sts.
Page 27 of 29
COLORBLOCK OVERSIZED DREAM CARDIGAN CROCHET PATTERN
Step 19. Ch 2, flip your work. BLOhdc on each of the next sts. Skip 1 st, sl sl on the next.
Step 20. Repeat steps 17-19 until you reach the last st on the neck part.
Step 21. Now you’ve reached the other front panel,
If you did Step 18 on your last st:
Ch2, flip your work. BLOhdc on each of the next 4 sts, BLOsc on each of the next 4 sts. Sl st into the st at
the back panel where that front panel is attached.
Sl st into the mattress stitch connecting the front and back panel. Flip your work, BLOsc on each of the
next 4 sts, BLOhdc on each of the next 4 sts.
Ch2 flip your work. BLOhdc on each of the next sts.
Sl st on the post.
If you did Step 19 on your last st:
Sl st again into the st at the back panel where your front panel is connected. Flip your work, BLOsc on each
of the next 4 sts, BLOhdc on each of the next 4 sts.
Ch2 flip your work. BLOhdc on each of the next 4 sts. BLOsc on each of the next 4 sts. Sl st on the mattress
stitch.
Step 22. Repeat steps 13-14 until you reach the last st of the front panel.
Step 23. Once you’ve reached the 1st st on the bottom ribbing, repeat steps 9-11 until you reach the end. Ch 1, cut
the yarn and fasten off.
Step 24. Attach the buttons by sewing.
Page 28 of 29
COLORBLOCK OVERSIZED DREAM CARDIGAN CROCHET PATTERN
You have now finished creating the colorblock oversized cardigan!
Hope you enjoyed!
Page 29 of 29
Recommended Digital Products
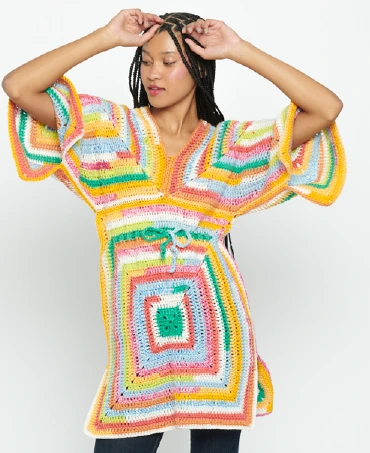
Handmade Crochet Tunic Pattern | Beginner-Friendly Colorful Striped Beach Cover-Up & Top PDF Pattern
$4.99
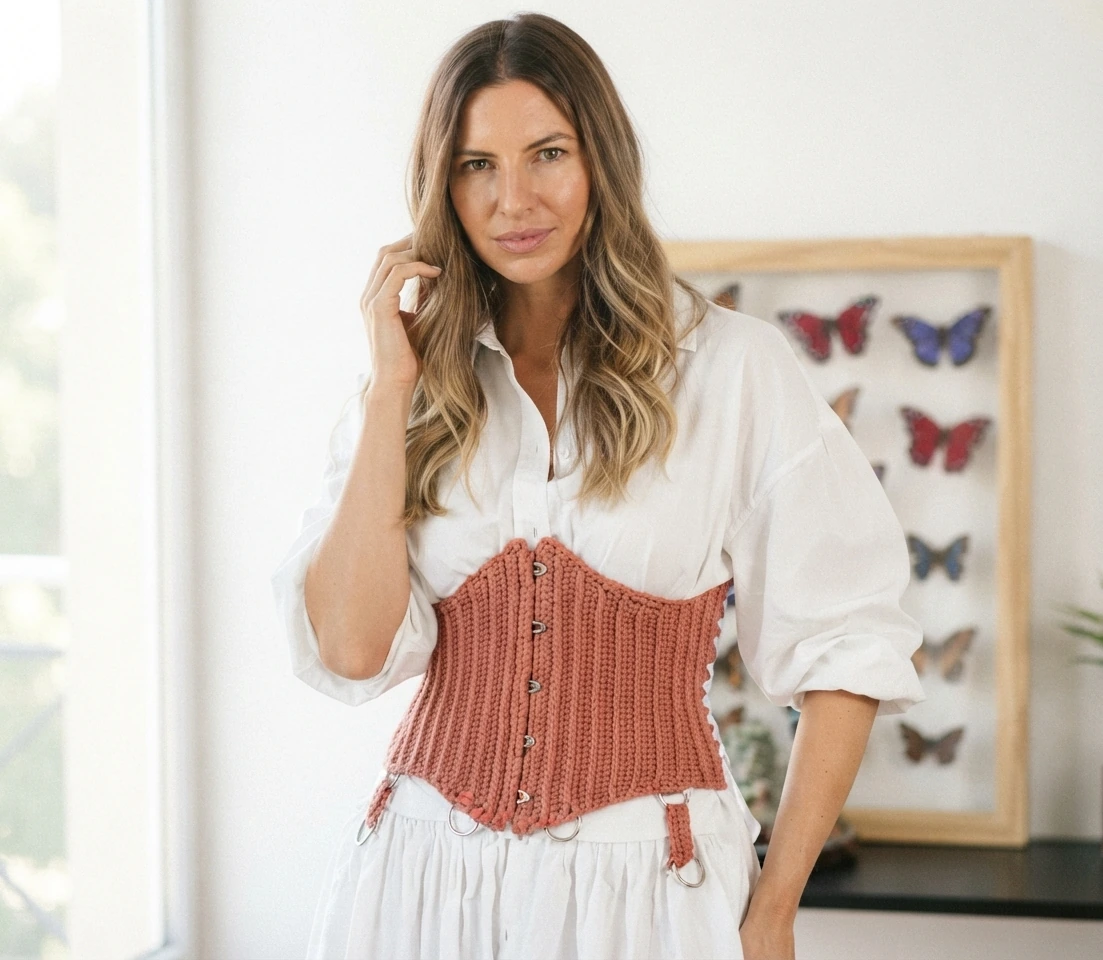
Handmade Crochet Corset Belt Pattern Boho Chic Waist Cincher with Busk & Ribbon Lacing Intermediate Crochet PDF Pattern
$4.99
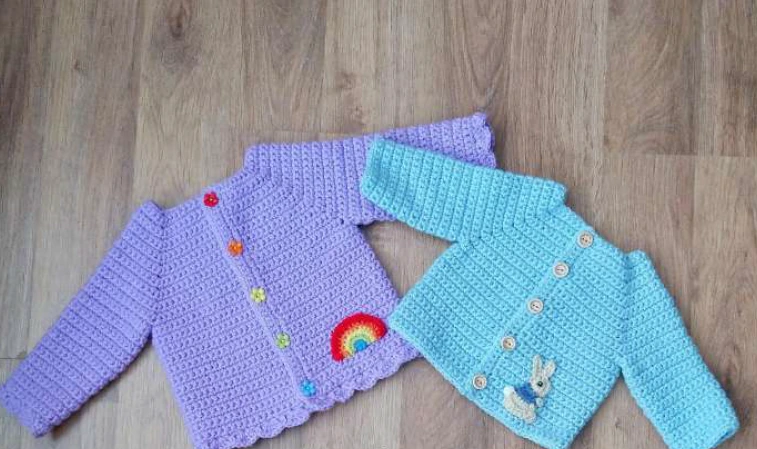
Simple Playdays Baby Cardigan Crochet Pattern PDF | Easy Unisex Newborn to 4 Years Sweater with Rainbow & Bunny Appliques
$4.99

The Ultimate Beginner’s Crochet Guide: Master 45+ Essential Techniques & Practical Projects
$5.99
Get this Crochet Pattern as a Free PDF
Enter your email to receive the PDF associated with this article.
Leave a Reply