
Granny squares dinausor
Plod the African Flower
Triceratops Crochet Pattern
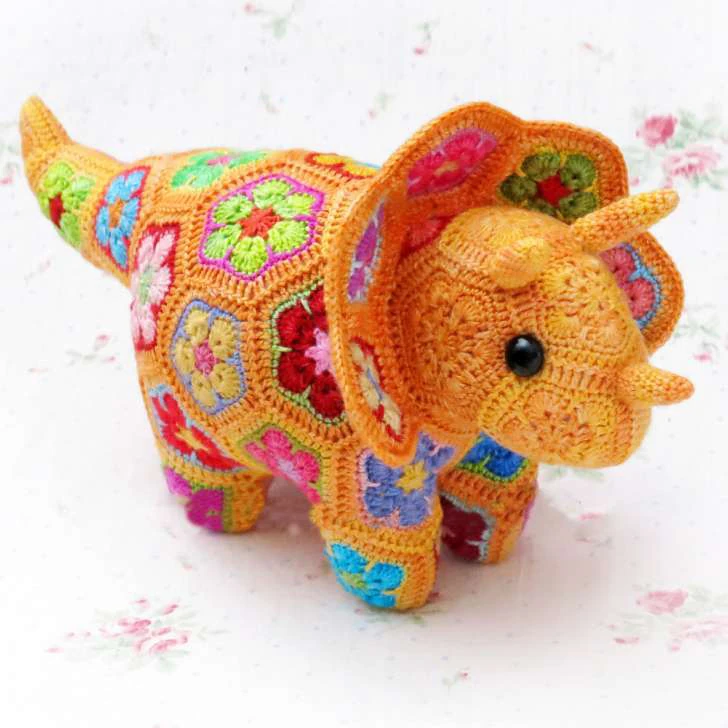
:: Steps to making your own Plod ::
1.
NB: First read the whole pattern through properly, so you have a good overview. I cannot
emphasize this enough!
2.
Make sure you know how to crochet the African Flower hexagon crochet motif. I have includ-
ed both written and charted instructions for the African Flower hexagon in this pattern.
3.
Make sure you are able to crochet an African Flower pentagon, octagon, heptagon and
square. For clarity: the pentagon has five petals and five sides and the heptagon has seven petals
and seven sides, the octagon has eight petals and eight sides and so on…. The difference is simply
the number of “petal” repeats that you crochet…pentagons, octagons and heptagons etc are there-
for equally easy to crochet. I have included written and charted instructions in this pattern on how to
crochet an African Flower Pentagon (as well as all the other motifs).
4.
Make sure you have gone through and practiced the join-as-you-go technique. This has been
explained and illustrated at the end of the pattern in a section titled “Appendix : Joining Tutorials”.
Since the joining method is really very important to the success of the project, I strongly suggest that
you practice joining on scrap yarn motifs before starting the project. If you would prefer to sew your
motifs together, you won’t need to practice the join-as-you-go technique, but will need to be confi-
dent in your neat sewing ability. I have not included instructions on how to sew stuff together…there
are plenty resources available on the internet…
5.
Either choose your yarn for this project or use the sock yarn that you have left over from other
projects. Make all the required motifs for your dino, BUT only up to Round 4 of the African Flower
motif if you are doing a join-as-you-go method (JAYG), or the full motif up to Round 5 if you are sew-
ing up the motifs.
: : Materials Requirements : :
The dino that was crocheted for this pattern, was made using sock weight/fingering/#1 weight
yarn. Using this weight yarn will give you a triceratops measuring approximately 30cm mea-
sured from tail to nose, and approximately 14cm from the top of the back to feet.
ALL OF THE CROCHET STITCHES USED IN THIS PATTERN ARE BASED ON AMERICAN
CROCHET TERMS
Sock weight / Fingering weight yarn/ #1 in colors of your choice… this little dino is a
great stash busting project as you can use small amounts of sock yarn for each motif, and the
more colourful the prettier. Although I can’t tell you how much yardage of each color I used I
can tell you that the total weight of yarn for the dino was around 170 g (unstuffed).
The yardage for the sock yarn I used is around 320m/100g (350yds/100g). It is a superwash
merino yarn, but you can use any alternative fingering weight yarn you like…I suggest that
animal fibre yarns would be preferable, as they have more stretch, making the stuffing and
shaping of the dino easier. Try to use a yarn with a similar yardage per 100g. If you use a heavier
weight yarn and a larger hook, the dino will be bigger than the one made in sock yarn, and you
will obviously need more polyester stuffing.
Crochet Hook 1.75mm
If you are planning to make your dino in a heavier weight yarn, adjust your hook size according-
ly…however, use the smallest hook size possible for the weight of yarn that you can manage.
Note that the hook size recommended by the yarn manufacturer would not be the correct size
to use for this project…Since the dino is stuffed, your stitch density will need to be tighter than
usual to prevent the stuffing from popping out. Make a test motif in your chosen yarn and hook
to see which would be the best size to use.
Polyester toy stuffing Haemostats (optional for stuffing)
Scissors
Tapestry Needle used for sewing in ends Sewing Pins
Sewing needle
Curved sewing needle
Long tapestry needle
Eyes (plastic safety eyes or glass wire-looped eyes). PLEASE NOTE THAT ATTACHED EYES ARE
NOT RECOMMENDED FOR TOYS CREATED FOR CHILDREN! They can be a suffocation hazard. If
you are making this toy for a child, rather embroider the eyes using embroidery thread! I would
still suggest sculpting the eye sockets before embroidering the eyes…it adds a lovely realistic
element. I have used 14mm wire looped glass eyes. These can easily be sourced from sellers
: : Skills Requirements : :
Basic Crocheting Skills: Chain stitch (ch) , Single Crochet (sc), Double Crochet (dc), Slip Stitch
(sl st), joining a chain to make a ring, joining in a new color
Join-as-you-go motif joining: This pattern will require that you join the crocheted motifs each
stitch to each stitch. This is necessary to prevent the stuffing popping out of the dino. It is
imperative that you are confident in your join-as-you-go ability. The method I use is explained
in the Appendix pages found at the end of the pattern. These tutorials are illustrated by using
motif chart illustrations with explanatory notes. This cuts down on printing
However, if you are scared witless by the thought of doing a join-as-you-go joining method,
all is not lost…you can simply make all your motifs in full (including Round 5), then sew them
together. The order of motif placement and the number of sides needing to be joined stays
exactly the same whether you join-as-you-go or sew up.
Basic sewing skills Sewing the frill and horns to the head.
Number of Motifs Required for Shoop
Body (multi-colored):
Hexagons = 16
Pentagons = 14
Octagon = 1
Heptagon = 1
Square = 1
Frill (multi-colored):
Pentagons = 10
Head (solid color):
Pentagons = 3
Hexagons = 3
Square = 1
TOTAL REQUIRED MOTIFS: 50
: : General Tips : :
There are a few tips that you will want to know, to make your life easier, when making Plod.
Please read these tips through several times so you are really ofay with them.
NOTE: The heptagons and octagons are SUPPOSED TO CURL. This is part of the design
intent … you are not doing anything wrong! It will work out in the end…promise! The squares
are also not totally flat motifs, but “cup” into a semi-rounded shape…this is also ok!
I strongly recommend that you work through the Joining Tutorial…because Plod is stuffed, you
will need to join the African Flower motifs, stitch to stitch, so that the stuffing doesn’t pop out.
Although this is really easy once you get the hang of it, if you aren’t careful in having the cor-
rect stitch number etc, you will have a nightmare joining motifs, and more than likely give up
in despair! I want to be sure that you are a happy dino maker, so please take the time to be a
joining superstar!
If you prefer, you can make the motifs as required and sew them up with yarn and needle in-
stead.
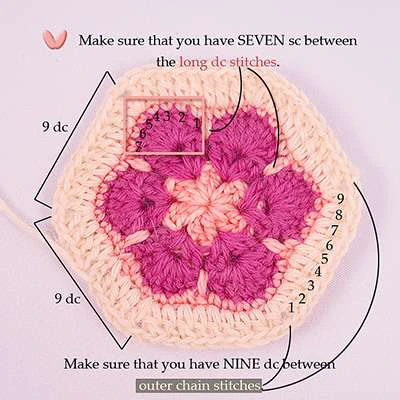
TIP 1: ROUND 4: When you crochet Round 4 of the African Flower Hexagon, ie the round of
sc’s on the outer edge of the flower petals, (in the photos on page 8, the apricot colored sc’s),
make sure that you end up with SEVEN sc’s between the long dc stitches. In order for you to
easily join the motifs, each stitch to each stitch, you will have to have the correct number of
outer sc’s separated by long dc’s.
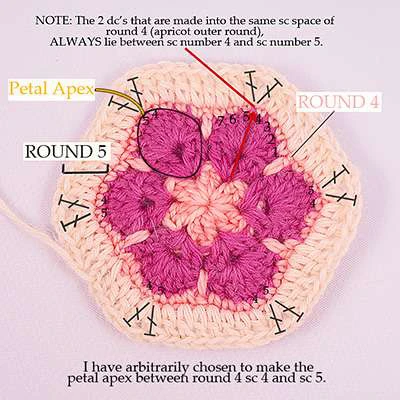
TIP 2: ROUND 5: When you crochet Round 5 of the African Flower motif (in the photos on
pg 8, seen as the outermost round in cream colored yarn), make sure that you have NINE dc’s
separated by the chain stitches as shown. NOTE that dc number 9 of a “9dc repeat”, and dc
number 1 of the next along “9dc repeat” (of round 5), are made into THE SAME sc space below
of round 4. This point is what I have arbitrarily called the APEX of the flower petal.
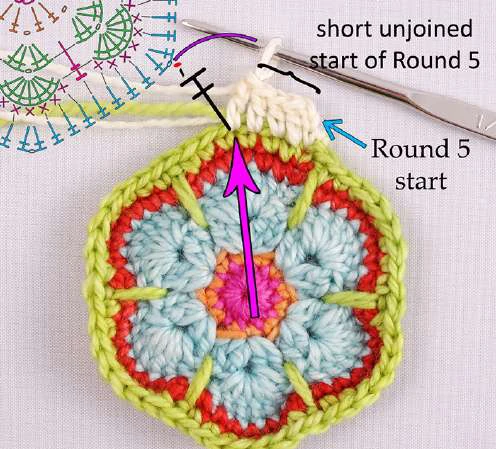
TIP 3: JOINING-AS-YOU-GO PROCESS: When you join one motif to another, the motif you
are joining TO, will ALWAYS have all its Rounds completed, ie Round 5 will always have been
crocheted. The motif you are joining (ie the one you are ADDING/JOINING to the other), will
only have been crocheted up to Round 4. The join-as-you-go process creates Round 5 of this
motif. So when you see an instruction like “Join a hexagon on three sides”, it means that you
need to take a hexagon that has been crocheted only up to Round 4, and crochet Round 5 as
you join to the other motifs. A “side” will always be the distance between two flower apices,
ie you will start your joining at one chain space point, and work to the next chain space.
This means that all motifs that are being joined will have a small part of Round 5 at the begin-
ning that is unjoined (photo below). This does not apply to motifs that are joined ON ALL SIDES,
only to motifs that are joined on less than ALL SIDES.
TIP 4: JOINING-AS-YOU-GO: If you find the joining-as-you-go too difficult, then make up the
completed motifs for each body part and sew them together using spare yarn and a tapestry
needle.
TIP 5: 9dc REPEAT: When you are joining sides of motifs to each other, you will essentially be
matching petal apex to petal apex (that is why you need to be sure that you have 9 dc between
each petal apex…ie matching and joining 9dc’s to 9dc’s on the joined sides). Where I have indi-
cated the sides of motifs to be joined, I am using colored lines to show which sides correspond
to each other. Remember that the lines will run from petal apex to petal apex (sometimes it
is hard to illustrate exactly the beginning and end of the side to be joined, because the cro-
cheted work tends to naturally curl, so the work and therefore the photos can be a bit distort-
ed…), and that this distance is what is called a “side”.
TIP 6: ALWAYS WORK WITH THE RIGHT SIDE FACING YOU: I have photographed the work
from the RIGHT SIDE, up to the point where it has become impractical to keep the work flat
for photographing…because you are creating a 3D shaped body and head, your work will curl
up naturally after adding several motifs. The motifs are ALWAYS added/joined with their right
sides facing you, If you look down at the work when starting to add a new motif, you will be
crocheting in an ANTICLOCKWISE direction, starting the joining round at the point indicated in
the photographs/illustrations by a pink arrow. If you have worked through the joining tutorial,
you will have a clearer understanding of this tip.
In the photo on the left, the blue arrow shows
the starting stitches of Round 5 (cream yarn)
of the ‘joining motif”. The first point at which
you will join to the motif shown by the crochet
chart (ie, the completed motif), is at the petal
“apex”, which is where the two dc’s of Round
5 have their “feet” sitting in the same stitch
space. In doing this you also “create” a pet-
al apex on the “joining motif”, ie joining petal
apex to petal apex. The purple curve and red
dot show a slip stitch into the chain space of
the opposite motif, after which you make the
second dc of the “joining motif” petal apex. The
pink arrow indicates the “joining motif” petal
apex point.
TIP 7: CROCHET HOOK QUALITY: I strongly recommend that you use good quality crochet
hooks. Your hooks MUST have good deep throats, or you might struggle with crocheting the
smaller motifs. As Plod is a stuffed animal, the motif stitch density has to be tight, to prevent
the stuffing popping out. Unfortunately this means that your crochet will be quite tight, and if
your hooks don’t have good throats, you will struggle to pull the yarn through motif stitches.
TIP 8: MOTIF SIZE: The exact size of each motif is not as important as that your tension
should be the same over time as you crochet. Remember, the yarn and hook stay the same,
the only variable for motif size is your tension. For reference, my completed hexagons mea-
sure around 5.5cm from point to point when using the recommended yarn and hook.
TIP 9: COLOR VARIATIONS: I have made Plod in a variety of colors, but the sky is the limit…
choose your own color combinations, the making process remains the same.
TIP 10: STUFFING: In some of the photos I have stuffed Plod partly, mostly to show the
motifs more clearly for reference purposes…this does not mean you need to stuff your dino as
well…only stuff Plod when the pattern instructs you to do so…
TIP 11: ORIENTATION: When I talk of Plod’s left and right or left and right -hand sides, I use
the terms as anatomically correct, ie if you are looking directly at Plod’s tail end, standing right
behind him, all motifs on the right hand side are “Right side / Right-hand side” motifs, and all
motifs on the left side are “Left side / Left-hand side” motifs.
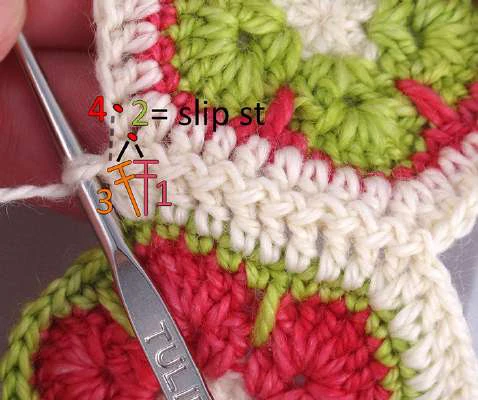
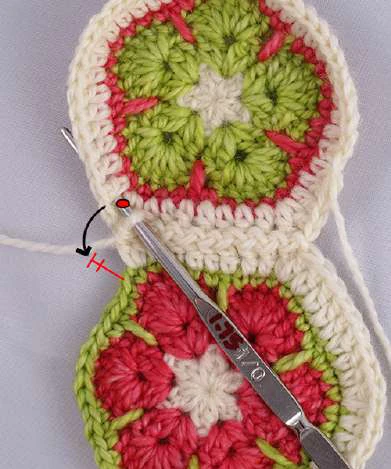
TIP 12: TURNING THE CORNER: Some of the motifs are joined along three sides to each oth-
er, eg a foot or leg…here are some photos that will help you “turn the corner” so to speak…
The numbers are the order of steps you take when turning the corner.
:: Making your Dino: Illustration Meanings ::
Plod is worked initially from the legs up, then from the bum forwards towards the
head. In the instructions that follow, I have used the following illustration keys to in-
dicate certain things…please be sure you know what each of these things show…it will
make it easier for you to follow the pattern
Bright Pink Arrows: These pink arrows always show the point on the work, where you
will start joining your next motif. Remember that a joining side is the distance be-
tween the chain space {dc, ch, dc} at a petal apex to the next-along chain space
{dc, ch, dc} of a petal apex. So the pink arrow will always point to the chain space at
a petal apex.
Colored lines: Colored lines on motifs are used to show which sides will be joined
together with JAYG or sewing. So for example, sides bearing green lines are joined
together etc…remember that a side is always the distance from a chain space at a
petal apex to a chain space at a petal apex, so a colored line will always indicate this
distance, even if it doesn’t look like that in a photo.
Black Numbers: Black numbers show what the motif is … so a “6” means that the
motif is a hexagon as it has six sides. This may seem like an obvious thing , but some-
times the photos may not be showing the whole motif, and a number can help orient
you in where things are. If the number is black, it means that the photo is taken with
the RIGHT (as opposed to wrong) side of the motif showing / facing you.
Red Numbers: Red numbers show what the motif is in the same way as the black
numbers (see above), EXCEPT, that they indicate the WRONG side of the motif (as
opposed to the right side). Sometimes in photos you will be facing the wrong side be-
cause the work has curled or assumed a non-flat shape…again, this is to help you with
orientation and the placement of the motifs.
ONE BIG THING TO REMEMBER: When you JAYG, you will ALWAYS be facing the
RIGHT (as opposed to wrong) side of the motif you ARE JOINING TO! Read the tips
section again at the beginning of the pattern if you need to for further clarification on
this
Black Lines: The black lines are used to show where the joining sides lie after a motif
has been joined. It helps you to orient the work and the motifs visually, as the archi-
tecture of the work may look different once the motif has been joined as compared to
the how the “unjoined” area looks.
Black lines may also be used to show “un-joined” sides of a motif.
In some of the photos I have placed a paper card behind the work for clarity’s sake…
this lessens the distraction from the parts of the work that are not relevant to the cur-
rent instructions.
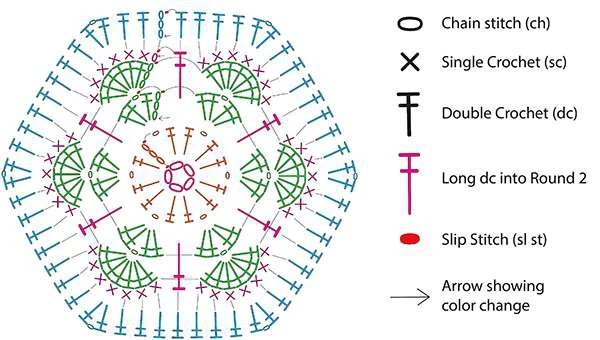
African Flower Hexagon Crochet Motif Instructions
Round 1: Ch5 and join with slip stitch to form a ring. Ch3 (counts as first dc), 1 dc in ring, ch1. Then, make * 2 dc
in ring, ch1 *. Repeat from * to * 4 times more, slip stitch join to third chain of beginning “ch3” of the round. Cut
yarn and pull through. (6 sets of 2dc’s separated by chain stitches).
Round 2: Join next color in the ch1 space (just to the right of the previous round’s ch3 beginning) and ch3
(counts as first dc). Make a dc in that same chain space then ch1. Make 2 dc (still in the same chain space).
Move on to the next chain space of the previous round, and make the following: 2 dc, ch1, 2dc in that chain
space. Repeat this in each of the next 4 chain spaces. Join with slip stitch to third chain of beginning “ch3” of the
round. (6 clusters of [2dc,ch,2dc] )
Round 3: Continue with the same colour. Slip stitch into the chain space in the middle of the first cluster of the
previous round. Ch3 (counts as first dc). Make 6 dc in same chain space (total of 7 dc’s). Make 7 dc’s into the
chain space of the next cluster. Repeat 4 more times, so that each cluster has 7 dc’s in its chain space. Join
with slip stitch to the third chain of the beginning “ch3” of the round. Cut yarn and pull through. (6 sets of 7
dc’s).
Round 4: Join new colour in the slip stitch of previous round’s end, and ch1 (counts as a sc). Make one sc into
each of the dc’s of the cluster (this makes 7 sc including the ch1). Make one long dc (between clusters) that
extends down into round 2 of the flower, so that it separates the round 2 clusters. * Sc into each of the 7 dc
stitches of the next cluster. Make one long dc (between clusters) that extends down into round 2 of the flower,
so that it separates the round 2 clusters. * Repeat from* to * four more times. Slip stitch to the beginning of the
round “ch1” stitch. Cut yarn and pull through. (42 sc and 6 long dc)
Round 5: Join next colour to the slip stitch at the end of the previous round. Ch3 (counts as first dc). Make one
dc into each of the next 2 sc’s, then (dc, ch1, dc) into the next sc (this forms the “apex” of the flower petal). Then
make one dc into each of the next three sc. Make one dc into the previous round’s “long dc” stitch. * Make one
dc into each of the next petal’s first three sc stitches, then (dc, ch1, dc) into the next sc (this forms the “apex”
of the petal), then make one dc into each of the next three sc. Make one dc into the previous round’s long dc
stitch. * Repeat from * to * four more times. Slip stitch to the third chain of the “ch3” of the beginning of the
round. Cut yarn and pull through. (You should have nine “dc” stitches between each petal apex, separated by a
chain stitch, so 54 dc in all).
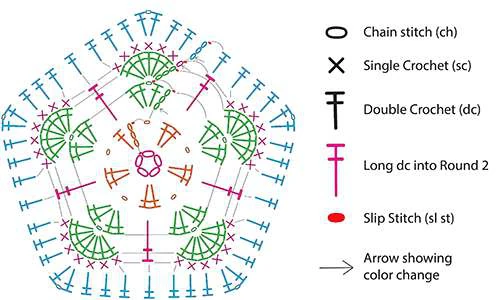
African Flower Pentagon Crochet Motif Instructions
Round 1: Ch5 and join with slip stitch to form a ring. Ch3 (counts as first dc), 1 dc in ring, ch1. Then, make * 2 dc
in ring, ch1 *. Repeat from * to * 3 times more, slip stitch join to third chain of beginning “ch3” of the round. Cut
yarn and pull through, leaving a tail. (5 sets of 2dc’s separated by chain stitches).
Round 2: Join next color in the ch1 space (just to the right of the previous round’s ch3 beginning) and ch3
(counts as first dc). Make a dc in that same chain space then ch1. Make 2 dc (still in the same chain space).
Move on to the next chain space of the previous round, and make the following: 2 dc, ch1, 2dc in that chain
space. Repeat this in each of the next 3 chain spaces. Join with slip stitch to third chain of beginning “ch3” of the
round. (5 clusters of [2dc,ch,2dc] )
Round 3: Continue with the same color. Slip stitch into the chain space in the middle of the first cluster of the
previous round. Ch3 (counts as first dc). Make 6 dc in same chain space (total of 7 dc’s). Make 7 dc’s into the
chain space of the next cluster. Repeat 3 more times, so that each cluster has 7 dc’s in its chain space. Join with
slip stitch to the third chain of the beginning “ch3”. Cut yarn and pull through, leaving a tail. (5 sets of 7 dc’s).
Round 4: Join new colour in the slip stitch of previous round’s end, and ch1 (counts as a sc). Make one sc into
each of the dc’s of the cluster (this makes 7 sc including the ch1). Make one long dc (between clusters) that
extends down into round 2 of the flower, so that it separates the round 2 clusters. * Sc into each of the 7 dc
stitches of the next cluster. Make one long dc (between clusters) that extends down into round 2 of the flower,
so that it separates the round 2 clusters. * Repeat from* to * three more times. Slip stitch to the beginning of
the round “ch1” stitch. Cut yarn and pull through, leaving a tail. (35 sc and 5 long dc)
Round 5: Join next colour to the slip stitch at the end of the previous round. Ch3 (counts as first dc). Make one
dc into each of the next 2 sc’s, then (dc, ch1, dc) into the next sc (this forms the “apex” of the flower petal). Then
make one dc into each of the next three sc. Make one dc into the previous round’s “long dc” stitch. * Make one
dc into each of the next petal’s first three sc stitches, then (dc, ch1, dc) into the next sc (this forms the “apex”
of the petal), then make one dc into each of the next three sc. Make one dc into the previous round’s long dc
stitch. * . Repeat from * to * three more times. Slip stitch to the third chain of the “ch3” of the beginning of the
round. Cut yarn and pull through, leaving a tail. (You should have nine “dc” stitches between each petal apex,
separated by a chain stitch, so 45 dc in all).
African Flower Heptagon Crochet Motif Instructions
Round 1: Ch5 and join with slip stitch to form a ring. Ch3 (counts as first dc), 1 dc in ring, ch1. Then, make * 2 dc
in ring, ch1 *. Repeat from * to * 5 times more, slip stitch join to third chain of beginning “ch3” of the round. Cut
yarn and pull through, leaving a tail. (7 sets of 2dc’s separated by chain stitches).
Round 2: Join next color in the ch1 space (just to the right of the previous round’s ch3 beginning) and ch3
(counts as first dc). Make a dc in that same chain space then ch1. Make 2 dc (still in the same chain space).
Move on to the next chain space of the previous round, and make the following: 2 dc, ch1, 2dc in that chain
space. Repeat this in each of the next 5 chain spaces. Join with a slip stitch to third chain of beginning “ch3” of
the round. (7 clusters of [2dc,ch,2dc] )
Round 3: Continue with the same colour. Slip stitch into the chain space in the middle of the first cluster of the
previous round. Ch3 (counts as first dc). Make 6 dc in same chain space (total of 7 dc’s). Make 7 dc’s into the
chain space of the next cluster. Repeat 5 more times, so that each cluster has 7 dc’s in its chain space. Join
with slip stitch to the third chain of the beginning “ch3” of the round. Cut yarn and pull through, leaving a tail. (7
sets of 7 dc’s).
Round 4: Join new colour in the slip stitch of previous round’s end, and ch1 (counts as a sc). Make one sc into
each of the dc’s of the cluster (this makes 7 sc including the ch1). Make one long dc (between clusters) that
extends down into round 2 of the flower, so that it separates the round 2 clusters. * Sc into each of the 7 dc
stitches of the next cluster. Make one long dc (between clusters) that extends down into round 2 of the flower,
so that it separates the round 2 clusters. * Repeat from* to * five more times. Slip stitch to the beginning of the
round “ch1” stitch. Cut yarn and pull through, leaving a tail. (49 sc and 7 long dc)
Round 5: Join next colour to the slip stitch at the end of the previous round. Ch3 (counts as first dc). Make one
dc into each of the next 2 sc’s, then (dc, ch1, dc) into the next sc (this forms the “apex” of the flower petal). Then
make one dc into each of the next three sc. Make one dc into the previous round’s “long dc” stitch. * Make one
dc into each of the next petal’s first three sc stitches, then (dc, ch1, dc) into the next sc (this forms the “apex”
of the petal), then make one dc into each of the next three sc. Make one dc into the previous round’s long
dc stitch. * Repeat from * to * five more times. Slip stitch to the third chain of the “ch3” of the beginning of the
round. Cut yarn and pull through, leaving a tail. (You should have nine “dc” stitches between each petal apex,
separated by a chain stitch, so 63 dc in all).
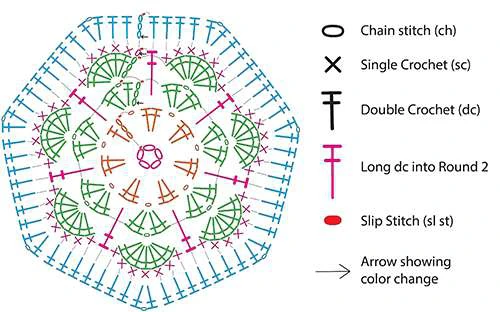
African Flower Octagon Crochet Motif Instructions
Round 1: Ch5 and join with slip stitch to form a ring. Ch3 (counts as first dc), 1 dc in ring, ch1. Then, make * 2 dc
in ring, ch1 *. Repeat from * to * 6 times more, slip stitch join to third chain of beginning “ch3” of the round. Cut
yarn and pull through, leaving a tail. (8 sets of 2dc’s separated by chain stitches).
Round 2: Join next color in the ch1 space (just to the right of the previous round’s ch3 beginning) and ch3
(counts as first dc). Make a dc in that same chain space then ch1. Make 2 dc (still in the same chain space).
Move on to the next chain space of the previous round, and make the following: 2 dc, ch1, 2dc in that chain
space. Repeat this in each of the next 6 chain spaces. Join with slip stitch to third chain of beginning “ch3” of the
round. (8 clusters of [2dc,ch,2dc] )
Round 3: Continue with the same colour. Slip stitch into the chain space in the middle of the first cluster of the
previous round. Ch3 (counts as first dc). Make 6 dc in same chain space (total of 7 dc’s). Make 7 dc’s into the
chain space of the next cluster. Repeat 6 more times, so that each cluster has 7 dc’s in its chain space. Join
with slip stitch to the third chain of the beginning “ch3” of the round. Cut yarn and pull through, leaving a tail. (8
sets of 7 dc’s).
Round 4: Join new colour in the slip stitch of previous round’s end, and ch1 (counts as a sc). Make one sc into
each of the dc’s of the cluster (this makes 7 sc including the ch1). Make one long dc (between clusters) that
extends down into round 2 of the flower, so that it separates the round 2 clusters. * Sc into each of the 7 dc
stitches of the next cluster. Make one long dc (between clusters) that extends down into round 2 of the flower,
so that it separates the round 2 clusters. * Repeat from* to * six more times. Slip stitch to the beginning of the
round “ch1” stitch. Cut yarn and pull through, leaving a tail. (56 sc and 8 long dc)
Round 5: Join next colour to the slip stitch at the end of the previous round. Ch3 (counts as first dc). Make one
dc into each of the next 2 sc’s, then (dc, ch1, dc) into the next sc (this forms the “apex” of the flower petal). Then
make one dc into each of the next three sc. Make one dc into the previous round’s “long dc” stitch. * Make one
dc into each of the next petal’s first three sc stitches, then (dc, ch1, dc) into the next sc (this forms the “apex”
of the petal), then make one dc into each of the next three sc. Make one dc into the previous round’s long
dc stitch. * Repeat from * to * six more times. Slip stitch to the third chain of the “ch3” of the beginning of the
round. Cut yarn and pull through, leaving a tail. (You should have nine “dc” stitches between each petal apex,
separated by a chain stitch, so 72 dc’s in all).
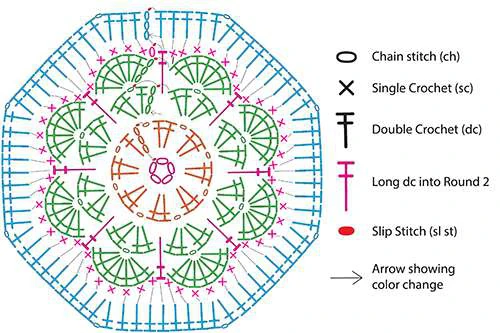
African Flower Square Crochet Motif Instructions
NOTE: There are two square motifs used in the making of Plod, and in my Plod, I have chosen to make
them in one color. You can use different colors if you choose. I have drafted the chart so that each round is
a different color, making it easier to read as well as indicating where you can change colors, if desired.
The square has only 4 rounds instead of 5. If you are using the JAYG methid, make the square only up to
round 3 before starting the JAYG, which creates Round 4 (the final round).
Round 1: Ch5 and join with a slip stitch to make a ring. Ch3 (counts as first dc), then make 1dc into the ring, ch1.
Make * 4 dc into ring, ch1. * Repeat from * to * twice more. Make 2 dc into ring and join with a slip stitch to the
third chain of the “ch3” of the beginning of the round. (4 sets of 4dc’s separated by chain stitches)
Round 2: If you choose, you can join a new color yarn. Ch3 into a chain space of Round 1. If you choose not to
change colors, first slip stitch into the next along chain space, then Ch3 (counts as first dc). Make 7 dc into this
same chain space. Make 8dc’s into each of the three remaining chain spaces of Round 1. Join with a slip stitch
to the third chain of the “Ch3” beginning of Round 1. (4 clusters of 8 dc’s)
Round 3: Join a new color if you wish. Ch1 into the slip stitch of the previous round. Sc into each of the seven
dc’s of this cluster. Sc into each of the 8 dc’s of the next cluster. Repeat for the remaining two clusters. Join with
a slip stitch to the ch1 at the beginning of the round. (4 sets of 8 sc’s)
Round 4: Join a new color yarn to the slip stitch of round 3. Ch3 (counts as first dc). Make a dc into each of the
next four sc stitches.Ch1, then * make a dc into the same sc space as the previous dc. Make a dc into each
of the next eight sc’s from Round 3. Ch1. * Repeat from * to * two times more. Make a dc into the same sc
space as the previous dc . Make a dc into each of the next three sc stitches of Round 3. Join with a slip stitch to
the third chain of the “ch3” at the beginning of the round. (4 sets of 9 dc’s separated by 4 chain stitches, ie four
“9dc repeats”)
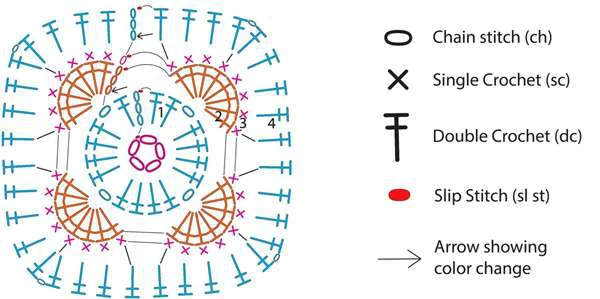
:: Making the Feet and Belly ::
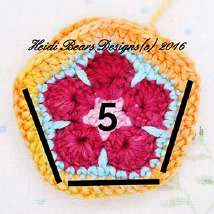
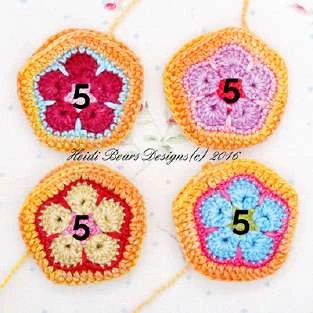
You’ll start by making all four of Plod’s feet. Each foot is made up of two pentagons, which are
joined along THREE SIDES to each other.
Complete a pentagon up to round 5. Take a second pentagon that has been made up to
Round 4 and join it to the complet-
ed pentagon along THREE SIDES as
shown on the far left. In the photo on
the left, you can see the three joined
sides.
The two pentagons form a “pocket”
when opened up. Make three more
feet in the same way.
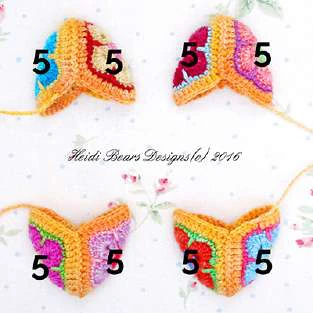
Plod’s four completed feet
look like this (photo far left).
Pop open each of the feet so
that you can only see half of
each pentagon (photo left).
Place the four opened-up
feet as shown.
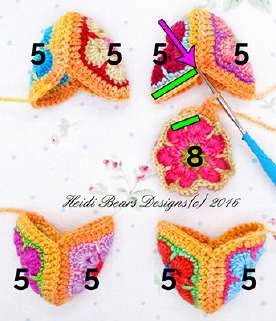
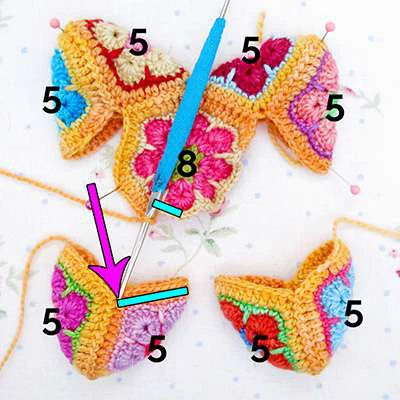
Next, you will join the belly
octagon. Follow along care-
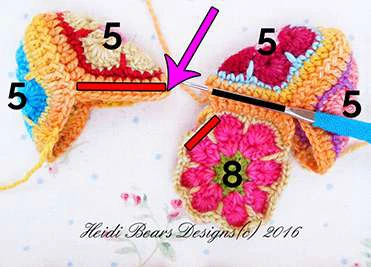
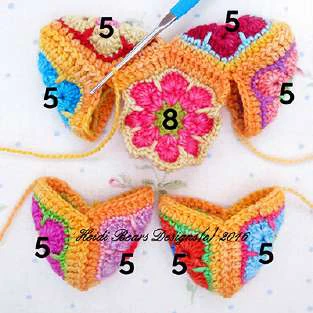
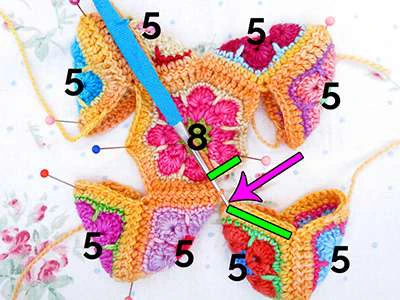
fully, joining one side at a time so as not to get confused. The first TWO SIDES of the belly
octagon are joined to the top INNER pentagons (photos below).
In the photo above far right, you can see these two sides joined and how things look now.
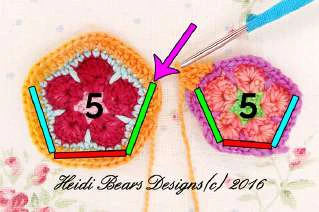
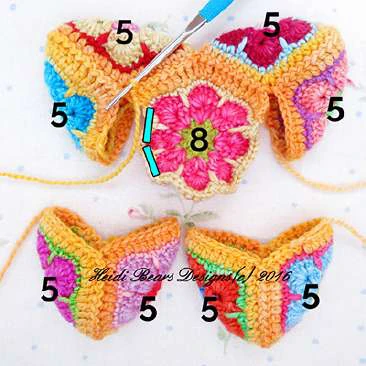
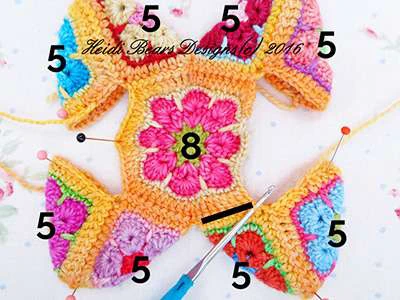
Now crochet TWO UN-JOINED SIDES on the octagon (photo below left, blue lines).
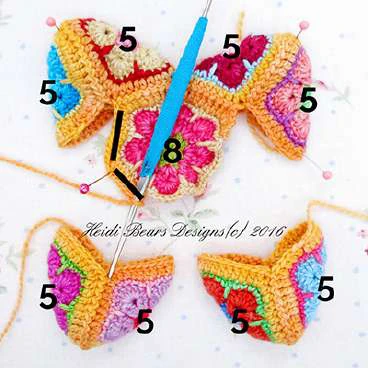
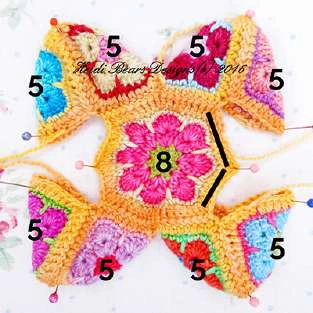
Then join the octagon on TWO SIDES to the feet again … the first side is joined to the lower
left inner pentagon and the second side is joined to the lower right inner pentagon (photos
below left and right respectively).
Finally, complete the remainder of the octagon’s Round 5 without joining (photo below right,
black lines). Well done! Plod now has a tummy : D
:: Joining a full row of Hexagons to the Body Base ::
The next steps involve joining a full row of hexagons around the body base you have just
made. You will need 8 hexagons for this part.
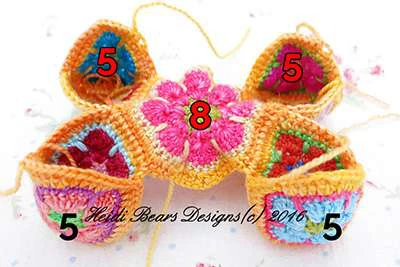
Open up each foot and place on your
work table as shown on the left. No-
tice that you will be facing the wrong
(as opposed to right) side of the belly
octagon.
The octagon still has FOUR FREE SIDES
(two free sides at the left-hand side of
the body and two free sides on at the
right-hand side of the body).
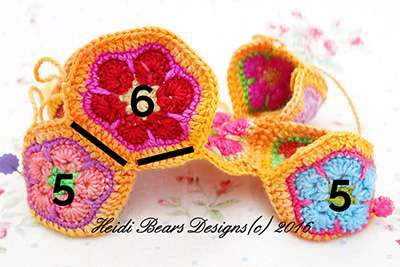
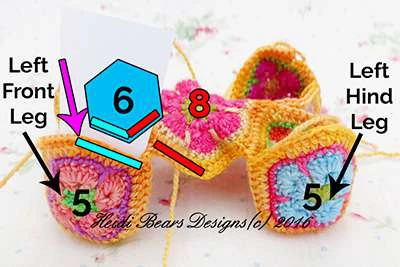
The first hexagon will be joined along TWO SIDES to the body. The first side is joined to the
left-hand front leg pentagon and the second side is joined to one free side of the belly octa-
gon (photo above left). When the two sides have been joined, your dino looks like this (photo
above right).
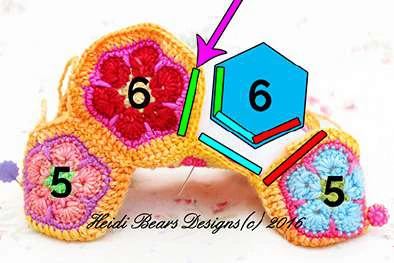
Next, join a hexagon to the body along THREE SIDES (photo above left). The first side is joined
to the previously-joined hexagon (green lines), then you join it to the belly octagon (blue lines)
and then finally to the left-hand hind leg pentagon (red lines). This is how things look now
(photo above right).
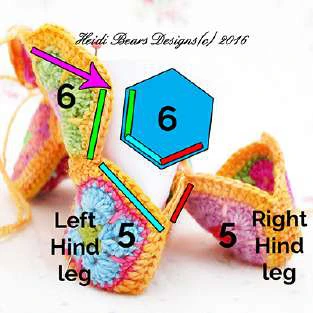
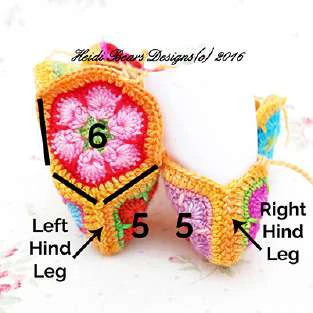
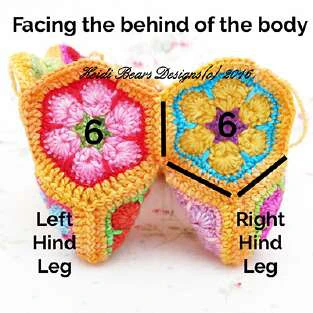
Turn the work so that you are facing
the bum end of the body. Join a hexa-
gon on three sides to the body, as
shown far left. The first side is joined
to the hexagon you joined in the pre-
vious step, the second and third sides
are joined to the left hind leg. Your
work should now look like this (left).
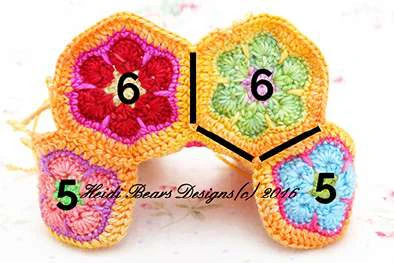
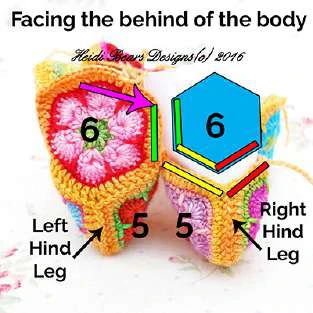
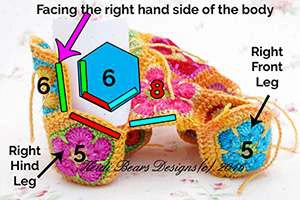
Next, join a hexagon, again, along
three sides, starting at the point
shown by the pink arrow in the photo
far left. The first side is joined to the
hexagon you added in the previous
step. The second and third sides are
joined to the right hind leg.
Things look like this now (photo left).
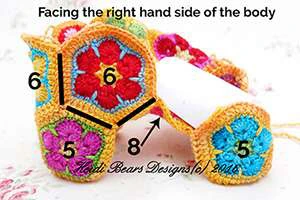
Turn the work so that you are facing the Right-Hand Side of the body. Join a hexagon to the work,
along three sides, (above left). The first side is joined to the hexagon you added previously.Note that
the third side is joined to the belly octagon. Your work should now look like this (photo above right).
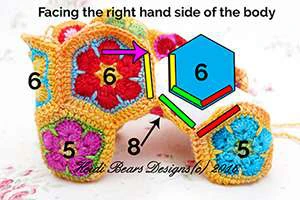
Join another hexagon, along three sides (photo above left). The second side is joined to the belly
octagon (green lines). Your dino body now looks like this (photo above right).
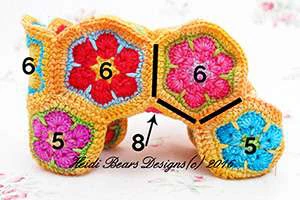
Well done! You have completed the body base and will now
move on to making Plod a little tail. For now we’ll only be
making part of the tail. We’ll finish the tail right at the end, in
order to leave a small hole for you to be able to stuff the tail
more easily.
Allons-Y!
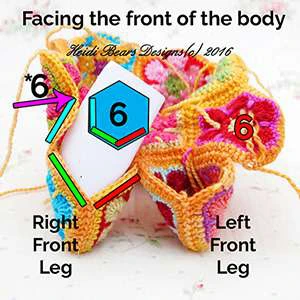
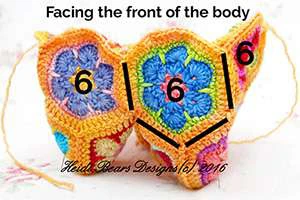
Turn the work so that you are now facing the front of the body. Join a hexagon along three sides as
shown above left. The first side is joined to the hexagon you added in the previous step (*). The 2nd
and 3rd sides are joined to the right front leg pentagons. Your work now looks like this (above right).
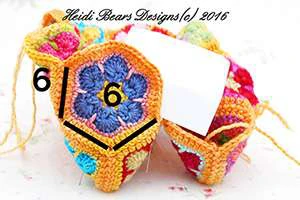
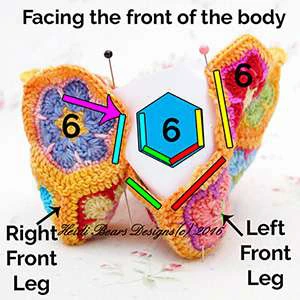
Next, join a hexagon along four sides as shown above left. The first side is joined to the hexagon you
added in the previous step. The second and third sides are joined to the left front leg pentagons, and
the fourth side is joined to the hexagon at the left -hand side of the body. Your work now looks like
this (above right).
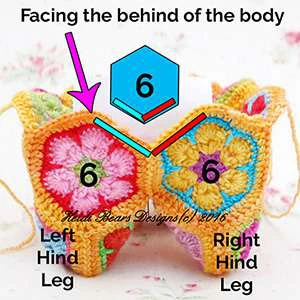
:: Making Plod’s tail ::
Turn the work so that you
are facing the bum end.
Join a hexagon to the
“ V” -shaped area be-
tween the two bum
hexagons as shown far
left, along two sides.
Follow the next steps
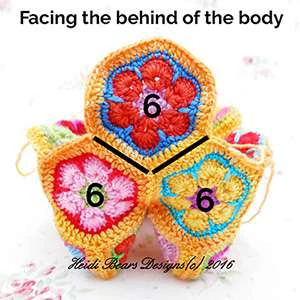
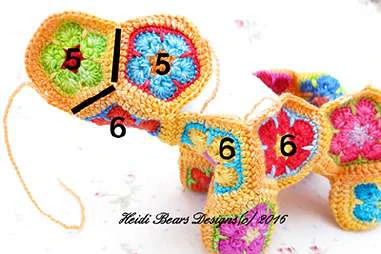
carefully. Join a pentagon
along one side of the
pentagon you added in
the previous step (photo
far left). In the photo on
the left you can see this
joined side shown by
means of the black line.
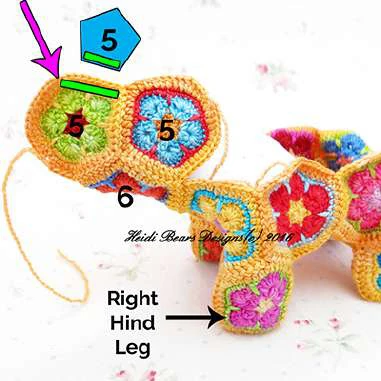
The next motif you will
join is a pentagon. It will
be joined only along one
side as seen in the photo
far left.
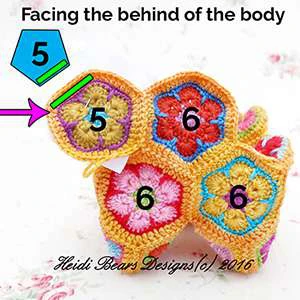
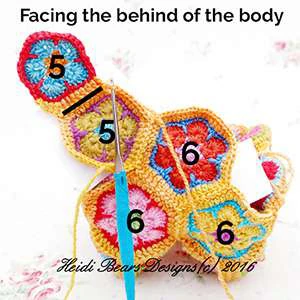
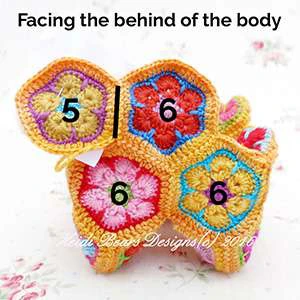
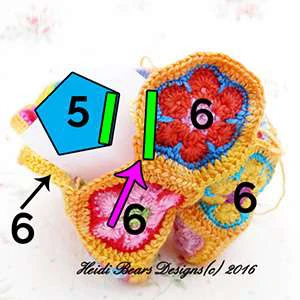
Now crochet the remainder of round 5
without joining (photo left).
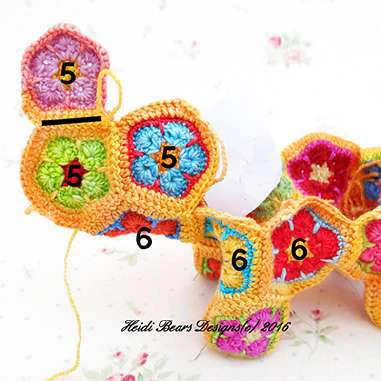
Next, join a pentagon
to the tail end, along
two sides as shown in
the photo far left.
Your work looks like
this now (photo left).
There are several
steps to adding the
next motif.
Join a pentagon to
the tail along one
side (to the previously
added pentagon)…
once joined, it looks
like this (photo left).
Continue to crochet ONE un-joined side (photo above left, black line).
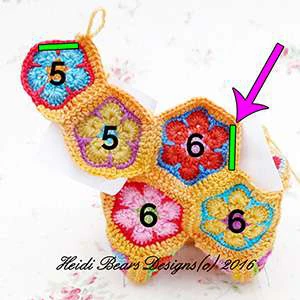
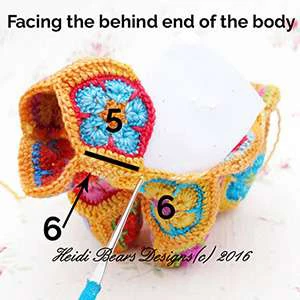
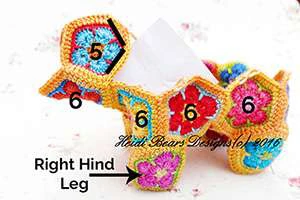
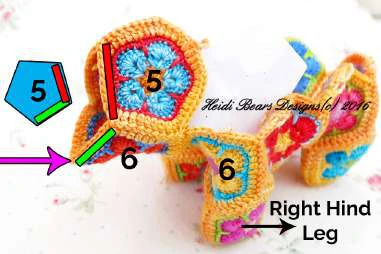
The next joined side is to the hexagon at the right-hand side of the bum as shown in the photo
in the middle above (green line). Once this side has been joined (black line in photo above far
right), you will see the beginnings of the tail shape emerging.
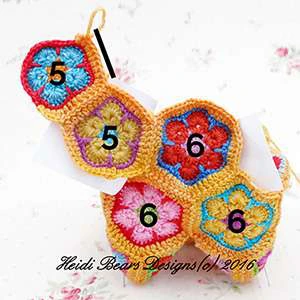
Turn the work so that
you are facing the left
hand side of the body.
Continue to join the
pentagon to the tail end,
along a further three
sides as shown far left.
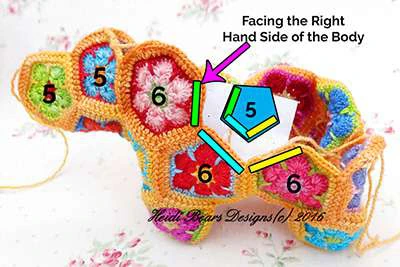
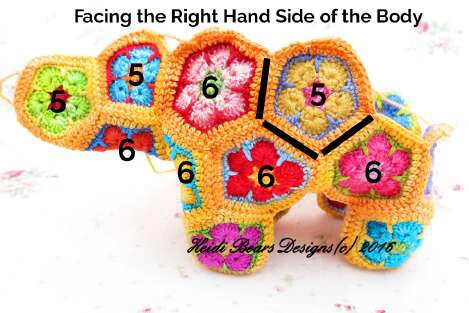
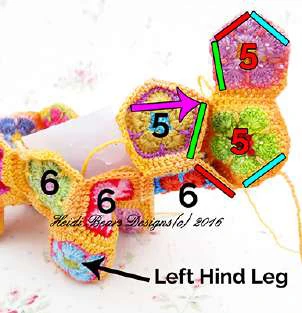
In the next steps we’ll be adding motifs to the right-hand side of the body. Join a hexagon to the work
as shown in the photo above left, along three sides. Once joined, things should look like this (photo
above right).
:: Making the rest of the Body ::
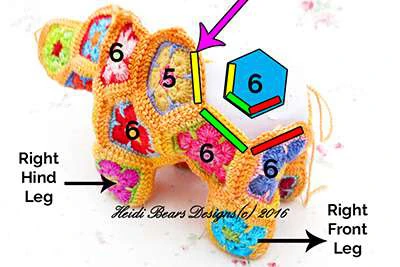
Now join a pentagon to the work, along three sides (photo above left). In the photo above right, you
can see where this pentagon is placed.
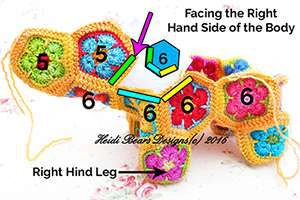
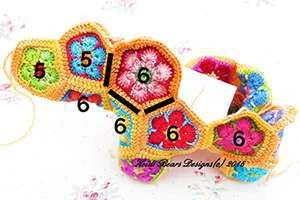
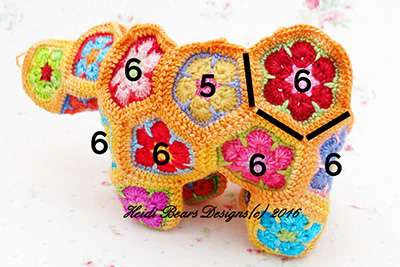
Next join a hexagon to the work, along three sides (photo above left). In the photo above right, you
can see how your work should look now. The right hand side is done for now 🙂
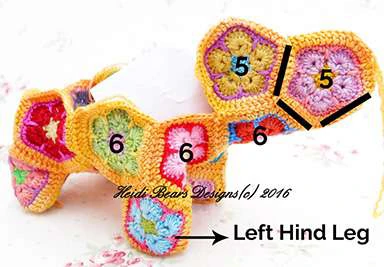
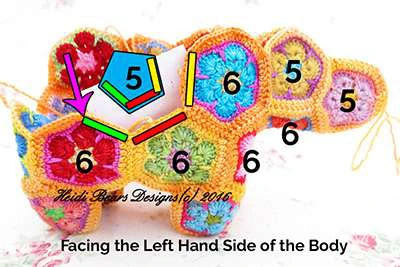
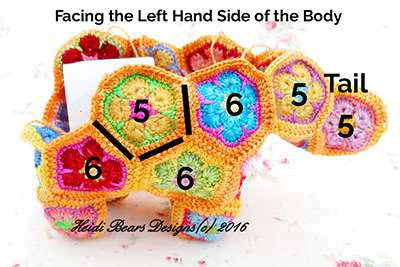
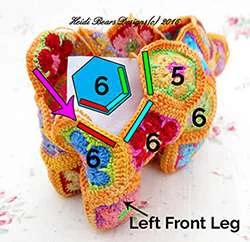
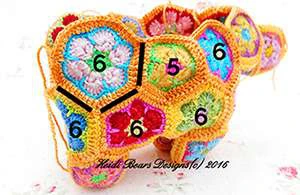
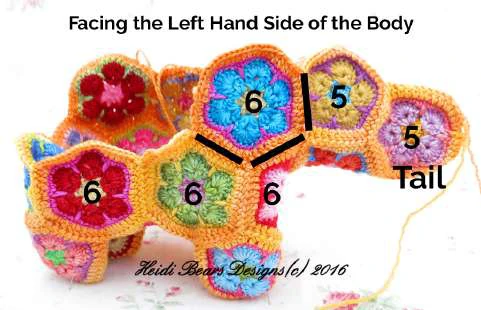
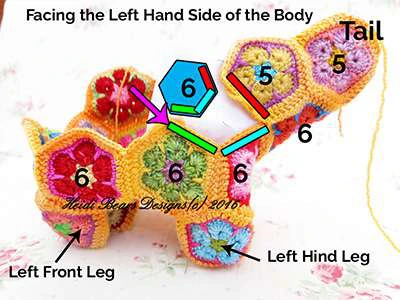
Turn the work to face the left hand side of the body. Join a hexagon to the body along three sides
(photo above left). In the photo above right, the joining is complete.
Next, join a pentagon along three sides as shown above left.
Join a pentagon along three sides as shown above left. The left side of the body is done!
:: Making the top of the Body ::
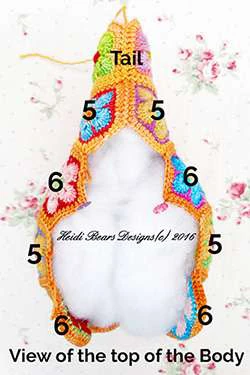
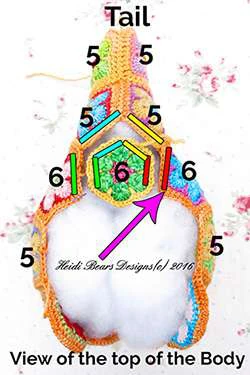
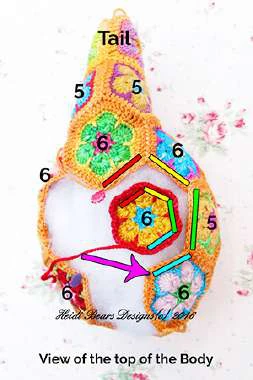
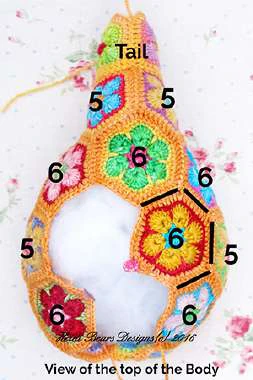
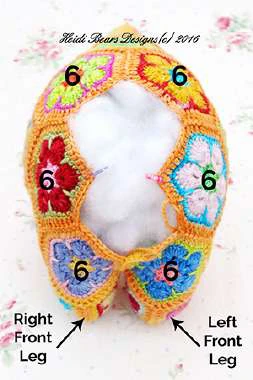
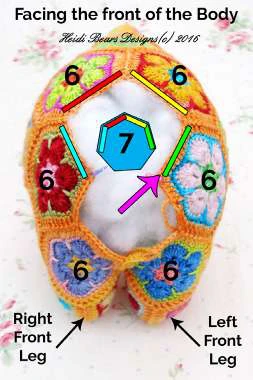
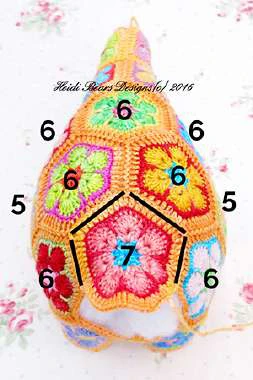
Place the work so that you are facing the top of the body (above far left). The tail is at the top of the
photo. Join a hexagon to the back, as shown above in the middle, along four sides. Your work should
now look like this (above far right).
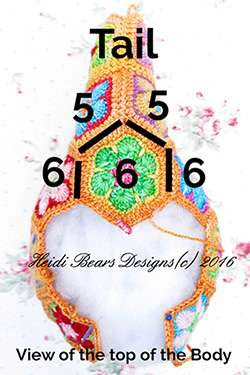
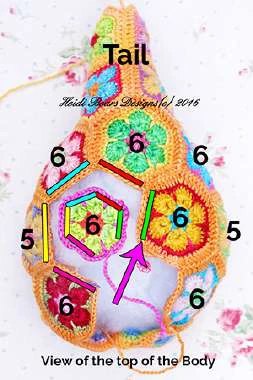
Next, join another hexagon, also along four sides (1st photo from the left above). Then join an adja-
cent hexagon, but this time along five sides (3rd photo above from the left).
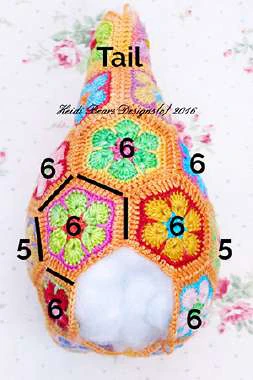
The last motif to add
to the body is a hep-
tagon. Join it along
four sides as shown in
the photos on the left.
There are three “free”
sides remaining on the
heptagon.
:: Stuffing ::
:: Making the Head ::
Now is the time to stuff little Plod. Even stuffing is very important for the final overall shape of your
dino, and there is an art to it. Start with small tufts of stuffing, and stuff the tail and hind legs first.
Make sure that the legs are equally stuffed, shape and firmness being considered. Now add small
tufts of stuffing to the body, again being careful to distribute the stuffing evenly between the left and
right hand sides of the body. When you have reached the middle of the body, stuff the front legs.
Now continue to stuff the rest of the body, always using small bits of stuffing and not big handfuls.
This makes it easier to redistribute the stuffing from the outside using a double pointed needle if
necessary… Make sure to leave enough “room” for you to still be able to crochet the head motifs to
the body.
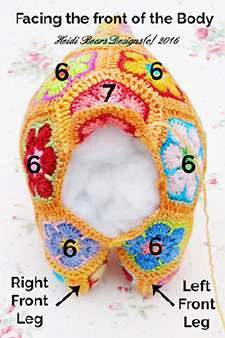
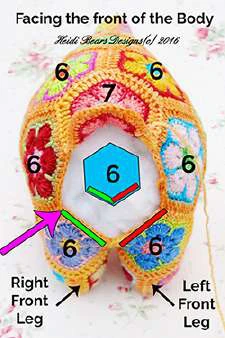
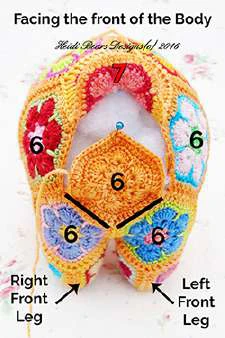
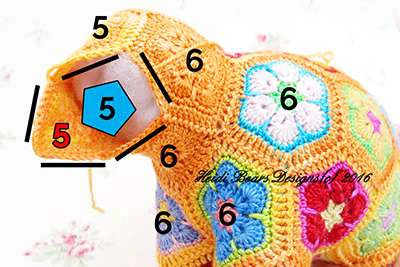
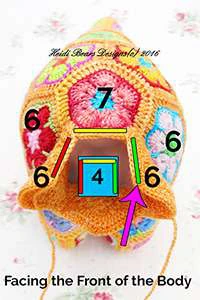
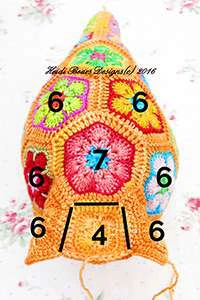
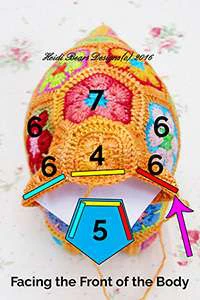
Face the front of the body (far
left). Join a hexagon to the “V”-
shaped area between the two
front legs, along two sides. The
first side is joined to the right
front leg and the second side is
joined to the left front leg.
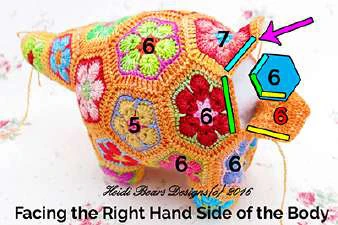
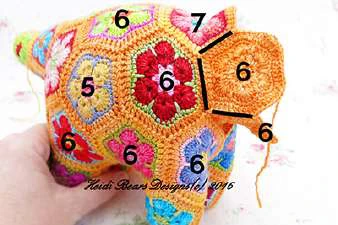
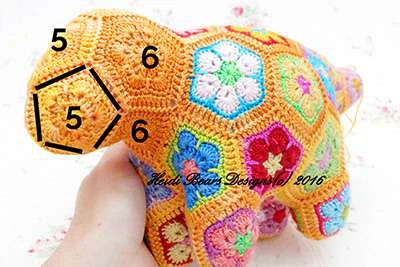
Next, join a hexagon to the Right-
hand side of the head, along
three sides, starting the first
joining side to the heptagon. Your
work should now look like this
(photo left).
Next, join a hexagon to the Left-
hand side of the head, along
three sides, starting the first join-
ing side to the one-color hexa-
gon you joined in the first step of
making the head.
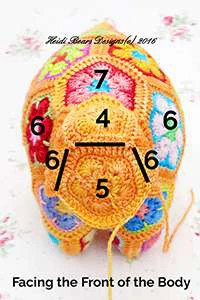
Next, we’ll work on the top of the head. Still facing the front of the body, but looking slightly from
above, join a square to the head, along three sides as shown above left and middle.
Then join a pentagon to the top of the head, along three sides (3rd photo above from the left). The
second side is joined to the square. Your work should now look like this (photo above far right).
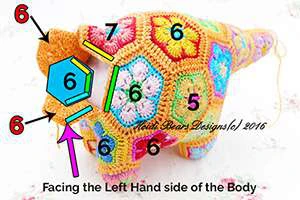
Yay! Two more motifs to go and the head will be completed! Face the Right-hand side of the head
(above left). Join a pentagon to the head along three sides as seen.
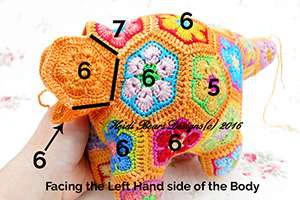
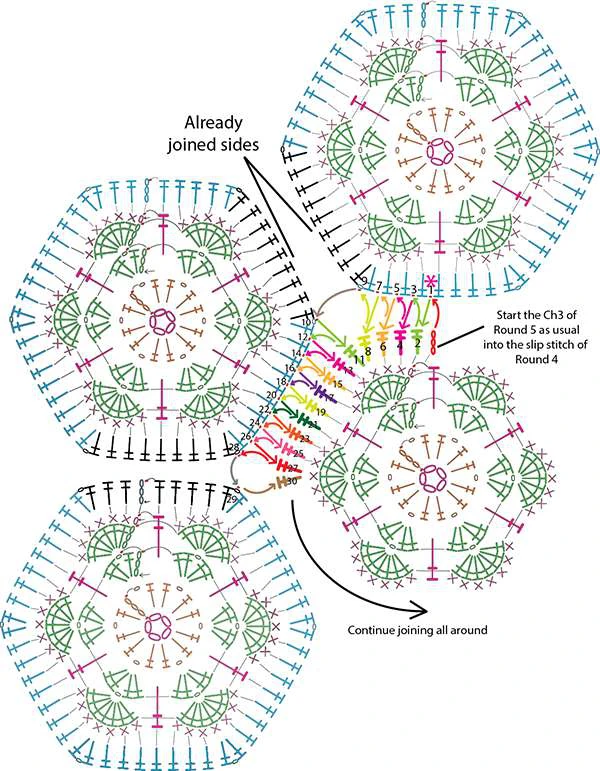
Face the Left-hand side of the body. The final motif to be added is a pentagon. This time join it along
ALL SIDES. If you need to refresh your memory on how to join along all side, please take a look at the
end of the pattern for the instructions.
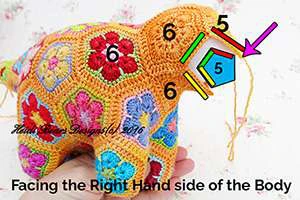
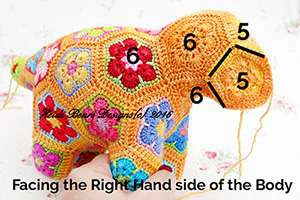
When you have two sides left over to still join, carefully stuff the remainder of the head and neck, mak-
ing sure the stuffing is even and symmetrically placed. Be careful not to lose your stitch that’s on the
hook! I usually pull it open into a big loop then remove my hook for the stuffing. Complete the joining.
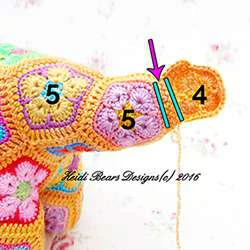
Complete the square, not
joining any further. There will
be a short opening between
the two un-joined sides of the
completed square. Stuff the
tip of the tail and then sew the
opening closed, using spare
yarn and a tapestry needle.
There is a little opening left at the tip of the tail. This was purposely left until last, so that you could
still place a little stuffing into the tail end. Stuff the tail so that you have a nice, pleasing shape.
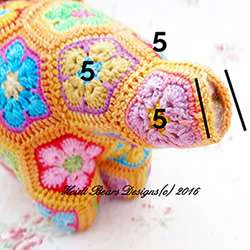
Note there are two sides remaining at this end (photo above far left). You’ll join a square motif to the
tail tip along these two sides.
Start by joining the square to the first side (which is at the left-hand side of the body (middle photo
above). Now turn the work so that you are facing the right hand side of the body and tail end (photo
above far right). Continue to join the square along the second side as shown.
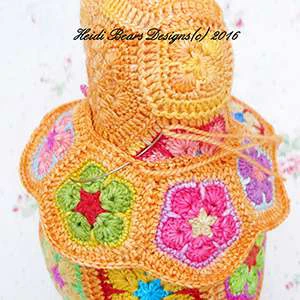
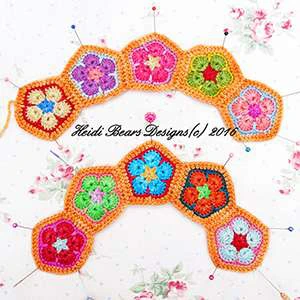
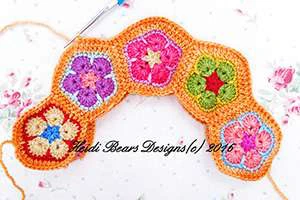
The neck frill is made up of ten pentagons. The front side of the neck frill has five pentagons and the
back side also has five pentagons. Each “row” of five pentagons are joined along one side to each other.
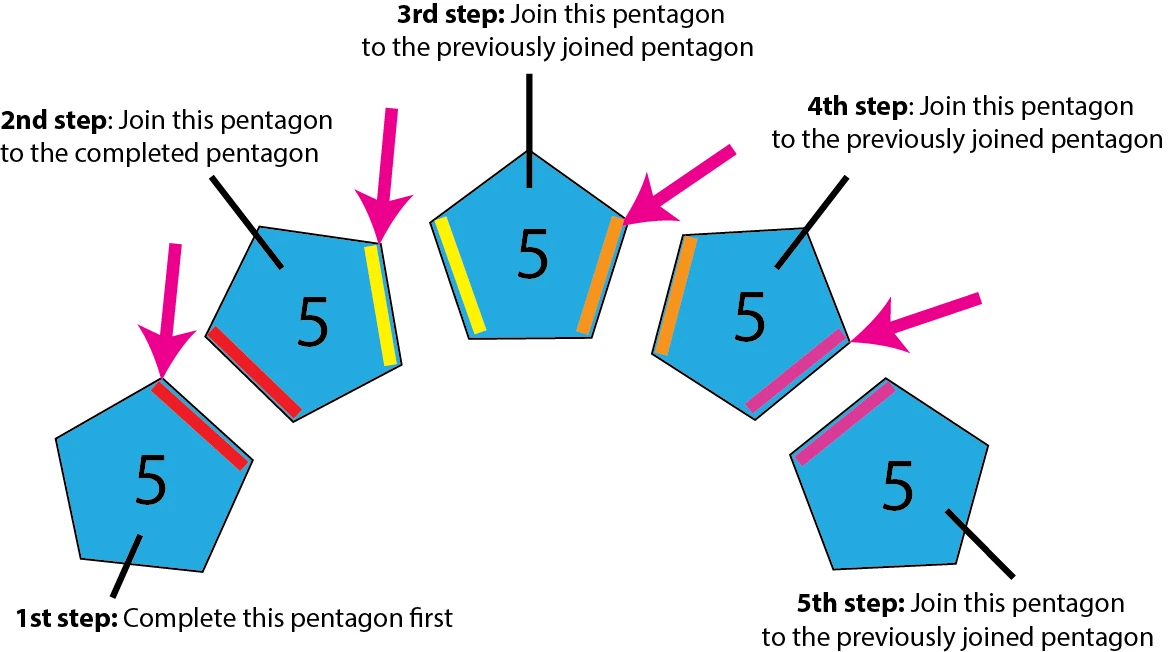
You can either complete all ten pentagons up to round 5, and sew five of them together or use the
JAYG method (in which case you’ll complete the one pentagon and then join the remaining four ,one at
a time, along one side). Use the illustration below as a guide to JAYGing the two sides of the neck frill.
:: Completing the Tail ::
:: Making and attaching the neck frill ::
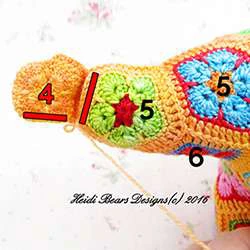
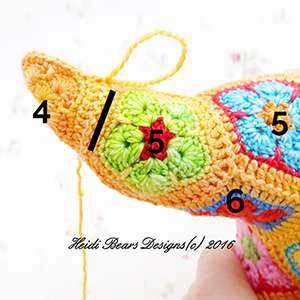
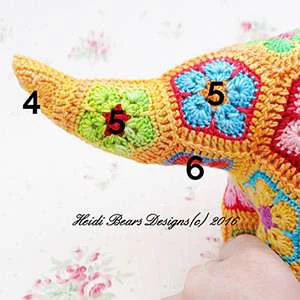
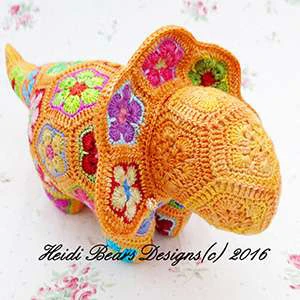
In the photo above left, I have completed the two rows of the neck frill. Place them together, wrong
side facing. Starting at one end, crochet them together, using a dc, making sure that you slip your
crochet hook under all four loops of the two stitches you are crocheting together (2 loops per stitch
from each side). Continue to join all around.
Use the photos on the left as a
guide for placement, and sew
the frill to the neck area along
the bottom edge as shown. Us-
ing a curved sewing needle will
make things easier 🙂
Note: You will only sew the frill
to the body along the bottom
edge of the frill.
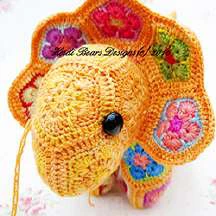
:: Sculpting the eye sockets and attaching the eyes ::
The single best bit of advice that I can give you in making this little dino, is to take the time to sculpt
the eye sockets…it really is easy and quick to do and adds a realistic look to Plod’s face that triples
the cuteness factor!
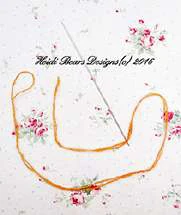
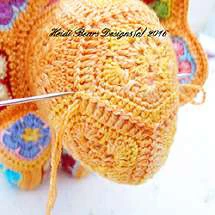
Take a length of yarn around a meter long (around a yard) and fold in half so that the two ends are
placed together (1st photo above). Thread these two ends into the eye of a long tapestry needle or doll
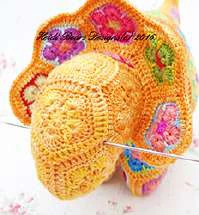
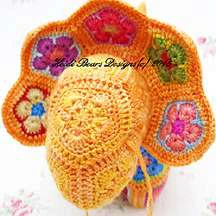
making needle. Insert the needle at the left eye area (2nd photo above) and push the needle all the
way through the head, exiting at the right eye area (3rd photo). Pull the yarn through the head, leaving
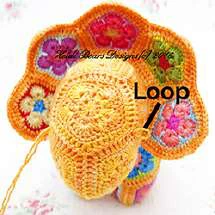
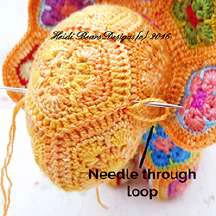
a small loop at the left eye as seen in the 4th photo above. Now re-insert the needle into the right eye
area (5th photo above) just next to where your needle exited, and push across the head back to the left
eye area, again exiting slightly adjacent to where you initially inserted the needle, putting the needle
through the yarn loop (1st photo below).
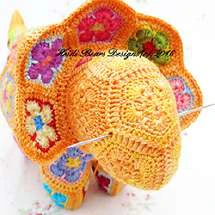
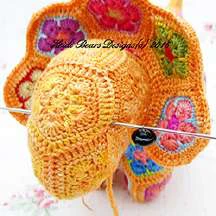
Pull up the yarn gently, and you will see the eye sockets indent (2nd photo above). Don’t pull too hard
or the eyes will be placed too close together.
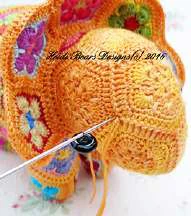
Thread the needle through the wire loop of the glass eye. Re-insert the needle into the centre of the
left eye motif, and push through the head to the right eye centre (3rd photo above). Before you pull
the yarn all the way through, use pointed nose pliers to pinch the wire loop narrower (this allows it to
be pulled into the head more easily). Give a gentle tug on the yarn to “sink” the eye into the head.
Repeat the process for the right eye…thread the needle and yarn through the right eye wire loop,
re-insert the needle into the same hole that the needle exited from, and again, pinch the wire loop
narrower (5th photo above), and push the needle all the way to the left eye, exiting under the left eye,
just to the side of where the wire loop sits. Give a gentle tug on the yarn and see the right eye “sink”
into the head. Make a triple stitch under the left eye to anchor the yarn and snip. The eyes are done!
:: Making and attaching the horns ::
Large Horn (sewn to the top part of the head)
Making sure to leave a long tail, Ch12. Join in the round with a slip stitch into the first ch. You will be
working in a spiral from now on, NOT in rounds!
Make a sc into each of the next 24 sts.
* Sc into each of the next two stitches, then make a sc decrease. Repeat two more times from * (three
decreases in total).
Crochet a sc into each stitch until you have worked in a spiral for a total of 50 sts.
** Make a sc into each of the next two sts, then crochet a sc decrease. Repeat from ** two more times.
Sc into each of the next 12 sts.
Crochet two sc decreases..
Cut the yarn and pull through the last stitch. Use a tapestry needle to draw the tail through the remain-
ing stitches and pull tight to close the hole. Lightly stuff the horn using polyester stuffing.
Small Horn (sewn to the lower part of the head)
Making sure to leave a long tail, Ch12. Join in the round with a slip stitch into the first ch. You will be
working in a spiral from now on, NOT in rounds!
Make a sc into each of the next 24 sts.
* Sc into each of the next two stitches, then make a sc decrease. Repeat two more times from * (three
decreases in total).
Crochet a sc into each stitch until you have worked in a spiral for a total of 20 sts.
** Make a sc into each of the next two sts, then crochet a sc decrease. Repeat from ** two more times.
Sc into each of the next 12 sts.
Cut the yarn and pull through the last stitch. Use a tapestry needle to draw the tail through the remain-
ing stitches and pull tight to close the hole. Lightly stuff the horn using polyester stuffing.
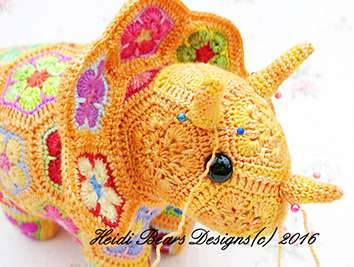
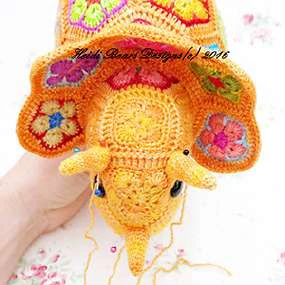
There are two size horns. You need to make two of the larger horns and one of the smaller one.
Use the photos on the left
for guidance in placement
of the horns. Thread the
tail end of yarn through a
tapestry needle and sew
the horns to the head
around the base of each,
making sure they are firmly
attached.
:: APPENDIX : JOINING TUTORIALS ::
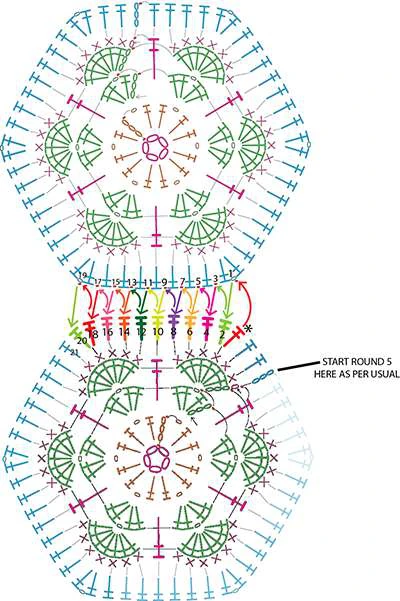
JOINING TWO MOTIFS ON ONE SIDE
NOTE: Slip stitches are made into the space BETWEEN the dc stitches of the motif you are joining
to, NOT into the actual dc stitch!
“Join Motif “
Now slip stitch join to the space (3) on the
opposite motif, which lies right next to where
you slip stitch joined before. Make the next
dc (4, pink) as you usually would on the “join
motif”. Continue in this manner, alternating be-
tween slip stitch joining to the opposite motif
and crocheting a stitch on the “join motif” The
numbers will guide you step wise.
When you join a motif stitch for stitch, to
another motif on one side only, you need
to start crocheting Round 5 of the “join
motif” at the usual point, which is where
your Ch3 starts the round. Work as usu-
al up until the first dc of the [dc,ch,dc in
same space] set, and make ONLY the first
dc of this set. This is the dc in red, with an
asterisk. DO NOT crochet a chain stitch…
instead join to the other motif’s flower
apex chain space (1) using a slip stitch
(shown by a red oval dot). Now crochet a
dc (2, lime green) into the same space on
the “join motif” as the previously made dc
(red*).
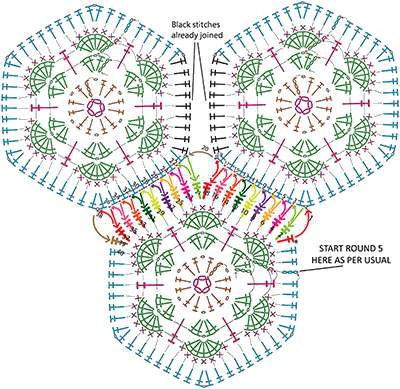
:: JOINING A MOTIF ON TWO OR MORE SIDES ::
“ MOTIF A ”
“ MOTIF B ”
Joining a motif to two other motifs “A” and “B” (which would already be joined to each other), involves
exactly the same process as joining on one side. Proceed as per the instructions for joining on one
side only, up until the point where you have made the first dc of the second set of [dc,ch,dc] of the
“Join Motif”, (marked 18, red). Now slip stich join into the Motif “A” flower apex chain space (19). Next,
instead of crocheting the green dc (21) on the “Join Motif”, FIRST SLIP STITCH JOIN TO THE flower
apex chain space of “Motif B” (20). Now you crochet the green dc (21) on the “Join Motif”. This means
you have joined on two slip stitch points at a multi-point intersection, making the joins strong and
even. Continue as before joining on the second side (the black numbered steps will guide you).
So what do you do if you have to join a motif to 3 or even 4 sides, meaning you have 3 or 4 flower
apex chain space points all together? Remember the rule…when you get to a flower apex chain space
multi-point, you slip stitch join INTO EACH OF THEM, from one to the next, to the next and so on,
until you have slip stitch joined ALL OF THEM…then you crochet the second dc of the [dc,ch,dc] set.
Join Motif
:: JOINING A MOTIF TO OTHER MOTIFS ON ALL SIDES ::
Recommended Digital Products

The Ultimate Beginner’s Crochet Guide: Master 45+ Essential Techniques & Practical Projects
$5.99

From Loop to Perfection: The Ultimate Step-by-Step Crochet Master Guide
$9.99
The Ultimate Crochet Handbook: Essential Techniques, Color Theory & 80+ Step-by-Step Patterns
$19.99
Master the Art of Crochet from Scratch – Ultimate Digital Guide with 8 Step-by-Step Projects!
$19.99
Get this Crochet Pattern as a Free PDF
Enter your email to receive the PDF associated with this article.
Leave a Reply